Blogmas: Nolan & Meghan’s DIY Christmas Project

Hello!

I think my time of creating Christmas ornaments are done for now at least. Technically, I’m not done, I’m just not doing them by myself anymore. This year my nephew decided to accompany me on this conquest.


  • Unfinished wooden ornaments – Gnomes & Reindeer
  • Super Tip Crayola Markers
  • Decorative String (optional as many packs of ornaments come with them)
  • Baby Wipes
  • Full of creativity (and energy!)

For my birthday, I got a huge box that was full of two large bags of Christmas ornaments. I had plans to do gnomes and gingerbread men this year, but I couldn’t find an even number of both characters, so I looked for reindeer and they were so cute on the site, and I knew everybody would enjoy them just as much and once my nephew saw the ornaments, h immediately wanted in on everything that had to do with them.

Honestly, it was amazing to see how much excitement he had for these gnomes, because I feared he wouldn’t like them, but I was very wrong with that assumption.

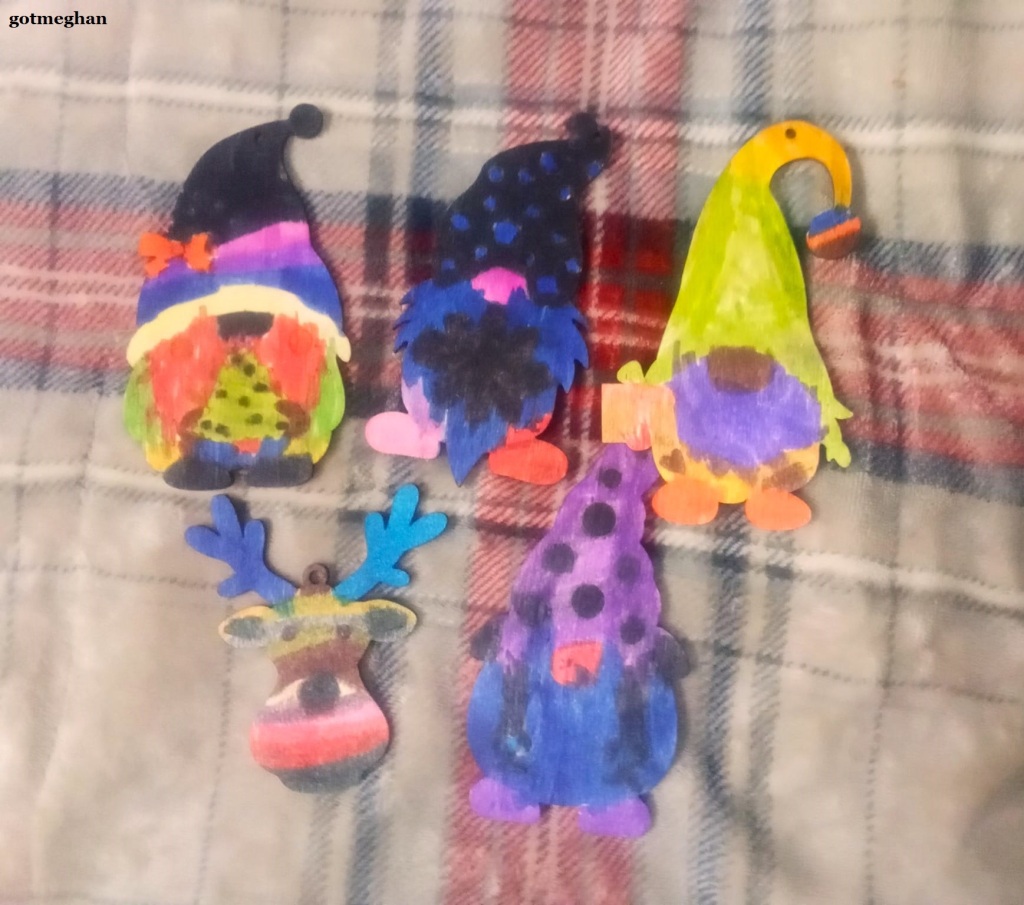
He comes over for a slumber party every Friday (unless his mom or dad have other plans with him) and he looks for the massive box they’re stored in and arranges one from each baggy on the opposite side of my little table. We have five gnomes in a different ensemble while one reindeer head or face, and it doesn’t matter how many times I tell Nolan they don’t have to be Rudolph, because it’ll go in one ear and out the other, so there are many Rudolph on his side.

I’ve done some kind of ornament since 2014. I worked on them with my nana first and she was fine with using paint to decorate anything, including glitter (although there were years, she tried to cut me off!) but even after she moved up north, I still used acrylic paint for everything. I never thought to use markers before. My little nephew literally grabbed my box of markers and went to town on his stack, and I was speechless!

After I recovered from this epiphany, the ideas didn’t stop coming to neither one of us. Since he is in kindergarten now, he has learned how to stay in the lines, but for these ornaments he is able to scribble or use a LOT of black on his characters. He is definitely a fun of darker colors mixed in with some neon here and there. And since he loves these coloring so much, he usually has the sides of his hands smeared with fresh markings. He wears them like they are his tattoos or something!

We actually have one gnome we call the “Pawpaw Gnome” because I told Nolan he reminded me of my dad/his papaw. This one has a full and long bread with deer antlers poking out of his hood. I tend to go with my favorite colors that actually look great on my dad. I know dad enjoys the fact that he has a gnome dedicated to him, even though he no longer wears his bread/hair long anymore.

My second favorite is the girl gnome or has a feminine touch as it has pig tails in a bow standing out of the hood. The hat itself has medium and small size circles throughout and I like to add shadows on them to make them pop out a little more. This is the only gnome I’ll use a bright pink shade because it reminds me of the girly aspect.

I liked this one so much that I kept it back for myself as a little gift. The color scheme is made up of the Frozen films and The Snow Queen by Hans Christian Andersen, I used on this year’s reading journal. I never had the perfect moment to publish what I was doing in the journal at the beginning of 2023, but I wanted to give you an idea of how everything turned out inside my journal. So, this gnome has my main colors: pink and green for Princess Anna and light blue and purple for Queen Elsa. Unfortunately, I didn’t refer to any other characters in my journal, but I added a bright orange to mimic Olaf’s carrot nose for the gnome’s pigtails and gave her brown boots to represent Kristoff and Sven.

I’m hoping by the time this post goes out, Nolan and I are finished with them and have been sent to their owners. If not, I hope you enjoy reading about my nephew and I’s new tradition. I think it will be probably three more years before my niece Kimber will join us. It’ll be interesting to see if Nolan wants to continue doing them with me once that time comes, but I’m focusing on the “now” rather than the future.

What kind of holiday craft(s) were you working on this holiday season? For those who include young kids, how do you help convince them to continue the traditions you’ve built with them?

snowflake

Blogmas | Annual Holiday DIY Project

Hello!

I love being able to do something creative around the holidays.

It’s become a bit of a tradition to do ornaments and now that I have been exploring the dot painting world, it has really opened a bunch of ideas in my mind and it’s fun to share them with my loved ones and of course blog about them. My only regret is that not every person will get one in the mail.

Sidenote: For the past month, I’ve had three bouts of stomach flu or whatever – I no longer believe it was stomach flu, but I’m also terrified to go down that road to find out what is exactly going on with my gut. Anyways, since I was down and out for several weeks, I was even more scared to do anything constructive because it would always come back to bite in the ass–literally! I know, TMI but you gotta laugh, right?


What you will need for this project:

  • Unfinished wooden ornaments – depending on which product you choose, sometimes you will be given string, multicolored beads, paint markers
  • Acrylic paint – I used two different brands of paint: Bunny Barn and DecoArt
  • 3 Paintbrushes – a large, medium and smaller brush
  • Palette container
  • Damp and dry wash cloth
  • Cup of water
  • Dotting tools

Last Christmas, I went back to the brand I used in my 2021 ornaments because they had two different collections, and I swore I had saved the others in one of the folders, but I guess I didn’t, which really bugged me in late October, so when I went looking for these characters days later, I had hoped I didn’t purchase the same designs! The ones I did find though, they had trees, bells, and snowflakes, but I really liked the others in the batch that I choose to overlook them and do my best to make every single ornament unique and I hope you (and their owners!) enjoy what I was able to do this time around.

The first day I only went in with eight characters and their base coats – for at least three of the ornaments were only painted in one color: the stars, snowflakes and hearts. Technically, the silver bells are only color, but they have a layer of glitter on top of them. I’d just like to point out the glitter wasn’t my idea; this was an addition made by my mother! For a woman who has panicked everytime I have paint out, she went all in with the glitter, I was actually very proud of her! Honestly, I didn’t know what I exactly wanted to do for these three and I went back and forth more on the hearts, but I do think keeping them as they are, is just as festive!

Once I had finished painting those guys, I moved onto the next few as i tried to do four at a time, but that really depended on the colors I still had available on my palette, so I did the baubles, snowmen, and angels, as they didn’t require much in the first layer. The snowmen were fairly simple as I just went to paint most of it in white and added the black on the arms, face and top hat. I had the thought of putting a neon orange nose of them but I figured all hell would break loose if I did so they went without their standard carrot nose. I just realized I didn’t even give them a scarf either. Oops!

The baubles were another easy-going ornament for me as I just used a color called “pure blue” and it is beautiful! I was tempted to use it everywhere but that was also part of the problem with it, since the shade was so vibrant, it was somewhat difficult for my mom to remove on the brushes, skin, …floor. It’s the same blue that reminds me of that scene in Harriet the Spy where her classmates “accidentally” pour a jug of blue paint on her. The last scene of her frantically scrubbing it off, is exactly how my mom had to remove it as well! Back to the baubles though, after they had dried, I grabbed my rustic gold and painted the section where you thread the string on top of it and it actually makes it look really good! I was worried I’d regret my decision there because when it dries, it tends to soak into the surface and instead of becoming lighter as acrylic paint normally does, it can look dark, but thankfully, the blue stands out just enough to balance out that dullness it can have at the end of the day.

311920491_645805607241209_2078713252452553379_n
This photo was taken before the wings of the angels (and the trees were decorated!) were taken.

The angel. I was somewhat thrilled to have a small stack of heavenly angels as a part of my holiday project. I was conflicted though because I wanted to keep them with a simple design, but also make them to be individuals as well; in the end I went with the latter as it just seemed better to go in this route in case, I got a little overzealous with making sure every angel was different from the other. So, they all received a sky-blue gown, white wings and light-yellow face/halo.

Next, I went to the reindeer, stocking, trees, and despite doing the Christmas trees last year, I was thoroughly excited to be a little more creative–sickness be damned at this point!

Anyways, I started with my trees, and I managed to remember the precise shade I had for my original tree project back in 2020, and it had a bluesy green color and I thought it made the trees more winter-y, which is what I really wanted to showcase a natural look with some decorations here and there. Every tree had the standard blue-green coat, brown trunk and yellow/red on top for the star. When I finished with the basic things, I moved on to create their overall look with yellow, red and blue dots everywhere; some trees had a design I enjoyed creating last Christmas and I definitely went for it on some of them, while the others have a couple or few smaller dots that make them seem cute and meek at the same time.

As for the reindeer, I knew they would appear this year, but since I thought, I was going to have that other collection, I figured I’d only have to focus my attention on the face of the reindeer themselves, whereas with the batch I ended up with, were made with the whole body intact, I was a little nervous on how to make them “believable” if that makes sense. Although I will admit, I did create a little Rudolph face on the bells last Christmas as an added bonus to the mix, and I absolutely loved that idea, but I was concerned on whether I’d feel comfortable making a harness over the chest and front legs like they were all a part and ready to carry Santa’s sleigh through the night sky. I didn’t use a pencil outline for any of my initial designs for when I started on the dot process, I just went with my gut and I’m happy to say it actually worked out in the end of the day.

To round off this cluster of ornaments, we have the innocent stocking. My mindset going into this one was to basically copy what my actual stocking looks like, it’s a ruby red with white topper or ruffle, I don’t really know what that part of the sock/stocking would be, but then again, I’ve never had to care of the correct term. Anywho, when I went into painting, I used this beautiful red shade that definitely captured the same color that of red-hot cinnamon candies, but that damn topper was difficult. My mom had thought of using the silver glitter again, and at one point I had agreed with it, but then I changed my mind when I suddenly found myself with two stockings with bright blue… Honestly, I don’t regret it. It’s really pretty! The other two were never painted actually painted; if I had the confidence to do it, they were going to have a textured fur look in that area but again, I still loved how they turned out too!

Here’s something funny for you, now that I’m officially done with these ornaments and they should be getting to their rightful places soon, I’ve already decided on what I’m doing next year. If I can find a bunch of them, my plain is to do gingerbread men and women. As much as I enjoy the variety packs, only having one character may be easier on me as I can just give my heart to my design process. What do you think about this idea?

Do you have any special Christmas crafts you do for or with your family? For those who do not have anything, but have your own ideas though, what is it? Share with me in the comments!

snowflake

Book Review: “Shield-Maiden: Under the Blood Moon” by Melanie Karsak

Hello again!

It’s crazy to think I am almost finished with this series. It has been a great sequel to “The Raven and The Dove” book I read earlier this year, but now my mind is like, what are we going to do after this one ends? The plan is to start on the other Viking series by Melanie Karsak but I am also thinking about focusing on other genres, so we’ll have to see what happens after July, because when I finished this book, I turned my attention to the newest book in Melanie’s “Celtic Rebels” series about Queen Boudica.


a0ad5d4f6824dcc4af923d1d21296303

As the blood moon rises, the shadow of Ragnarรถk falls on Uppsala.

With the dark days in Dalr behind them, Hervor and Hofund journey to Grund. Hervorโ€™s focus turns to tracking down the sea kings and taking vengeance, but she soon finds that life in Grund is convoluted. Family grudges, secret alliances, and shady friendships abound in the capital. Everyone has their own agenda, and for some, Hervor is in the way. Hervor will find that surviving Grund is far more complicated than the bloody fields. But a blood moon is rising. Soon, Odinโ€™s shield-maiden must clear the path to her promised futureโ€ฆno matter who must meet Tyrfing to ensure that fate.

taken from Goodreads.

I had mentioned that once everything ended in “Under the Thunder Moon” you couldn’t see what was going to unfold for our beloved characters. It was going to be interesting as far as how Melanie was going to do about Hervor now being a jarl on Bolmsรถ and princess of Grund after marrying Prince Hofund. She was becoming her own person, especially now that Eydis was to be with Leif in Dalr. You didn’t exactly how everything would turn out, but I was definitely intrigued about it.

There is a lot of traveling involved as we start from Bolmsรถ to Dalr, Silfreheim to finally Prince Hofund’s home Grund. As most people would feel in this situation, Hervor and her gang of warriors are uneasy, especially after she was crowned Jarl Hervor of Bolmsรถ. This world is completely opposite to life on both Dalr and Bolmsรถ, as Grund is much larger and has a court full of cunning and resentful people close to the royal family. We also have the issue of the sea kings creating havoc everywhere they go, and it was exciting to see all of these various Jarls, Kings, Princes, and several shield-maidens of Scandinavia come together to kick some serious ass towards the end but beware when you arrive to this scene because a beloved character dies, and it hurt me pretty bad–so much that it took me five days to finish this post!

“No one backs a wolf into a corner and remains unscathed.โ€

While I was reading, I tried to highlight as much as possible, and I do this for two reasons: I get my quotes of this review, but I also enjoy researching various things and then sharing the results with you guys. I did this with the second book of the series, as it mentioned the Trojan horse scheme. For this book though, there was a section where Prince Hofund is showing Hervor, Yrsa and Blomma the marketplace and while Hofund is pulled away, Hervor buys material to make into suitable dresses for court life, and she or Yrsa asks how the seamstress made such a vibrant colors and she explains there is a shell by the sea that helps color the fabric naturally, and what was weird about this, was I remembered hearing something about that exact shell a week or so beforehand!

I enjoy watching History Tea Time with Lindsay Holiday on YouTube and I was listening to her video about FAQs and Odd Facts and there is a part in the video where she is explaining how the darker purple became “Royal” purple and I just thought this was so interesting and incredibly weird that both of things would happen at the same time! Anyways, click here if you’d like to learn more about the process into making a richer color of purple.

Have you read the fourth book in “The Road to Valhalla” by Melanie Karsak yet? For those who have, what were some of your thoughts?

snowflake

DIY: The Dotted Sea Turtle

Hello!

Since we are only (as far as I know!) going once to visit with family, I managed to kill two birds with one stone. and I created some DIY birthday projects. You’ve already seen my nana’s present, so it is officially time to unleash the dotted sea turtle I did for my aunt and uncle!

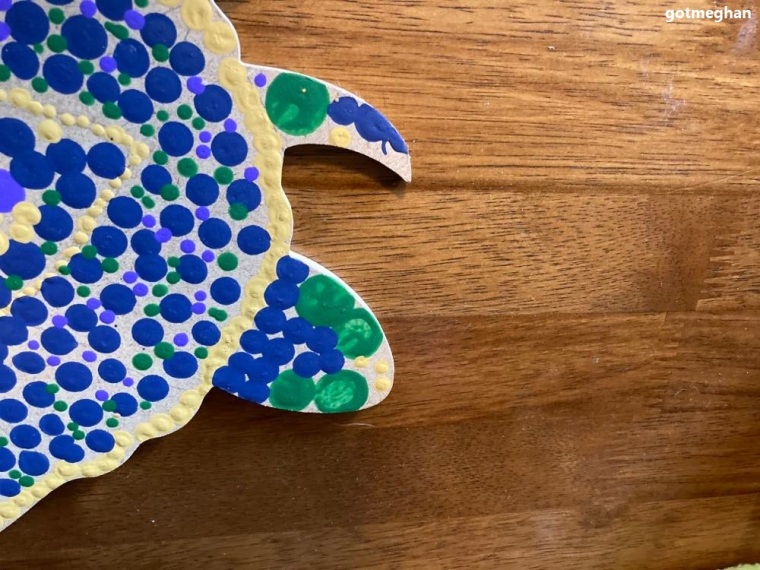
This is how the sea turtle came in the packaging; I mentioned in my last post that I was thoroughly surprised that both canvases came together as I don’t believe they were made by the same brand or company. On the left of the photo, there is a peek of this wooden square that they were laying on while in the thin box. We thought it was a strange addition, but we believe it was brought in to make sure the cutouts weren’t damaged in the mail. I will probably use it as a safeguard for my future projects.


What you will need:

  • Canvas – You can search for various types of turtles, but my aunt specifically adores sea turtles, and this was the only one I enjoyed on my hunt.
  • Acrylic paint – I used DecoArt bottles of gold, navy blue, green, and purple.
  • Dotting tools – You can use various household appliances that have a flat surface, but if you’d like to get your own “professional” tools, they are available at Wal-Mart, Amazon and Etsy.
  • Pencil with a good eraser
  • Ruler
  • Damp towels or baby wipes

LINKS:

Sea Turtle Wooden Cutout Style 3 | Dotting tools | Paints: Spun Gold, Navy Blue, Leaf Green, and Regal Purple


Originally, I wanted the sea turtle to be somewhat similar to the pig canvas, so that it wouldn’t be such a difficult process to paint, but I couldn’t find any cutouts of medium sized turtles to fit my vision, so I had my mom help me find another and we agreed on this one. Honestly, the perk of this design was the ridges on the sides, they allowed me to have a better understanding of how big the shell itself would be to the turtle’s face and fins.

I wanted for the turtle to be lifelike but with a mystic flair to him. I actually had two ways I saw this guy in my mind; the first was the turtle mentioned on the film Finding Nemo. I wanted to create him with bits of yellow and brown to make him look the part, but I also wanted to add some shimmer like in “The Rainbow Fish” books without taking it too far. My mother won’t allow me to have any glitter inside the house–much less my room–because of the weird impulse to create a mess! It’s a fair trade as long as I can continue to do more projects in my room! Anyways, I decided to add both green and purple to draw out a bit of color to him to make him unique to other turtles out there.

To start, I needed to map out the shell, and I used both a regular pencil and a standard sized ruler to make sure everything was even on all sides, and I made the lines across the edges of where the shell would cover on each fin and made an even longer line so I could have enough space on his head. Once I was sure of each section, I moved on to figure out how I wanted to design the shell. I was really torn with how I wanted this dude to look, so I needed to see if I wanted to include separate areas like normal turtles have on their shells. They tend to have individual spots all around the outer edges and have a larger section in the middle and this can be on the top and bottom of their shell. So, I made three tiny circles with the ruler going horizontally and by the end, I even had my dad impressed with my little hack!

After I got everything planned out, I began to add the first stage of the dots.

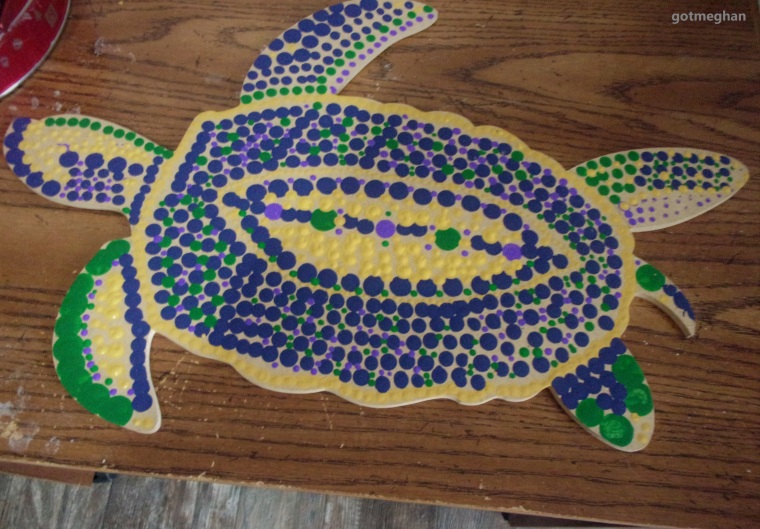
I decided to go with the “bottom” layer first with my medium sized tool in the color blue and instead of using my light-yellow shade like I was going to use; I went with my new gold paint. Something you should consider while purchasing some acrylic paints, they tend to dry lighter than their original hue, so, even though the gold looks nice and shiny when it’s wet, the sheen kind of faded as it dried on the surface, so you might want to consider looking into a metallic gold just in case you end up hating the final result. Personally, I loved the color and I thought it worked really well with the surface of the wood. I only went around the outer part once – I debated whether or not I wanted to continue to the circle I created in the middle of the shell, and I ended up using a smaller dotting tool to cover the middle of the shell in gold.

After I finished the gold part of the shell, I decided to move on with the navy blue. A part of me wanted to add a small group of dots along the face and fins but I didn’t know how it would turn out with the dullness of the gold, I did put some gold in certain areas but for the most part kept it only for the shell itself. Anyways, when I started adding more colors, my initial thought process went right out of the window, and I began to experiment with the larger tools, they are thicker in width, I have some difficulty gripping them, so I tend to back away from them, but for this I wanted to have some fun and gave the turtle fairly obnoxious spots all over his back and even went so far as added them to the rest of him….

When you’re doing these types of projects, accept your impulses because they’re going to win at some point.

If I had any space left over, I just covered it with the green so that it looked like he had algae on him as real sea turtles can have a mixture of algae and barnacles all over their bodies! I didn’t intend for the purple to reflect the barnacles; it was actually a personally choice. My aunt and uncle love the color purple and it stands as an important hue for them so that’s actually my reason for using it but hey, if they want to include that little bit of knowledge to their guests, they can!

aef50ec499d3177e282bf05c1c43d8b0

When I was finally done with it, I began to think of names for him. It was to come up with nana’s pig because I couldn’t get it out of my mind–my mom was pretty sold on “Hattie” it was the middle name that we couldn’t agree on! However, I decided to play a little game on my aunt and uncle, since they sort of knew about nana’s gift, I sent a message to them on Facebook, basically explaining I was working on another story, and I needed a name for my main character. This actually worked out better for me because they did not realize what they were doing until we brought it out for them.

I was inspired by a lot of pop culture like Pokรฉmon and The Big Bang Theory with Squirtle and Sheldon, but I also remembered about the Galapagos tortoises, which made me think of Alex Trebeck and his love of the Galapagos Islands, so I made sure to pick out some names that were given to some different types of turtles that are (and were) located on the vast islands, like Rothschild, Duncan, and Fernand. They ultimately went with Nitro, as it is the name of one of their cars!

Well, that’s it!

I know this post wasn’t a proper “How-To” but it wasn’t that kind of project. If it had came in the same design like the pig, it would have been, because there were a lot of lines involved with it. For this, I was able to do whatever I wanted to do with it, and I think that’s the reason why I wasn’t so hard on myself for creating those huge dots on the shell, I was able to free-foot it, get it? If you ever get a canvas like this, I think you should look at it as your sign to be even more creative with everything.

What did you think of my DIY project of “Nitro”? What other designs and/or shapes do you think I should consider doing next?

snowflake

DIY: The Dotted Piggy!

Hello!

Since discovering dot art back in 2019, I’ve felt like my journey with art in general is on another level. I absolutely love the feeling of creating something new and being at peace with the imperfections that come with it. After I finished with my Christmas projects, I wondered how long I would last until I had the itch again, and if you are wondering, it was only three months.

We have three chances a year to go up north to visit with my family, the first is around my nana’s birthday and I tried looking for little figurines or plush stuffed pigs on Amazon and Wal-Mart, and I just couldn’t find anything that stood out the most and I searched for a fairly long time and became frustrated that there were more things for guinea pig lovers than the pink ones… I don’t remember what pushed me into creating something for her, but once I had the thought, I just went crazy with the number of ideas to do with them.

I found this unfinished wooden cut out of a pig face on Wal-Mart’s website and I just thought the whole thing had enough sass to it that I knew everyone would love too. While I was went looking for the pig, I ended up finding a sea turtle design and thought it could be a great idea to do for my Aunt Laurie and Uncle Mike because they love beach themes, but my aunt really loves turtles too. I worked on the projects at the same time, but I will not be sharing my thoughts on it until the end of June, which is my aunt and uncle’s birthday month.


What you will need:

  • Canvas – you can use whatever you can find, whether it’s wood or ceramic.
  • Acrylic paint – I use DecoArt paints and the colors I used were pink, red, black, and white.
  • Dotting tools – you can purchase a set of tools online, but you could use anything in various sizes like a pencil, Q-Tip, toothpick, etc.
  • Paintbrushes – this is totally an option, as I only used it for the base coat and the tongue, but you can definitely dot these spaces or leave it out entirely.
  • Damp towel or baby wipes to was wash your hands/feet and anything else that has accidently paint on it…

Links:

Unfinished wooden pig (similar) | Dotting tools of various sizes | DecoArt Acrylic Paints: Black, Royal Fuchsia, and White


One of the main reasons I adored this pig was because of the outline around the ears, eyes, mouth and nose. I was worried that once I started doing the first layer of paint, they would disappear but for the most part, they stayed visible for me to do the black dots, but we are getting a heard of ourselves, so let’s rewind a bit.

The canvas itself was the perfect size, as it wasn’t too big or too small, one that even the big bad wolf would probably enjoy. I started off painting on the floor of my room and I went with a very light shade of pink; since I didn’t have the right color in my collection, I had to make it with my neon pink and white acrylic bottles. I put the pink in two slots in my palette and added the white as I heard (and tested it!) this worked better to blend and create the right hue of the paint and it covered the entire thing, but my thought process for the overall design was to add dimension between the cutout and dots. I actually went back and forth on the base coat because I thought it was too much but I’m very glad I decided to do it because it added an extra oomph to the whole thing!

The next day, I finally got started on how I gave her some personality, and again I was so sure how this part was going to turn out at first. I am still learning how to follow a line while making my dots. I made simple small designs for when I did the Christmas tree and Rudolph ornaments but since I only had to follow the slits of its features, I figured it would be easy enough for me, and thankfully it was and to make things even better for me, I used one of my smaller tools, they are really great with details, especially tiny ones and I have realized through doing this project, I am definitely confident creating each section. At first, I was going somewhat outside the lines so that I could still see everything but then as I went on, I managed to cover up most of them with the black paint.

I hadn’t even completed the mouth before I was falling in love with the overall result. The black really set a tone to the plain pink base coat and you could see we were both loving the magic coming to her. I tried to not get so confident that I would be taking risks and messing up the whole project, but I also couldn’t hide my excitement either!

Once I finished the outlines, I left it to dry for about a day. I gave myself time in between each layer so I wasn’t choosing over the comfort of my body and what I wanted else I could do to the pig. I was also in a brand-new position as I wasn’t on the floor anymore, I decided to use my new little table I got for Christmas, and I was really unsure how my body would react and definitely didn’t want to overdo anything either so once I started experiencing some pain in my lower back and eventually my knees, I knew I would need to stop at some point. Whenever this happens, of course I become upset with having to stop in the middle of a project but knowing my body’s limits is a very important. If I continued to push myself, I could possibly make mistakes and would be frustrated with myself about that as well.

When I went back to it, I was conflicted about how much I really wanted to use the dots. I really love the contrast between a regular painted section and a very populated dot area, and I knew it even before I did the ears of how cool that effect would be to the overall design. So, I decided to paint the tongue red. It would be another smaller part so as long as I didn’t go off my original idea. After I completed it, I went forward with doing a dotty inside of the mouth, and I am still not 100% happy with how it turned out, but I think adding the hot pink larger dots on the rest of the pig helped because the color contrast between the lighter pink of the background and a milder shade of the same paint really made it pop. Once I went around the chin with those big dots, I literally couldn’t contain my excitement for how cute she was becoming and I had to show her off quite a bit to my folks but also had to shield her away from my family–especially my nana, because she knows that anything pig worthy goes to her automatically! A part of me wanted to show her but I knew how important it was to reveal it face-to-face, so I kept a very big secret for at least a week and a half, which is impressive to my standards!

When I finally finished with everything, our plan was to glue or tape down a cute pink bow around its hairs, it had three little semi-sharp “hairs” poking out on the top of its head and decided to include some dots on them, in case we didn’t have time to put it on her, but in the end, it turned out we didn’t have a way of making sure it stuck there forever so I’m very glad I put dots around that section anyways!

As of right now, they haven’t found a way to put it up in my nana’s room. She has a big room, but she has a lot of decor, photos, and posters all over her walls, so finding the right placement for it is going to be a little bit tricky. While we were up there, I was even trying to find a spot for it and I had a difficult time with it, so good luck Mike!

I hope you enjoyed this “little” how to do post. The second post will be going out in June, so we have some time to find more projects in the meantime!

snowflake