Integrating Node.js Applications With MCP Servers
Learn how to integrate Node.js apps with Model Context Protocol (MCP) servers using the official @modelcontextprotocol/sdk and mcp-handler libraries.
Join the DZone community and get the full member experience.
Join For FreeModern applications are rarely standalone. Most need to talk to databases, APIs, or even AI-driven agents that make real-time decisions. As this landscape grows, developers need a common way to connect apps, services, and data without constantly reinventing the wheel. That’s where MCP (Model Context Protocol) comes in.
In this post, we will look at what MCP is, why it matters, and how you can integrate a simple Node.js service with an MCP server. We will also walk through a working example, i.e, a user info microservice, and see what the setup and output look like.
What Is MCP?
Model Context Protocol (MCP) is an open standard that defines how different systems, like applications, APIs, and AI models, can talk to each other. Instead of writing custom integrations for every service, MCP gives you a shared language to describe what data or actions a service can offer. It works a bit like a universal connector where your app becomes plug-and-play with any MCP-aware system.
In MCP terms, there are three main pieces:
- Host: The environment or application that needs to use some external data or tool.
- Client: The component that sends standardized MCP requests from the host.
- Server: The service that actually provides the data or performs the requested action.
Think of it like a USB for apps, where you can plug in many tools, and as long as they follow the MCP standard, they just work.
Why Use MCP?
Here are a few reasons why MCP is starting to get attention in developer circles:
- Standard integration layer: Without MCP, every integration looks different. You might write custom REST endpoints, WebSocket handlers, or SDKs for each tool. MCP standardizes all of that, so any host can use any server that speaks MCP.
- Faster development: If your system exposes capabilities through MCP, new clients (for example, AI agents or other services) can start using them immediately. That means less glue code and faster time to value.
- Better context sharing: Traditional APIs just return data. MCP, however, includes context like session state, metadata, and tool definitions. This is especially useful for systems that make decisions or need a running conversation with your service.
- Fits modern architectures: Node.js microservices are already modular by nature. MCP fits neatly into this pattern, and each microservice can be turned into an MCP server, exposing its capabilities to other systems securely and consistently.
Architecture
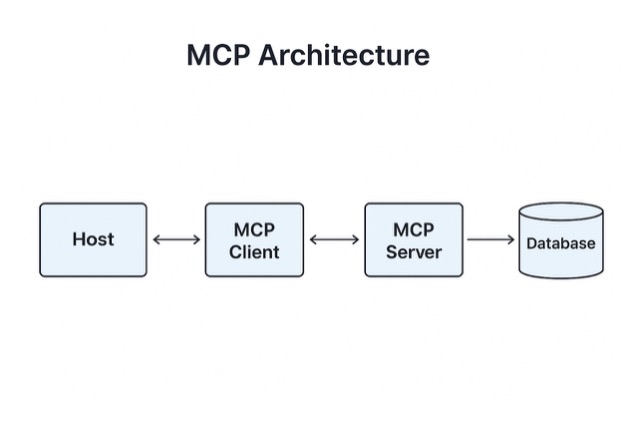
Here is the high-level flow when integrating a Node.js app with MCP:
- The Host (like a web app or chatbot) needs data, for example, user details.
- The MCP Client in the host formats that request following the MCP rules.
- The MCP Server (built in Node.js) receives the request, fetches data from your source (database, API, etc), and responds with a standard MCP-formatted result.
This design allows multiple apps to reuse the same service without extra integration work.
Example: Building a User Info MCP Server
Let’s walk through a real example using the @modelcontextprotocol/sdk and mcp-handler libraries which are sometimes referred to together as the mcpcontext stack.
We will create:
- A Node.js MCP server that exposes two tools, i.e, GET_USER_INFO and UPDATE_EMAIL.
- A simple client that calls those tools.
Step 1: Setup
Run the following commands:
mkdir mcp-example
cd mcp-example
npm init -y
npm install @modelcontextprotocol/sdk mcp-handler zod express body-parser axios
This installs:
- @modelcontextprotocol/sdk – the core MCP SDK
- mcp-handler – helper library for defining and managing tools easily
- zod – schema validation for tool parameters
- express – HTTP framework for the server
- axios – for client calls
Step 2: MCP Server (server.js)
import express from "express";
import bodyParser from "body-parser";
import { createMcpHandler } from "mcp-handler";
import { z } from "zod";

const app = express();
app.use(bodyParser.json());

// Create MCP handler
const handler = createMcpHandler(
  (server) => {
    // Tool 1: Get user info
    server.tool(
      "getUserInfo",
      "Fetch user info by ID",
      {
        userId: z.string().min(1),
      },
      async ({ userId }) => {
        const users = {
          "123": { id: "123", name: "Alice", email: "[email protected]" },
          "456": { id: "456", name: "Bob", email: "[email protected]" },
        };
        const user = users[userId];
        if (!user) throw new Error("User not found");
        return { user };
      }
    );

    // Tool 2: Update user email
    server.tool(
      "updateUserEmail",
      "Update a user’s email",
      {
        userId: z.string().min(1),
        newEmail: z.string().email(),
      },
      async ({ userId, newEmail }) => {
        const users = {
          "123": { id: "123", name: "Alice", email: "[email protected]" },
          "456": { id: "456", name: "Bob", email: "[email protected]" },
        };
        const user = users[userId];
        if (!user) throw new Error("User not found");
        user.email = newEmail;
        return { user };
      }
    );
  },
  {},
  { basePath: "/mcp" }
);

// Attach to Express
app.post("/mcp", handler);

app.listen(3000, () => {
  console.log("MCP Server running on port 3000");
});
Step 3: MCP Client (client.js)
import axios from "axios";

async function callTool(tool, params) {
  const response = await axios.post("http://localhost:3000/mcp", {
    method: "callTool",
    params: { tool, arguments: params },
  });
  return response.data;
}

(async () => {
  console.log("Fetching user info...");
  const response1 = await callTool("getUserInfo", { userId: "123" });
  console.log(response1);

  console.log("\nUpdating user email...");
  const response2 = await callTool("updateUserEmail", {
    userId: "123",
    newEmail: "[email protected]",
  });
  console.log(response2);
})();
Step 4: Run the Example
Start two terminals:
Terminal 1:
node server.jsTerminal 2:
node client.jsExpected Output
Server console:
MCP Server running on port 3000Client output:
Fetching user info...
{ result: { user: { id: '123', name: 'Alice', email: '[email protected]' } } }

Updating user email...
{ result: { user: { id: '123', name: 'Alice', email: '[email protected]' } } }
How It Works
- The MCP server defines two tools (getUserInfo, updateUserEmail) and describes the parameters using zod.
- The Express app acts as the transport layer for MCP requests.
- The client sends a JSON payload that follows the MCP format (method, params.tool, params.arguments).
- The handler processes the request and returns a standardized JSON response.
This is exactly how larger MCP integrations work, where each tool can represent a function, API, or even a complex workflow.
Conclusion
Using the MCP Context (mcp-handler + SDK) libraries, Node.js developers can quickly build standardized, interoperable services that fit right into modern architectures, including those that interact with AI systems or distributed microservices.
The biggest advantages are:
- Reusability: Once you define tools, any MCP client can use them.
- Consistency: Uniform request/response patterns.
- Extensibility: Add new tools or transports (HTTP, WebSocket, STDIO) with minimal effort.
If you’re building APIs or microservices today, adopting MCP early makes your system more flexible and future-proof. You can start small, like the "user info" example above, and grow it into a fully connected ecosystem.
Opinions expressed by DZone contributors are their own.
Comments