
Jump Links
If you're anything like me, you like to keep your laptop and gaming PC running at its best. Updating the drivers for the hardware components is undeniably an easy way to optimize your computer. While many of us solely rely on the operating system to keep the drivers up-to-date, power users often like to take the matter into their own hands, hence "the newest is always the best" might not be suitable for all.
When you need to back up your PC drivers
As Microsoft regularly seeds driver packages through Windows Update, most of the common hardware peripherals on your computer get them as soon as you're connected to the internet. In fact, you can also get your hands on the latest builds by overwriting your existing driver using the OEM-specific releases (e.g. updating through Nvidia or AMD's software).
With that said, what just sounds so straightforward might cause performance issues like stuttering, unexpected crashes, and even BSODs. While Windows 11 can detect a myriad of hardware units out of the box, you might stumble upon a non-working touchpad while clean installing your OS. In some cases, even the SSD can't be found by the installer, simply because the required storage controller drivers aren't present in the Windows ISO. Or maybe your DIY PC features a piece of hardware for which the device driver is no longer available from the manufacturer.
If you don't want to waste your time digging through shady online resources offering unofficial driver packs, why not just back it up for safekeeping?
How to back up all device drivers
Here's everything you need to know about backing up your hardware drivers on Windows. Let's explore what the different methods are and how to utilize them.
Back up drivers using PowerShell
-
Start PowerShell with administrator privileges.
- You can do so by searching for it in the search bar of the Start menu, then right-click on Windows PowerShell and select Run as administrator.
- Alternatively, open a run box (Windows key + R), write powershell, and press Control + Shift + Enter to open it as an administrator.
-
Enter the following command and press Enter:
Export-WindowsDriver -Online -Destination "full path of the backup folder"-
Substitute "full path of the backup folder" in the command above with the actual full path of the folder where you want to export the third-party device drivers. If this folder doesn't currently exist, it will be created automatically. For example:
Export-WindowsDriver -Online -Destination "D:\driver_backup_powershell"
-
Substitute "full path of the backup folder" in the command above with the actual full path of the folder where you want to export the third-party device drivers. If this folder doesn't currently exist, it will be created automatically. For example:
- If everything goes right, then the device drivers should be exported into the specified folder location.

Back up drivers using Microsoft PnP Utility
Microsoft PnP Utility aka pnputil.exe is a command line tool included with every version of Windows since Windows Vista. You can use it to manage the driver store and perform various actions on the driver packages, including backing them up.
- Press the Windows key + X combo on your keyboard and select Terminal (Admin) to launch an elevated shell window. You may also use PowerShell or Command Prompt with elevated privileges if you prefer.
-
Execute the following command:
pnputil /export-driver * "full path of the backup folder"-
Substitute "full path of the backup folder" in the command above with the actual full path of an already existing folder. If this folder doesn't exist, you will need to create it first before running the command. Example:
pnputil /export-driver * "D:\driver_backup_pnputil"
-
Substitute "full path of the backup folder" in the command above with the actual full path of an already existing folder. If this folder doesn't exist, you will need to create it first before running the command. Example:
- After a successful run, you should see the statistics corresponding to the installed and exported driver packages. You can then close the Terminal instance if you like.

Back up drivers using DISM
People who are into Windows update tracking are no stranger to Deployment Image Servicing and Management (DISM). Apart from Windows image servicing, DISM can help you to tinker with the drivers as well.
- Open an elevated command line shell by pressing the Windows key + X combo on your keyboard and selecting Terminal (Admin). As always, you can use PowerShell or Command Prompt with elevated privileges too.
-
Type the command below :
dism /online /export-driver /destination:"full path of the backup folder"-
Substitute "full path of the backup folder" in the command above with the actual full path of an already existing folder. If this folder doesn't exist, you will need to create it first before running the command. Example:
dism /online /export-driver /destination:"D:\driver_backup_dism"
-
Substitute "full path of the backup folder" in the command above with the actual full path of an already existing folder. If this folder doesn't exist, you will need to create it first before running the command. Example:
- When you see the completion message, close the Terminal window.

Regardless of the way you exported the installed drivers for your PC, you should end up with a bunch of *.INF, *.SYS, *.CAT files along with a truckload of DLLs and executables. Don't expect a fancy GUI installer, because this is as raw as it can get.

How to integrate the backed-up device drivers with Windows ISO
Before you start, you need to grab a copy of the Windows ISO. In case you're unaware, you can easily create your own up-to-date Windows ISO from UUP dump. If you already downloaded the ISO, then we recommend integrating the latest cumulative updates before jumping to the next portion of this tutorial.
Many vendors periodically release driver packs corresponding to specific hardware lineups in the form of ZIP archive files. If you plan to use them instead of your own backed-up drivers, you'll need to extract said ZIP files.
-
Copy the contents of the Windows ISO to a folder with a relatively short path, e.g.
D:\Win11ISO. - Create a folder (e.g. D:\mounted_wim) where you’re going to mount the install.wim file using DISM.
-
Use the following command to mount the desired index of the install.wim file to the folder you created in the previous step:
dism /mount-wim /wimfile:<full path of the install.wim> /index:<desired index number> /mountdir:<full path of the mount folder location>-
Set the parameter values as necessary. For example:
dism /mount-wim /wimfile:"D:\Win11ISO\sources\install.wim" /index:6 /mountdir:"D:\mounted_wim"
-
Set the parameter values as necessary. For example:
-
After the index is mounted, you can add drivers to it using the command below:
dism /image:<full path of the mount folder location> /add-driver /driver:<full path of the driver backup folder location> /Recurse-
We will be using the following command for our test scenario:
dism /image:D:\mounted_wim /add-driver /driver:"D:\driver_backup" /Recurse
- The "/Recurse" parameter will help us by recursively scanning the specified folder for all *.INF files with the driver description. DISM will add all the dependent files to the offline driver store of your Windows image.
- In case you have any unsigned driver, you can use the "/ForceUnsigned" parameter to integrate it. However, you must disable the digital signature enforcement or sign the device driver with a self-signed certificate before you can use it on a regular x64 PC — both of the topics are beyond the scope of this tutorial.
-
We will be using the following command for our test scenario:
-
After the driver files have been merged, commit your changes, and unmount the WIM file:
dism /unmount-wim /mountdir:<full path of the mount folder location> /commit-
In our case, the command should be:
dism /unmount-wim /mountdir:"D:\mounted_wim" /commit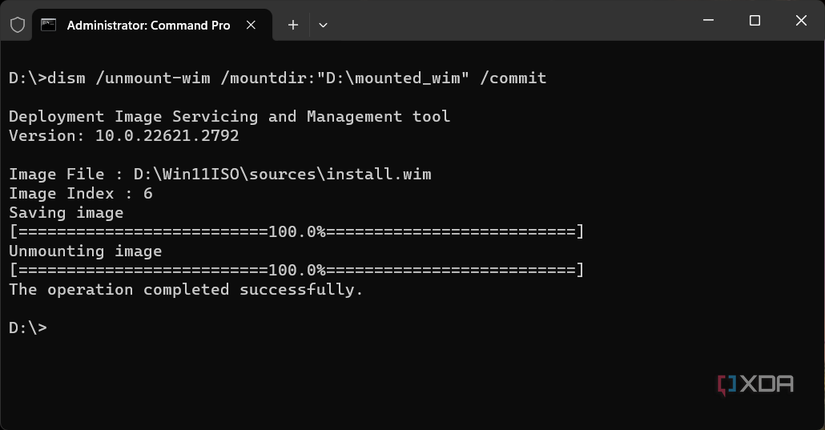
-
In our case, the command should be:
- There you go! You’ve successfully integrated the drivers to your Windows 11 setup source.


The install.wim file is the Windows image that will be deployed to the local drive of the computer. If you need to add drivers to a Windows boot image (Windows Preinstallation Environment that is used to boot the computer and run the Windows Setup), do the same, but for the boot.wim file. This is usually needed if Windows Setup is unable to detect the storage or network adapters.
At this point, all you need to do is simply replace the stock install.wim (and the boot.wim, if necessary) file with the updated one you just created under D:\Win11ISO\sources. For a bootable USB flash drive, it's a matter of a few seconds. Then start Windows installation and the updated image will take care of the rest.
Now that you’ve successfully made a complete driver backup and a slipstreamed Windows installer, you have a safety net for your system. So long as you check for new updates once every few weeks or so and repeat the process, your PC should run at peak performance for a long time to come.