Yue face right

Water Water everywhere

When we moved into the house I had a bunch of maintenance done which included fixing a few things on the roof and gutter cleaning.  At the time of the cleaning I was warned that because of the big trees I may need to clean the gutters twice a year.  Also I had leaf guards installed in the down spout (kind of like an egg beater) and sometimes they were more of a pain than a use.

Enter this week where the gutter plugged.  I had water coming over the gutter in two spots under which I put buckets.  Then I bailed the buckets into the rain barrel (which isn't hooked up yet)  Good news is that the rain barrel is full.  Bad news is in addition to the zipper being broken off of the lid (soft sided barrel) it is also cracked at the top where it use to bend a lot when empty.

Short story in addition to hooking up the barrel to the gutter I need at least 1 new barrel (maybe two as one doesn't seem to finish the year right.

This morning I managed to get on the ladder and move the leaves jamming the egg beater thing.  (And that was about all I could do with the ladder in the current configuration and no one to hold the ladder.  Later I will have to get up again with someone one steadying the ladder)  Good news.  The gutter now drains.  Bad news that is a LOT of water that is coming down that gutter and it doesn't go into a drain.  Instead it goes into a spreader thing.  I think I will need to work on getting the water further away from the house.

bucket full of water
Collapse )
howl

Oops

One of my hobbies is Amateur Radio and after we moved I didn't have my antenna hooked up to my main radio for the longest time.  About two months ago we finally got the antenna stuffed in the attic and the main radio hooked up.

The noise floor was increasable but things still worked

Fast forward to Monday when the local club had our blow the dust off your radio event part of which is a check in on winlink.  (a digital mode)  

One of the "features" of the new house is that the kitchen tap is some sort of electric tap where you tap it to turn on and off.  WELL....  While I wasn't able to connect to the Club's winlink mode (unlike the previous month) I WAS able to turn on the tap down stairs.

Ah NO...  That is going to need to be fixed as soon as I figure out what is going on.


Yue face right

Garden Update

So I've moved.  That changes things.  No pictures at the moment but we will get there one day.  

The new house has a back garden area but I haven't rototilled the back garden plot yet and it looks like there may be some bulbs coming up so I've transplanted some of what I've been hardening off into pots.  About 5 plants per pot (lettuce, arugula, mustard​, kale with an onion in the middle)  I know that is over crowding a bit but I suspect I will end up thinning them down to just the onion as the year goes one.

I still have more to transplant and I hope to progress through out the week.

I've managed to empty all of the tomato pots into the garden and hopefully the mantis tiller will be able to go through what is left of the tomato root.  Reading the manual on the mantis tiller it needs 50:1 gas oil ratio and doesn't like gas older than 30 days.  Fortunately, the tank on the tiller was empty.  I've just purchased the gas in the correct ratio and will use that rather than mix it myself.  With luck I will be able to use it tomorrow to till the back.  

Collapse )
howl

Repotted the Aloe Vera Plant

Will it survive?

The Aloe Vera plant that I purchased last July has out grown its original container.  It is very top heavy and if you breath near it tip over it goes.  It also produced two pups.  So today was an excursion to the local garden center to get clay pots (make it harder to tip) and see what I can do about repotting it and hopefully not killing it. 

As the plant is very sensitive the water (and the way I normally kill such plants it will get watered tomorrow after the plant gets a chance to settle down a bit.

howl

Weekend Experiments

This past weekend was the weekend of experiments.  Some of which I have pictures for others I don’t.


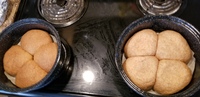
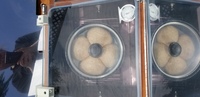
First off is Bread in the Sun Oven.  Or more correctly buns. My issue with making buns in the Sun Oven is space.  The tray I’m using doesn’t give very large buns. So I had the thought to get the enamel pots that came with the sun oven and line those with parchment paper.  That would give me some vertical space and maybe I can get some decent buns out of them.


It sort of worked but I learned that the bottom pot didn’t get hot enough to cook the dough completely so I put the lid back on it and put it out again in the sun oven.  After another hour the buns were cooked. Actually just over an hour because I was sidetracked with supper. So those buns ended up a little darker.


The bread I made after lunch on Sunday.  In the future if I want to do this I think I will take out the ingredients before going to church so they can come up to temperature.  That will also allow the water / sugar mixture to cool enough that the yeast will proof instead of cook. That will let me get the bread into the oven earlier in the day so if I have to switch the pots around again that I will have time to do so.


The nice thing about cooking the buns in the pot (besides giving me bigger buns) is the lid on the pot traps most of the moisture so I don’t have the massive steam build up on the sun oven glass which then means the oven itself gets hotter.


Next experiment which is still in progress is Pineapple Vinegar.  Pineapple is suppose to be good for hayfever so I’m trying to eat more of it along with Kifer.  I like Pineapple so it isn’t a hardship at all however, since I have previously tried making Apple Cider Vinegar I wondered if there was a variant for Pineapple.


There is.  So I have taken the Pineapple rinds and I have them in a jar of sugar water.  We will see what it looks like in two weeks. Do I get vinegar or do I get a mess?


Another experiment was getting a small seedless watermelon and running that through the dehydrator.  That started Monday morning and Wednesday morning I took the thicker pieces out. Sometimes it can be hard to cut watermelon consistently.  Next time I think I will quarter it and then run it through the electric slicer to get a more consistent thickness. When I pulled the final pieces off of the dehydrator this morning they were still flexible indicating a bit of water content.  By the time I gave the pieces that didn’t fit the canning jar to some co-workers it had stiffened up. Ends up being a very sweet candy. Quite nice. I will probably do that again and store some more of it. About 1 small watermelon = 1 quart jar when dehydrated.  I will probably save the eating of the watermelon until after hayfever season is done as apparently I should be staying away from dried fruit and melons. I know I can pickle watermelon rinds but that is an experiment for another day.


Finally there is tomato planting.  Mom was kind enough to start 3 varieties of tomatoes for me but this year she started them in the biodegradable paper bags with the plastic liners.  So the tomatoes have more room and aren’t as root bound. I had intended to plant these on the Monday of the May long weekend but it was a wash out at my house so I had to wait until Tuesday to start planting.  I managed to get 7 into their buckets before I ran out of soil.

howl

Playing with Food Storage Toys

So it has been a while since I posted and I figured it was time I did some sort of update.

This one is on playing with food storage toys.  A few years ago Costco had 6 gallon buckets with gamma lids on sale.  As I gave up my Costco card a while ago (WAY TOO Tempting) I had my parents get me a set when they got a set for themselves.  Earlier this week I finally dug into the pile of buckets and pulled out a bucket.  My intent was to decant some bags (and some are quite old) of sugar into the bucket and have it sealed with the gamma lid.  Previously I had sugar in a bucket (probably the 5 gallon version) but it had the standard lid.  You can say it was a PAIN to get into.  The Gamma lid is a massive improvement.

Unfortunately, I discovered one lid was broken.  Now I had a choice.  Use a bucket with an intact lid or perhaps repair this lid.  If I repair this lid then I have an issue with off gassing of the lid because whatever glue I use may not be properly food safe.

Enter OTHER new toy.  For Christmas I received from my parents a impulse sealer and some bags.  Now this gives possibilities of repairing the lid and having the sugar sealed in mylar bags inside the buckets.  This give a double seal on the sugar, breaks the sugar down to smaller more easily used packets and gives me the opportunity to use the broken lid.

I repaired the lid with some white caulk I had lying around.  This would give a water resistant seal and the white would identify the lid as the broken not likely air tight one.  Once the caulk had set I also put some E9000 glue on top (so caulk on inside of the lid E9000 on the outside)  That would ensure that the entire set of cracks were covered and the E9000 would give it strength.  Sealing the lid from both sides was important as the cracks went around corners on the lid which made visibility of the crack difficult depending on which side you were looking at and where the crack was going.

On to the sealing.  The sealer I have has a seal length of 200 mm.  The bags were 10 inches x 14 inches.  That makes the sealer ever so slightly shorter than the width of the bag (by 54 mm or 2 inches).  That means for a good seal I needed to seal the bags at least twice with the two seals meeting up in the middle.  As it has been many years since I last sealed bags this took a bit of doing.  Also the sealer is a variable temperature sealer so I had to find the right temperature.  I originally started at 4 (max seems to be about 8.5 or 9) but that didn't give a seal that I really liked so I upped it to about 5.5 or 6.  Originally was 6 but backed off a bit.

Then it was time to fill and seal the bags.  I used a 1 cup liquid measure to scoop from the bag of sugar (10 KG) into the mylar bag.  This takes around 7 - 8 scoops and then it was time to seal.  Having seen previous seals where it didn't quite take I actually sealed the bag about 6 times which produced 3 lines of seals across the top.  No oxygen packs went in these bags because apparently that causes the sugar to clump and turn into rock.  As I wasn't interested in rock candy or chipping my surgar out of the bag later the oxygen absorbers were skipped.  All of this was done in the kitchen / nook area with its tile floors.  I was originally going to set up in the dinning room with its table but I could just imagine spilt sugar on carpet (I still don't get carpeting a dining room.  That is a high food spill area) so used the freezer as a table instead which means scooping from floor level up to the freezer level.  There is no way I would want to put a full bag of sugar on the freezer.  I think that would be too much for the lid.  It is only sheet metal after all.

I figure each 10 KB bag of sugar fits into about 4 mylar bags. I can get about 6 mylar bags into a bucket.  So for today's experiment I went through most of two bags of sugar (as the entire reason I started this was because I had empied out the previous container and needed to decant some sugar.  Now I need to decide if I'm going to put the rest in mylar bags or since the other gamma lid is intact just dump the whole bag of sugar into the bucket.  The mylar bags while a bit of work does limit the amount of damage should an accident occur. 

Food for thought.

howl

long over due update

I have a friend who recently got her fire arm licence.  She invited me to join here shooting a few months ago and our schedules finally matched up. We went out to the DVC in Port Coquitlam and there I managed to shoot a 38 revolver and her family's 22 which is an antique.  We had fun and apparently I had good grouping for a first time.

The 22 was the first on I shot and we started at 5 Meters and eventually had it all the way out which I think is about 10 Meters.

The 38 was shot at the 5 meter mark.

We spent about an hour at it and I can see how shooting can be a very expensive hobby.

A few weeks ago I planted some seeds in a soil blocking device I received as a present from my sister in law.  The seeds (including the notorious spinach) managed to sprout and I’ve since transplanted them into the garden.  I’m going to use that again to start some herb seeds.  Mom is having issues starting seeds at her house this year.  You are suppose to use a special soil mix for this but it seems to have worked with Nature’s Gold potting mix so I’m fairly happy with it.

  • First Week

  • Second Week

  • Spinach in ground

  • radish in ground

  • carrots in ground


howl

First real Sourdough Bread Loaf

Recently I changed visiting teaching partners to someone who had moved into the ward.  We got to talking and mentioned baking.  She has a San Francisco Sour Dough starter that she brought back from a trip down there and gave me some.  I managed to keep it alive long enough to get a loaf of bread out.
I received the Sour Dough Wednesday night and had been feeding it by the 1/8 cup of white flour morning and night.  It is stored in a peanut butter jar with a bit of cheese cloth on top to allow it to breath but keep everything else out.  I’ve also been careful to keep it away from metal.  Apparently, it doesn’t like that.  By Friday it was looking a little sad so I gave it 1 cup of whole wheat flour (home ground) and an equal amount of water by weight.  I also put it in the oven with the light on to give it a little warmer environment than what is standard in my kitchen.  By Friday night it was very happy so I took my first shot at making sourdough bread by using the recipe found at http://www.annies-eats.com/2012/08…

The bread turned out ok but the top collapsed a bit so I need to use a different knife to do the slashes and play with the rising time a bit.  I was suppose to let it rise about 2 hours but I think I should have stopped a bit earlier.  Though it could also be that this bread really isn’t designed for a loaf plan.

Now I just need to keep the starter alive and see what else I can use it for.  One of the things I got as part of the back basics bundle was access to a sourdough e-course.  I will need to take that to make sure I don’t accidentally kill anything.

On the left is what the starter looks like first thing.

On the right is the starter after it has been fed and mixed up a bit.  I use a rubber spatula to stir it up.  When I added the whole wheat flour and put it in the oven with the light on.  It really bubbled up.  That was when I learned that I hadn't managed to kill the starter and that my kitchen may be a bit cold right now for it.


When I first mixed the spong it barely covered the bottom of the bowl.  I put it in the oven to rise.  It rose very enthusiatically I think it was about 1/2 inch deep when I moved the bowl to the fridge.  On the next morning I mixed in the red of the flour and made a very solid ball.  The sponge went in at 9 at night and at 9 in the morning I had mixed the dough together.


After rising for three hours I punched the dough down.  It was very soft at this point.  I put it into the bread loaf pan as I prefer bread as a sandwich loaf rather than as a artisan loaf.


The bread then rose for 2 hours after which the top was slashed and it was baked off.  Though a little deformed it still tastes good.  I will have to play with it again when I'm home for both days on a weekend.  I think this one ended up as 1/2 white flour and 1/2 whole wheat.  I used whole wheat for the bread flour in the recipe and white while getting the sponge going.

 
Yue face right

Catch Up 2016 / start 2017

Catch up 2016 / 2017
2016 – Aug
I attempted to make cookies in the sun oven again.  I think I’m just going to give up on that one.  The cookies just seem to melt into position.  I think for a good cookie I need to get it hot enough to properly bake.  The sun oven just doesn’t get hot enough in the lower mainland.  If I go to visit a friend who has moved to Williams Lake I may bring the sun oven along to see if it will get hotter out there.  You can see in the corner two tooth picks.  That is to prevent moisture from building up on the inside of the sun oven.  It doesn’t work that well when the light can’t get through.


2016 – September
After pealing a box of applis which I later dried (they turned out well) I took the peals and cores and tried to make apple cider vinegar.  Here you can see what it looked like when I started and then the final product as it looks today.  I had a little jar to go with it as well but I’m working on actually using it now that I’ve made it.  I think I will try to make it again but with out the sugar to kick it off.  The recipe I use is here http://untrainedhousewife.com/how-….


2017
This winter was really bad.  It ended up snowing quite a bit.  Given that normally we don’t have any snow the fact that we were getting dumped on every other week was quite significant.  As I am not driving to work during December I broke down and put winter tires on the car.  Here is a picture of the car in the February snow storm.  You can see in the shadow under the car how much fell from the night before.  You can also see Gary with the snow blower clearing the driveway.  Our next door neighbors broke their shovel during one of the previous storms and there wasn’t one to be had in the area.  They had to go down to Bellingham in order to get one.  They were quite happy to come home to find that we had cleared the driveway for them.  There are times when I really like power tools.


2017 – March
So for the beginning of March it is still snowing but Gary is tired of us sharing the car.  With me working the car is normally with me and even when I’m home the back really isn’t designed to haul stuff.  So we are now back to a two vehicle family.  He has a new truck.  This has several advantages including being able to haul wood.  Below are two project I had him help with for the garden.  The first is the rain barrel stand which will allow me to get a bucket under the spigot and hopefully with a 3 foot drop there will be enough velocity coming out that I can use it to run a hose at low pressure.  Also we have hauled wood for the new garden box.  The box is below.  We have some compost in the back but we will need to get some more and add some manure as well.  Then I will start planting in it.  It will hold a lot of dirt.