Traditional QR Codes
Quick Response (QR) codes were developed in 1994 by Masahiro Hara and are now recognized as an ISO/IEC standard. They represent an evolution of 2D barcodes, capable of encoding numeric, alphanumeric, binary, or Kanji data in the form of a pattern of black squares on a white background. These codes are available in various sizes (or versions), ranging from version 1 (21 x 21 squares) to version 40 (177 x 177 squares).
Numerous libraries and tools exist for generating QR codes. My preferred open-source library is QR Code Generator, which supports all standard features and is available in Java, TypeScript/JavaScript, Python, Rust, C++, and C. Additionally, my favorite all-in-one open-source tool is QR Toolkit, a Vue/Nuxt application offering marker and module customization, along with verification and comparison mechanisms, an invaluable resource when tweaking QR codes.
QR codes comprise several critical components to ensure readability by scanners, including three positional markers, alignment and timing patterns, and a masking system. While I will not delve into these details now, I will instead focus on the built-in error correction mechanism. This employs Reed-Solomon codes - also used in storage media (CD/DVD, RAID6) and network technologies (DSL, satellite) — by adding extra codewords to the QR grid for error correction. The standard defines four levels of error correction, each associated with a different tolerance percentage:
| Level | Approximate Error Tolerance |
|---|---|
| Low | ~7% |
| Medium | ~15% |
| Quartile | ~25% |
| High | ~30% |
This means a QR code with High error correction can still be scanned if up to 30% of the image becomes unreadable. This feature is often utilized to embed images within QR codes: the embedded image is treated as errors during scanning.
For years, this technique has been used for personalizing QR codes. This article explores an innovative approach to customizing QR codes by leveraging Generative AI instead.
Harnessing Generative AI
My proposal involves using a Stable Diffusion model integrated within the ComfyUI graphical interface to design and execute local generation workflows on a GPU-equipped PC. For detailed guidance on these components, refer to this article or this video.
To modify and refine existing QR codes while maintaining their scannability, we will use a specialized ControlNet called QR Code Monster. ControlNets are auxiliary neural network models that inject targeted guidance into the generation process by focusing on specific features of an input image. Each ControlNet emphasizes particular aspects, such as structure (pose, edges, segmentation, depth), texture, content layout (bounding boxes, masks), or style (color maps, textures). In our scenario, we’ll focus on maintaining or modifying QR code contrast features.
Let’s proceed to create a workflow in ComfyUI, employing Stable Diffusion 1.5, the QR Code Monster ControlNet, and a QR code generated via QR Toolkit.
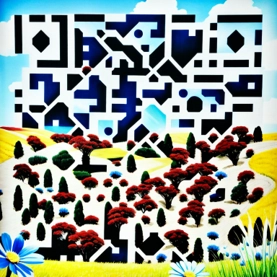
Adjusting parameters such as the ControlNet’s strength and start/end positions, along with the sampling process (e.g., 50 steps), I obtained a result that remains scannable and aligns with my input prompt: “A beautiful landscape, blue sky, grass, flowers.”
This demonstrates how Stable Diffusion combined with ControlNet preserved the original pattern while injecting desired visual elements. Using QR Toolkit’s comparison feature, we can assess the QR code’s readability by examining the difference markers.
Next, we can modify the prompt to produce multiple variants of our QR code. For example:
While changing the overall style is straightforward (first example), embedding specific content within the QR code remains more challenging than with traditional tools (second example). To explore this further, we'll examine two axes separately: Style and Content, before combining them.
Customizing Style
Enhancing the prompt allows for more precise control over the QR code’s aesthetic. For instance, leveraging a large language model (LLM) to generate detailed prompts:
“A pattern forged from molten lava, glowing with an intense fiery orange and red hue. Cracks in the surface reveal volcanic heat, with small embers rising around it.”
Similarly, for a more intricate and mystical style:
“An elegant, glowing elven door adorned with intricate, nature-inspired patterns and shimmering silver runes. Delicate vines and luminescent flowers intertwine with the carvings, pulsating with soft emerald and sapphire light. The archway, crafted from ethereal white stone, radiates a mystical aura, with faint golden mist swirling at its base, hinting at an ancient portal to a hidden realm.”
Predefined styles can also be injected into prompts using the iTools Prompt Styler Extra node in ComfyUI:
This node offers reusable prompts categorized by various artistic styles: 3D, Art, Craft, Design, Drawing, Illustration, Painting, Sculpture, Vector, and more. Incorporating it into our workflow makes testing different styles effortless without altering other parameters.
Below are examples of QR codes generated with different styles:
Additionally, combining styles with custom prompts allows for highly personalized designs, enabling limitless customization of your QR codes’ appearance.
Embedding Content
Having mastered style adjustments, the next step is to embed specific generated content into QR codes. For example, I wish to insert an image of a yoga pose. If you’ve read my previous articles on AI image generation, you’ll understand the transfer of poses through workflows. Details are available here for further reference.
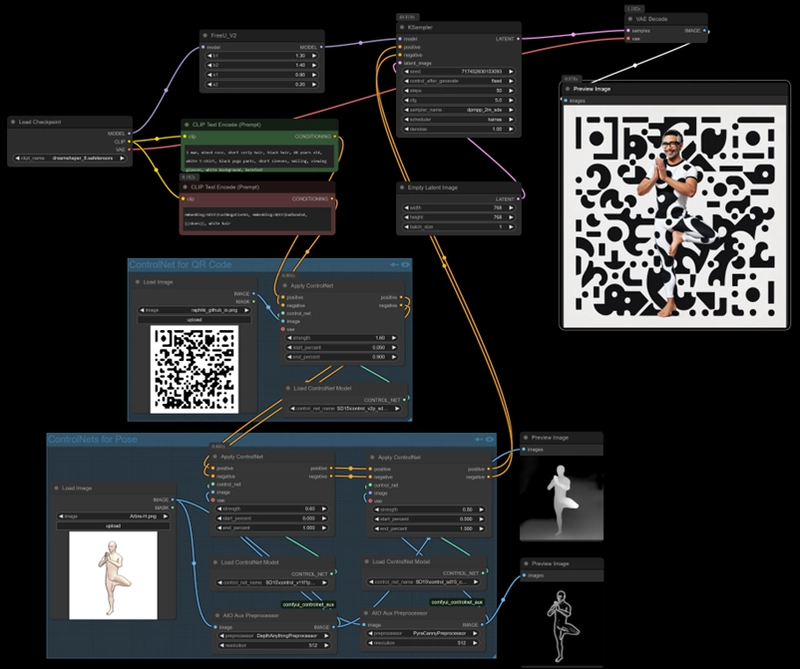
We’ll start with an abstract image of the target pose, add Depth and Canny Edge ControlNets to our workflow, and specify in the prompt: “man, mixed race, short curly hair, black hair, 40 years old, white T-shirt, black yoga pants, short sleeves, smiling, viewing glasses, white background, barefoot.” Essentially, I aim to generate an image resembling myself.
To ensure a realistic likeness, additional steps include incorporating the FaceID IP Adapter and the FaceDetailer post-processing model into the workflow. Refer to this article for comprehensive guidance on implementing face transfer. The outcome preserves scannability and creates a QR code embedding the desired pose and identity:
Using QR Toolkit again, the comparison displays about 26 mismatch nodes, primarily around the facial features and body.
Integrating Style and Content
All previous steps can be combined by adding the iTools node to the final workflow:
Making the QR Code Animate
Given that I can embed a face into the QR code, I can also animate facial expressions using specialized nodes. The Advanced Live Portrait tool is designed for editing, inserting, and animating facial expressions in images. By inputting our generated QR code, we can animate my face to produce a smiling expression or nodding motion.
The resulting animation can be exported as an animated GIF or video:
Final Thoughts
This short tutorial has demonstrated how to significantly enhance both the stylistic and content-related aspects of a QR code. You are now equipped to craft engaging, customized QR codes that align with your personal or branding style.
The only limits are your patience and imagination, so have fun experimenting!


Top comments (0)