
The goal
If you want to run PostgreSQL in production, setting up Transport Layer Security (TLS) is a must in order to prevent man-in-the-middle attacks. In this step-by-step guide, I will show you how you can connect to your database securely using your own local Certificate Authority. If you need an in-depth explanation of all settings, you can check out the official documentation on how to set up TLS in PostgreSQL.
In this example, we will ONLY allow encrypted connections and we will set sslmode to verify-full, which is the strictest possible connection setting in PostgreSQL.
To follow along, check out the example repository over here: PostgreSQL with TLS repository
Prerequisites
You need Docker installed on your machine. If you are on a Mac or Windows, make sure to install Docker Desktop and have it running in the background. Verify Docker is running by typing docker ps in your terminal. You should see a list of running containers or at least no error if Docker is running.
Video Tutorial
Step 1: Generate Certificates
Generate a Certificate Authority (CA)
Note: All certificate files that are generated in the following steps (CA, server, and client) should be treated as secrets. Do not add them to your git repository, do not log them, and do not bake them into your Docker image (use runtime envs only). If necessary, add them to your
.gitignorefile.
First, we create a root CA key and certificate that will sign our server and client certs. You can change the name if you want. Our CA will be valid for 365 days and needs to be renewed after that.
openssl genrsa -out rootCA.key 2048
openssl req -x509 -new -nodes -key rootCA.key -sha256 -days 365 -out rootCA.crt -subj "/CN=MyLocalCA"
Create Server Certificate Files
Generate a key and CSR (Certificate Signing Request), then sign it using the CA:
Important: Here you need to provide the domain name your PostgreSQL instance will be running on. In the example, I use
localhost, but make sure to swap out the hostname if you use another one.
openssl genrsa -out server.key 2048
openssl req -new -key server.key -out server.csr -subj "/CN=localhost"
openssl x509 -req -in server.csr -CA rootCA.crt -CAkey rootCA.key -CAcreateserial -out server.crt -days 365 -sha256
Create Client Certificate Files
This certificate will be used by the client to authenticate. Only certificates that have been signed by the same certificate authority as the server certificate will work.
To create the client certificate, we follow the same steps as for the server. As a common name, I chose the postgres user:
openssl genrsa -out client.key 2048
openssl req -new -key client.key -out client.csr -subj "/CN=postgres"
openssl x509 -req -in client.csr -CA rootCA.crt -CAkey rootCA.key -CAcreateserial -out client.crt -days 365 -sha256
Step 2: Create Config Scripts to Enable TLS in PostgreSQL
Create a new file in the root of the project and name it ssl-config.sh. The script contains instructions to enable ssl in PostgreSQL and enforce TLS for all connections with sslmode set to verify-full.
If you want to allow insecure connections, you can omit the "Force SSL" section of the script or change the sslmode to something more forgiving.
#!/bin/bash
set -e

# Configure PostgreSQL to use SSL
echo "ssl = on" >> /var/lib/postgresql/data/postgresql.conf
echo "ssl_cert_file = '/var/lib/postgresql/server.crt'" >> /var/lib/postgresql/data/postgresql.conf
echo "ssl_key_file = '/var/lib/postgresql/server.key'" >> /var/lib/postgresql/data/postgresql.conf
echo "ssl_ca_file = '/var/lib/postgresql/rootCA.crt'" >> /var/lib/postgresql/data/postgresql.conf

# Enforce SSL for all connections
echo "hostssl all all all cert clientcert=verify-full" > /var/lib/postgresql/data/pg_hba.conf
Create another file in the root of the project and call it entrypoint.sh. This script copies our certificates into the container at runtime before the default entrypoint is executed.
#!/bin/bash
set -e

# Add certificate files
echo "$SERVER_CRT" > /var/lib/postgresql/server.crt
echo "$SERVER_KEY" > /var/lib/postgresql/server.key
echo "$ROOT_CA_CRT" > /var/lib/postgresql/rootCA.crt

# Update file permissions of certificates
chmod 600 /var/lib/postgresql/server.* /var/lib/postgresql/rootCA.crt
chown postgres:postgres /var/lib/postgresql/server.* /var/lib/postgresql/rootCA.crt

# Run the base entrypoint
docker-entrypoint.sh postgres
The script requires 3 environment variables:
SERVER_CRTSERVER_KEYROOT_CA_CRT
The contents of these envs is the plaintext content of the 3 certificate files: server.crt, server.key, and rootCA.crt.
Step 3: Build a Docker Image with TLS Enabled
Create a new file in your project and name it Dockerfile. We will base the Docker image on postgres:17.5, then copy our custom ssl-config.sh and entrypoint.sh into the image, make it executable and replace the default entrypoint:
# Start from postgres 17.5 as a base image
FROM postgres:17.5

# Copy ssl-config script which runs on first startup
COPY ssl-config.sh /docker-entrypoint-initdb.d/ssl-config.sh

# Copy the entrypoint script to the image
COPY entrypoint.sh /usr/local/bin/entrypoint.sh

# Make the entypoint script executable
RUN chmod +x /usr/local/bin/entrypoint.sh

# Set the entrypoint
ENTRYPOINT [ "/usr/local/bin/entrypoint.sh"]
Step 4: Connect to the instance
To see if everything is working, we will try to build and run our image locally and try to connect to our instance. We will use the psql client to check if we can connect to our instance. If you have not installed it on your machine, make sure to add it first using your package manager of choice, e.g. brew install postgresql on macOS.
Note: This local test will only work if you previously set the common name of your server certificate to
localhost. Otherwise, you need to create a new server certificate with localhost as a common name.
Build the docker image:
docker build -t postgres-tls .
Run the image:
docker run \
 -e POSTGRES_PASSWORD=secret \
 -e SERVER_CRT="$(cat server.crt)" \
 -e SERVER_KEY="$(cat server.key)" \
 -e ROOT_CA_CRT="$(cat rootCA.crt)" \
 -p 5432:5432 --name postgres-tls postgres-tls
Make sure to use the correct path to your server.crt, server.key, and rootCA.crt file if you moved these files around.
Test the connection:
# This command should get you into the PostgreSQL shell:
psql "host=localhost dbname=postgres user=postgres sslmode=verify-full sslrootcert=rootCA.crt sslcert=client.crt sslkey=client.key"

# This should fail, because we enforce tls:
psql "host=localhost dbname=postgres user=postgres sslmode=disable"
Important: Make sure to run this from the same directory where your certificates are, or update the file paths accordingly.
Also make sure the permissions on client.key are set to 600. You can update the permissions usingchmod 600 client.key
Step 5: Deploy
In order to make the database available over the internet, we will deploy it on Sliplane.
Sliplane is an affordable cloud provider, that makes deployment and managing containerized applications very easy.
1.) Create a GitHub repository with the two files described above: entrypoint.sh from step 3 and Dockerfile from step 4. I created an example repo that you can fork here: PostgreSQL with TLS repository
2.) Log in to Sliplane with your GitHub account
3.) Create a new Project and click on "Deploy Service"
4.) Create a new Server, where your PostgreSQL instance will be running - you can easily start with the base server and scale up later if you need to
5.) Choose "Repository" as the deploy source
6.) Choose your PostgreSQL repository from the dropdown.
If the PostgreSQL repository does not show up in the list, you need to hit "Configure Repository Access" first in order to grant Sliplane access to deploy the repo
7.) In the "Expose Service" section, change the protocol to TCP

8.) In the "Environment Variables" section, add
POSTGRES_PASSWORD - arbitrary secret
SERVER_CRT - contents of your server.crt file
SERVER_KEY - contents of your server.key file
ROOT_CA_CRT - contents of your rootCA.crt file
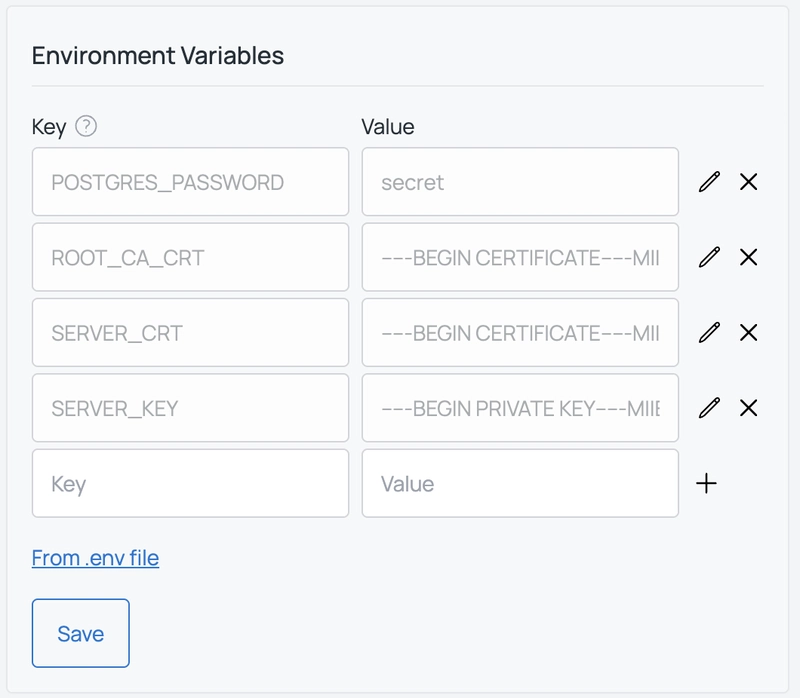
9.) In the "Volumes" section, add a new volume with a name of your choice and choose /var/lib/postgresql/data as the mount path

10.) Hit "Deploy".
Here you can see an overview of how the settings should look:

After the deploy we get issued a sliplane.app domain that we can use in our server certificate. Alternatively, you could use a custom domain in your certificate and attach that domain to your service afterwards.
11.) Back in your terminal, create a new server certificate as described above and use your sliplane.app domain as a common name. You can find the domain in the service settings of your newly created service under Public Domain.

openssl genrsa -out server.key 2048
openssl req -new -key server.key -out server.csr -subj "/CN=...sliplane.app"
openssl x509 -req -in server.csr -CA rootCA.crt -CAkey rootCA.key -CAcreateserial -out server.crt -days 365 -sha256
Note: Your service needs to be public when you create it. Otherwise, it won't get a public domain (see screenshot above)
Make sure to replace the\CN=...with your own sliplane.app domain.
12.) Replace the SERVER_CRT environment variable of your Sliplane service with the new certificate. After you hit save, a new deploy will be triggered.
That's it! You now have access to a PostgreSQL instance via a secure connection. You can test it by running:
psql "host=YOUR_APP.sliplane.app dbname=postgres user=postgres sslmode=verify-full sslrootcert=rootCA.crt sslcert=client.crt sslkey=client.key"
Note: Replace the sliplane.app domain that you have been issued and that is used in your certificate.
If you liked this tutorial, feel free to comment, like, and share.
Thanks!
Lukas

Top comments (3)
Redis next?
Coming
Some comments may only be visible to logged-in visitors. Sign in to view all comments.