Kubernetes can feel intimidating at first, but with this step-by-step guide, you’ll be up and running in no time. This article will walk you through the essentials of Kubernetes, introduce you to Minikube and KubeCTL, and help you launch your first local cluster.
🤔 What is Kubernetes?
Kubernetes (sometimes called K8's) is an open-source system for managing containerized applications. It helps you automate deployment, scaling, networking, and health monitoring across clusters of machines. This process is also referred to as container orchestration. Kubernetes was originally developed by Google and is now maintained by the Cloud Native Computing Foundation (CNCF)
What is Minikube?
Minikube is a tool that lets you run a local, single-node Kubernetes cluster on your laptop. It's ideal for developers who want to learn and test Kubernetes without using cloud services.
Unlike managed platforms like EKS (AWS), AKS (Azure), or GKE (Google Cloud), which run in the cloud and handle production-scale clusters, Minikube provides a simplified, self-contained local environment for development and experimentation. It supports various virtualization drivers (Docker, VirtualBox, etc.) and includes all the components needed to simulate a real Kubernetes cluster locally.
Installing Minikube:
Navigate here to download Minikube. Select your OS and follow the instructions. Alternatively for quick installations:
macOS (Homebrew)
brew install minikube
Windows (Chocolatey)
choco install minikube
Linux
curl -LO https://storage.googleapis.com/minikube/releases/latest/minikube-linux-amd64
sudo install minikube-linux-amd64 /usr/local/bin/minikube
What is Kubectl?
kubectl is the command-line tool used to interact with a Kubernetes cluster. It lets you deploy apps, inspect resources, view logs, and manage your cluster—all by sending commands to the Kubernetes API.
Whether you're using Minikube locally or a cloud service like EKS or AKS, kubectl is the primary way to control and monitor your cluster.
Installing KubeCTL
Navigate here to install KubeCTL
Alternatively, for quick install:
macOS (Homebrew)
brew install kubectl
Windows (Chocolatey)
choco install kubernetes-cli
Linux
curl -LO "https://dl.k8s.io/release/$(curl -s https://dl.k8s.io/release/stable.txt)/bin/linux/amd64/kubectl"
chmod +x kubectl
sudo mv kubectl /usr/local/bin/
Verify Installation:
kubectl version --client
🚀 Start Your First Local Cluster
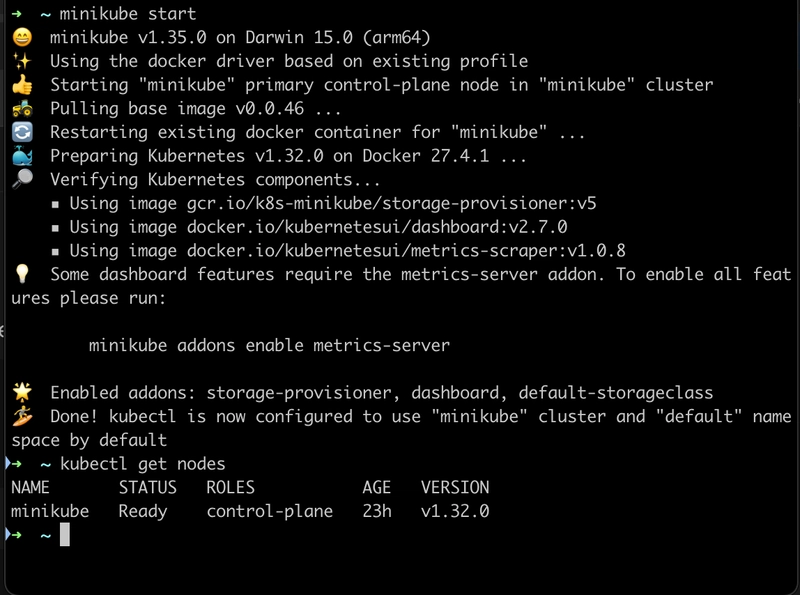
With Minikube and kubectl installed, you can now spin up your first Kubernetes cluster:
minikube start
This may take a few minutes. Once it's done, check the node:
kubectl get nodes
You should see a node listed with a Ready status as shown:
🌐 Deploy a Sample App
Let’s test the setup by deploying a basic Nginx web server.
kubectl create deployment hello-nginx --image=nginx
kubectl expose deployment hello-nginx --type=NodePort --port=80
Explanation of These Commands:
-kubectl create deployment hello-nginx --image=nginx: Creates a Deployment named hello-nginx using the official Nginx image. Kubernetes ensures the pod stays running.kubectl expose deployment hello-nginx --type=NodePort --port=80: Uses kubectl expose to make a deployment accessible externally. This creates a service that routes external traffic on a static port to the hello-nginx pods.
Then open it in your browser:
minikube service hello-nginx
This will open a browser window pointing to the Nginx welcome page served from your local Kubernetes cluster.
🧠 Recap
We just:
Learned about Kubernetes, Minikube and KubeCTL
Installed Minikube and KubeCTL
Launched a local Kubernetes cluster
Deployed and accessed a containerized app
You're now ready to dive deeper into Kubernetes concepts like Pods, Services, ReplicaSets, Deployments, and more — all from your local machine with the help of Minikube.


Top comments (4)
Pretty cool seeing it broken down this clear - I get way too lost usually when I see Kubernetes stuff.
Glad to help!
Nice! Cool post!
Thanks for viewing!