
MCP agents can now talk to real apps and actually get stuff done.
However, building an MCP agent can be complex. So many layers, models, memory, protocols and tools are involved.
In this guide, we will break it all down. You will learn what MCP is, the architecture of MCP Agents, all the frameworks out there and how to build your own MCP agent from scratch using the OpenAI SDK. I have also included practical examples with source code at the end.
Just the guide I wish I had when I started.
What is covered?
In a nutshell, we are covering these topics in detail.
- Introduction to MCP and its core components.
- The architecture of MCP Agents.
- All the frameworks & SDKs available to build MCP Agents.
- A step-by-step guide on how to build your first MCP Agent using OpenAI SDK.
- Some real-world examples with source code.
I will be using MCP servers from mcp.composio.dev as they are fully managed and come with built-in Auth.
We will be covering a lot so let's get started.
1. Introduction to MCP and its core components.
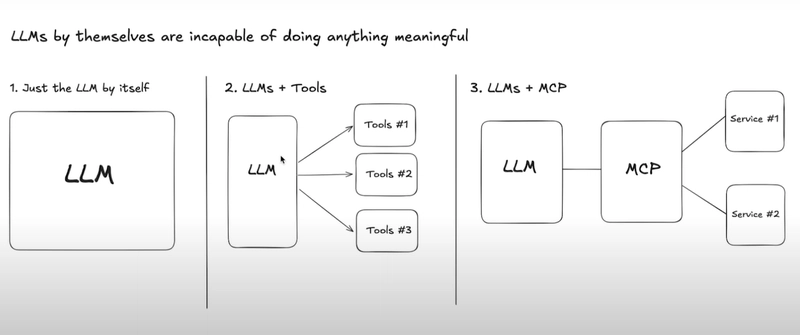
Model Context Protocol (MCP) is a new open protocol that standardizes how applications provide context and tools to LLMs.
Think of it as a universal connector for AI. MCP works as a plugin system for different MCP Clients (like Cursor, Claude, Windsurf), which allows you to extend the Agent’s capabilities by connecting it to various data sources and tools.
MCP helps you build agents and complex workflows on top of LLMs. For example, an MCP server for Obsidian helps AI assistants search and read notes from your Obsidian vault.
At its core, MCP follows a client-server architecture where a host application can connect to multiple servers.
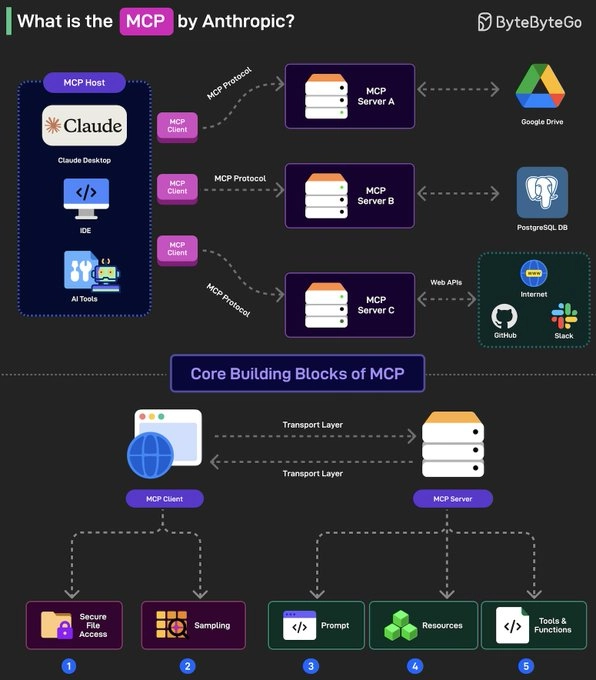
Core Components.
Here are the core components in any general MCP Server.
MCP hosts- apps like Claude Desktop, Cursor, Windsurf or AI tools that want to access data via MCP.MCP Clients- protocol clients that maintain 1:1 connections with MCP servers, acting as the communication bridge.MCP Servers- lightweight programs that each expose specific capabilities (like reading files, query databases...) through the standardized Model Context Protocol.Local Data Sources- files, databases and services on your computer that MCP servers can securely access. For instance, a browser automation MCP server needs access to your browser to work.Remote Services- External APIs and cloud-based systems that MCP servers can connect to.
If you're interested in reading about the architecture, check out official docs. It also covers protocol layers, connection lifecycle, and error handling with the overall implementation.
2. The architecture of MCP Agents.
MCP Agents are designed to reason, access tools, use memory and take action, all through the MCP protocol.
While MCP defines how apps and data sources connect to language models, MCP agents are the actual brains that can operate autonomously or interactively using the structure that MCP provides.
At a high level, an MCP agent is built on three layers:
1) Model Context Layer - the Brain
- The language model (LLM) is the brain of the agent.
- LLM (such as GPT-4, Claude) processes natural language requests
- Guided by
context(available tools/resources) andprompts(behavior instructions) - For example: "When editing calendar events, please check for time zone conflicts first"
2) Protocol Layer - the Nervous System
- This is how the agent senses and communicates with the outside world.
- Includes:
- MCP Clients as the communication bridge (Cursor, Claude Desktop)
- MCP Servers as connectors to specific tools (such as Gmail, Notion, Filesystem)
- Uses a standardized JSON-RPC interface for tool execution.
- Handles:
- Request/response coordination
- Authentication and access
- Error handling and retry logic
3) Runtime Layer - the Muscles
- This is the part that acts
- Execution environment for tools/APIs
- Maintains short-term state between actions (like draft messages, intermediate steps)
For example:
def send_email(recipient, body):
    # MCP server translates this to Gmail API calls
    gmail_service.users().messages().send(...)
In summary:
- The Brain thinks.
- The Nervous System connects and coordinates.
- The Muscles execute and act.
When an MCP agent starts, the client connects to servers to fetch available tools, resources, and prompts. Based on the user’s request, it selects what to show the model. When the model picks an action, the client executes it through the server, handling authorization and data flow along the way.
Each layer fits together to make the whole system work.
3. All the frameworks & SDKs available to build MCP Agents.
If you want to build your own MCP Agent, there are several frameworks and tools available to help you get started. Picking the right one depends on:
- Language or tech stack you are using.
- Whether you want a managed setup (easy to use, but less control) or self-hosted (more control, more setup) environment
- Whether it supports the apps you want to connect to out-of-the-box
Here are the most popular frameworks and SDKs that support MCP:
-
OpenAI Agents SDK - first-party support for building assistants using OpenAI’s platform. It includes built-in support for MCP via classes like
MCPServerStdioandMCPServerSse. This is a production-ready upgrade of their previous experimentation for agents (Swarm).
pip install openai-agents
- Composio With OpenAI - Lightweight SDK to integrate OpenAI agents with Composio managed MCP servers. Automatically handles tool registration, auth and communication.
pip install composio-openai openai
- mcp-agent by LastMile AI - simple, composable framework to build agents using MCP and simple workflow patterns. It also handles the complexity of managing the lifecycle of MCP server connections so you don't have to. And It implements OpenAI's Swarm pattern for multi-agent orchestration, but in a model-agnostic way.
pip install mcp-agent
-
MCP Python SDK - the official Python SDK implementing the full MCP specification. It provides server classes (like
FastMCP) for quickly creating MCP servers (defining tools, prompts, resources) and client classes to connect to servers.
pip install "mcp[cli]"
-
MCP TypeScript SDK - The official TypeScript/Node SDK implementing the full MCP specification. It lets you build MCP servers (using
McpServer) and MCP clients in JavaScript/TypeScript.
npm install @modelcontextprotocol/sdk
- Google ADK - Google's open-source Agent Development Kit (ADK) includes built-in support for MCP servers and tools. You can also integrate it with Google's multi-agent runtimes.
pip install google-adk
- CopilotKit MCP support - provides built-in integration for MCP with one command. You can turn your frontend into an MCP client that talks to any compliant MCP server. This allows your app to access shared toolsets, coordinate with external agents and plug into multi-agent workflows.
npx copilotkit@latest init -m MCP
- LangChain MCP Adapters - a lightweight wrapper that converts MCP tools into LangChain tools that can be used with LangGraph agents. Useful for integrating MCP tools into LangChain-based workflows.
pip install langchain-mcp-adapters
- Strands Agents SDK - An AWS open source SDK for building AI agents in a model-driven way. It has built-in MCP support. Supports Amazon Bedrock, Anthropic, LiteLLM, Llama, Ollama, OpenAI and custom providers.
pip install strands-agents strands-agents-tools
- fast-agent - a framework with complete, end-to-end tested MCP Feature support including Sampling. Both Anthropic (Haiku, Sonnet, Opus) and OpenAI models (gpt-4o/gpt-4.1 family, o1/o3 family) are supported.
fast-agent is multi-modal, supporting Images and PDFs for both Anthropic and OpenAI endpoints via Prompts, Resources and MCP Tool Call results.
pip install fast-agent-mcp
-
PraisonAI - a Python multi-agent framework that provides simplicity and low-code design. It provides one-line MCP integration (via
MCP(...)in the API) for agents. Provides clear docs with code for connecting with external tools like Brave, GitHub, Perplexity, Slack.
pip install praisonaiagents mcp
- Semantic Kernel - Microsoft’s open source orchestration SDK for AI agents now includes support for MCP tools via an official adapter. You can register and call MCP tools from within your Semantic Kernel pipelines. A detailed step-by-step integration guide is available on the official blog.
pip install semantic-kernel
-
Vercel AI SDK - The AI SDK now supports the MCP to connect your applications to a growing ecosystem of tools and integrations. When you define
schemas, the client will only pull the explicitly defined tools, even if the server provides more tools.
import { experimental_createMCPClient as createMCPClient } from 'ai';
import { openai } from '@ai-sdk/openai';

const mcpClient = await createMCPClient({
  transport: {
    type: 'sse',
    url: 'https://my-server.com/sse',
  },
});

const response = await generateText({
  model: openai('gpt-4o'),
  tools: await mcpClient.tools(), // use MCP tools
  prompt: 'Find products under $100',
});
There are other options like Agent-MCP but since they don't have a lot of stars (which builds credibility), I've decided to not include these.
You can also use MCP Clients like Cursor, Claude Desktop, Windsurf, Cline, Witsy to integrate MCP Servers. If you're interested in finding more, check the official list of 20+ MCP Clients.
4. A step-by-step guide on how to build your first MCP Agent using OpenAI SDK.
The OpenAI Agents SDK is an official, open source framework released in March 2025 to help developers build robust, tool-using agents powered by OpenAI models. It provides first-party support for agent workflows like tool calls, memory management, streaming, retries and more.
You can also use adapters like composio_openai to have more control over your MCP ecosystem. This one lets OpenAI Agents SDK clients talk to MCP-compliant servers, allowing you to:
⚡ Connect your OpenAI agent to tools available on any MCP server
⚡ Use tools from platforms like Composio Cloud right inside your agent
⚡ Keep using OpenAI’s agent runtime while also making it MCP-compatible
Let’s build it from scratch (with just OpenAI SDK).
Step 1: Prerequisites.
- Please ensure python 3.8 or higher is available in your system.
- You will need an OpenAI API key.
Step 2: Set up the project
Creating a virtual environment means setting up an isolated space for your Python project where all dependencies are installed locally (and not system-wide). This avoids version conflicts and keeps your global Python installation clean.
Creating a virtual environment is not strictly required, but is highly recommended. So let's create one.
# macOS / Linux:
python3 -m venv env  # creates a folder called 'env' with a local Python setup
source env/bin/activate  # activates that environment

# Windows:
python -m venv env    # same as above
.\env\Scripts\activate  # activates it (Windows PowerShell / CMD)
You will know it’s active when you see (env) at the beginning of your terminal prompt.

Here is the project structure that we are going to follow.
mcp-openai-agent/
├── agent.py                 # Defines the OpenAI agent with tool usage
├── run_agent.py             # Entry point to run your agent
├── requirements.txt         # Python dependencies
├── .env                     # API keys and config
└── README.md
Step 3: Install required packages and set API Key
We will need two main packages:
-
openai-agents: The official OpenAI SDK for building tool-using agents with memory, function calling, retries and streaming. -
python-dotenv: Loads environment variables from a.envfile into Python, useful for managing API keys and secrets.
Use the following command to install these.
pip install openai-agents python-dotenv
After installing your dependencies, run:
pip freeze > requirements.txt
This writes all installed packages in your virtual environment (with versions) into requirements.txt. You can then use this file later with:
pip install -r requirements.txt
For reference, please add a .gitignore in the root directory to avoid pushing the virtual environment directory and the .env file.
Add your OpenAI API key in the .env file. This will be the naming convention.
OPENAI_API_KEY=api_key_value

Step 4: Getting MCP Server URL
We will use Composio for the MCP servers since they have built-in auth. You can find the list at mcp.composio.dev.
⚡ Built-in Auth comes with support for OAuth, API keys, JWT and Basic Auth. This means you don't have to create your own login system.
⚡ Fully managed servers eliminate the need for complex setups, making it easy to integrate AI agents with 250+ tools like Gmail, Slack, Notion, Linear and more.
⚡ Can operate locally or remotely depending on your configuration needs.

With each of the options, you will find the total active users, its current version, how recently it was updated and all the available actions.
You will find instructions to install it using TypeScript, Python and it supports Claude (MacOS), Windsurf (MacOS) and Cursor as MCP hosts.
We will be using this URL in the next step.
Step 5: Building the Agent
Let's write the main agent code in agent.py. We will set up an OpenAI based agent that connects to an external tool (MCP server) and returns both the agent as well as server instance.
import os
import openai
from agents import Agent
from agents.mcp import MCPServerSse
from dotenv import load_dotenv

load_dotenv()

openai.api_key = os.getenv("OPENAI_API_KEY")

TOOL_URL = os.getenv("MCP_TOOL_URL")

# return openai agent connected to mcp tool
def build_agent():
    mcp_server = MCPServerSse({"url": TOOL_URL})

    agent = Agent(
        name="GitHub Agent",
        instructions="You help the user manage GitHub by creating issues, updating repos, and handling PRs using the connected GitHub tool.",
        mcp_servers=[mcp_server],
    )

    return agent, mcp_server
Here's a simple explanation of the above code:
MCPServerSse({"url": TOOL_URL}): Connects to the MCP tool using Server-Sent Events (SSE) using the provided URL.-
Agent(...): Instantiates an agent with:- A name (
"MCP Agent") - Instructions for behavior (helping the user)
- A list of
mcp_serversit can use (in this case, just one).
- A name (
The
build_agentfunction returns both the agent and the MCP server instance.
You need to add the MCP Tool URL from Composio in the .env. It will look something like this.
MCP_TOOL_URL=https://mcp.composio.dev/<tool>/sse?customerId=xyz

// for example
MCP_TOOL_URL=https://mcp.composio.dev/github/sse?customerId=xyz
I'm using the GitHub server as an example. You can choose any other.

Let's add the code to run_agent.py. This serves as the main entry point to run our MCP agent.
import asyncio
from agent import build_agent
from agents import Runner

# main task with the use case
TASK = "Create an issue in the repository 'Anmol-Baranwal/mcp-agents' with the title 'Feat: MCP Server Implemented' and body 'just testing stuff.'"
async def main():
    agent, mcp_server = build_agent()

    try:
        await mcp_server.connect()

        result = await Runner.run(agent, TASK)

        print("✅ Final Output:\n", result.final_output)

    finally:
        await mcp_server.cleanup()

if __name__ == "__main__":
    asyncio.run(main())
Here’s what each part of the code is doing:
async def main(): the whole agent loop is run asynchronously.agent, mcp_server = build_agent(): calls the function fromagent.py.await mcp_server.connect(): creates a live connection with the MCP tool server.-
await Runner.run(agent, TASK): this is where the agent starts reasoning and using tools.- Sends the task + context to the LLM (such as GPT-4).
- Lets the model decide which tool(s) to call.
- Handles retries, tool calls and intermediate steps.
result.final_output: once the agent completes the task, this is the final response. You can log it, return it from an API or plug it into your app.await mcp_server.cleanup(): this ensures the MCP connection is gracefully closed.
Step 6: Final output
In the run_agent.py, I've asked it to "create an issue in the repository Anmol-Baranwal/mcp-agents with the title 'Feat: MCP Server Implemented' and body 'just testing stuff.'
Since there is no active connection, it will first establish one. You will need to authenticate by copying the OAuth URL in the browser.

You can adjust the instructions to check if the connection is established. Then re-run the agent to complete the task. Make sure the repository is public otherwise, it will not be able to create the issue due to lack of permissions.


Yay! 🎉 You have successfully created an MCP Agent from scratch.
Once the GitHub tool is connected and authenticated through Composio, you can ask the agent to create GitHub issues, update repository descriptions or metadata, or even assist with pull requests and dev workflows.
I've tried several different ways and it worked every single time.

In the next section, we will build two useful MCP agents, each with a different framework.
5. Some real-world examples with source code.
While OpenAI works really well, there are other frameworks as well. Here are two practical examples of building MCP agents, the first one using Agent-MCP and the other using the OpenAI SDK.
✅ MCP-Agent: Look up a file, read a blog and write a tweet
We will be using mcp-agent which is a composable framework to build agents using MCP and simple workflow patterns.
It also handles the complexity of managing the lifecycle of MCP server connections and implements OpenAI's Swarm pattern for multi-agent orchestration, in a model-agnostic way.
It is also the most lightweight and is closer to an agent pattern library than a framework. In short, you can build any kind of AI application: multi-agent collaborative workflows, human-in-the-loop workflows, RAG pipelines and more.
You can install it by using uv (recommended) or pip.
uv add "mcp-agent"

# OR
pip install mcp-agent

Here's an example agent that summarizes a blog post into a tweet. The servers are included in the repo, so you will need to clone it. You will need to add OpenAI API key and Anthropic API key in mcp_agent.secrets.yaml under mcp-agent\examples\basic\mcp_basic_agent.
import asyncio
import os

from mcp_agent.app import MCPApp
from mcp_agent.agents.agent import Agent
from mcp_agent.workflows.llm.augmented_llm_openai import OpenAIAugmentedLLM

app = MCPApp(name="hello_world_agent")

async def example_usage():
    async with app.run() as mcp_agent_app:
        logger = mcp_agent_app.logger
        # This agent can read the filesystem or fetch URLs
        finder_agent = Agent(
            name="finder",
            instruction="You can read local files or fetch URLs.
                Return the requested information when asked.",
            server_names=["fetch", "filesystem"], # MCP servers this Agent can use
        )

        async with finder_agent:
            # Automatically initializes the MCP servers and adds their tools for LLM use
            tools = await finder_agent.list_tools()
            logger.info(f"Tools available:", data=tools)

            # Attach an OpenAI LLM to the agent (defaults to GPT-4o)
            llm = await finder_agent.attach_llm(OpenAIAugmentedLLM)

            # This will perform a file lookup and read using the filesystem server
            result = await llm.generate_str(
                message="Show me what's in README.md verbatim"
            )
            logger.info(f"README.md contents: {result}")

            # Uses the fetch server to fetch the content from URL
            result = await llm.generate_str(
                message="Print the first two paragraphs from https://www.anthropic.com/research/building-effective-agents"
            )
            logger.info(f"Blog intro: {result}")

            # Multi-turn interactions by default
            result = await llm.generate_str("Summarize that in a 128-char tweet")
            logger.info(f"Tweet: {result}")

if __name__ == "__main__":
    asyncio.run(example_usage())
Here's a brief explanation of the above code.
MCPAppmanages the overall MCP environment.OpenAIAugmentedLLMintegrates an OpenAI model to interpret instructions and interact with the tools.-
Defines an agent named
finder:- The agent can access two MCP servers:
fetch(for fetching web content) andfilesystem(for reading local files). - It follows instructions to read files or fetch URLs and return information.
- The agent can access two MCP servers:
-
Runs the agent asynchronously:
- Initializes the MCP servers automatically.
- Lists the available tools (servers) and logs them.
- Attaches an OpenAI-powered LLM (default GPT-4o) to the agent.
-
Uses the agent to perform tasks:
- Reads the content of a local file
README.md. - Fetches and extracts the first two paragraphs from a blog URL.
- Summarize that blog content into a short tweet.
- Reads the content of a local file
Logs output of each step for review.

You can also use mcp_agent.config.yaml, which you can check in the quickstart section.
I just kept it simple for the sake of this blog.

✅ OpenAI SDK: Send an email using the MCP server
You will need to generate the SSE URL from Composio Gmail MCP server. Let's create an agent that can send emails using OpenAI SDK.
import asyncio
import os
from dotenv import load_dotenv
import openai
from agents import Agent, Runner
from agents.mcp import MCPServerSse

# Load environment variables from the .env file
load_dotenv()

# Set OpenAI API key from .env
openai.api_key = os.getenv("OPENAI_API_KEY")

# MCP tool URL (replace with your actual Notion tool URL from step 4.3)
TOOL_URL = os.getenv("MCP_TOOL_URL")

async def main():
    gmail_server = MCPServerSse({"url": TOOL_URL})
    try:
        await gmail_server.connect()

        agent = Agent(
            name="Gmail Agent",
            instructions="You help the user manage their emails using the connected Gmail tool.",
            mcp_servers=[gmail_server]
        )

        # 🔁 You can change the page title and content to suit your project or workflow
        task = "send an email to [email protected] with subject 'Hello from MCP Agent' and body 'This is a test email sent via the Gmail MCP server.'"
        result = await Runner.run(agent, task)
        print(result.final_output)

    finally:
        await gmail_server.cleanup()

if __name__ == "__main__":
    asyncio.run(main())
The structure is very similar to the main example we discussed in the previous section.
You need to authorize the connection by pasting the OAuth URL in the browser, for the permissions to take action based on your prompt.


Once you've done that, the agent can go forward to sending the email by running the python run_agent.py.

As you can see, the email is successfully sent based on the prompt.

You can do much more exciting stuff like feting emails, replying to threads, searching people, list drafts or even getting info of contacts saved in google.
Using the OpenAI Agents SDK together with Composio, you can build smart agents that can take real action like updating Notion, sending emails via Gmail or creating issues on GitHub.
Composio handles the heavy lifting by providing pre-integrated tools, so there’s no need to mess with API setup or boilerplate code. Just connect the service, assign the task and let your agent do the work.
MCP is still evolving but the fundamental concept will be the same. As more edge cases are discovered, there will be more frameworks in the future.
I hope you found something valuable.
Go build something wild. Make it useful. And let the world see what's possible when workflows meet context.
Have a great day! Until next time :)
| You can check my work at anmolbaranwal.com. Thank you for reading! 🥰 |
|
|---|


Top comments (5)
Super clear overview! I’ve been looking for something like this that connects all the dots with actual code, not just concepts. Curious if you've run into any big roadblocks when mixing MCP with LangChain or Semantic Kernel?
thanks for reading! I didn't use all the frameworks, just OpenAI SDK & MCP Agent (by LastMile AI) as shown in the guide. You can check over reddit (which has detailed reviews).
Very helpful article.
Please, help me to understand, how agent knows server names and tools, as there were not any tools connected:
server_names=["fetch", "filesystem"], # MCP servers this Agent?Finally got a good complete one guide. Thanks a lot @anmolbaranwal
Appreciate it Yash. I'm sure frameworks will become better over time (at least in mcp compatibility) since it's still in early stages.
Some comments may only be visible to logged-in visitors. Sign in to view all comments.