- Details
- Written by Nam Ha Minh
- Last Updated on 11 April 2024 | Print Email
Throughout this Spring Boot tutorial, you will learn to implement login and logout (authentication) in a Spring Boot application. In other words, securing webpages in Java web applications based on Spring framework using Spring Security APIs. The credentials are stored in MySQL database, and Spring Data JPA with Hibernate is used for the data access layer. The view layer is based on Thymeleaf templates.We will secure an existing Spring Boot application, ProductManager – which is described in
this tutorial.
NOTE: The code examples in this article have been updated to Spring Boot 3.x, Spring Security 6.x and Thymeleaf 3.1.2.
1. Create users table
First, we need to create a table in MySQL database to store the credentials. Create the
users table with the following columns:
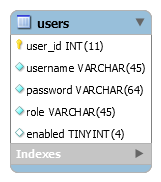
For MySQL script to create this table and insert dummy user details, refer to
this tutorial.
2. Declare dependencies
For Spring Data JPA and Hibernate, we need to declare the following dependency in Maven build file:
<dependency>
	<groupId>org.springframework.boot</groupId>
	<artifactId>spring-boot-starter-data-jpa</artifactId>
</dependency>
For Spring Security APIs:
<dependency>
	<groupId>org.springframework.boot</groupId>
	<artifactId>spring-boot-starter-security</artifactId>
</dependency>
For MySQL JDBC Driver:
<dependency>
	<groupId>mysql</groupId>
	<artifactId>mysql-connector-java</artifactId>
	<scope>runtime</scope>
</dependency>
We don’t specify version of these dependencies because Spring Boot already defines the default versions in the Spring Boot starter parent dependency.With Spring Boot 3.x, the dependency for MySQL JDBC driver has some changes as follows:
<dependency>
	<groupId>com.mysql</groupId>
	<artifactId>mysql-connector-j</artifactId>
	<scope>runtime</scope>
</dependency>
With Spring Security 6.x and Thymeleaf, update the dependency for Thymeleaf Extras Spring Security as follows:
<dependency>
	<groupId>org.thymeleaf.extras</groupId>
	<artifactId>thymeleaf-extras-springsecurity6</artifactId>
</dependency>
3. Configure data source properties
Next, we need to specify the database connection information in the
application.properties files as follows:
spring.jpa.hibernate.ddl-auto=none
spring.datasource.url=jdbc:mysql://localhost:3306/sales
spring.datasource.username=root
spring.datasource.password=password
Note that the first line tells Hibernate won’t create tables upon startup. Update URL, username and password according to your MySQL database.
4. Code User class
To use Spring Data JPA, we need to code a model class that maps with the
users table in the database. So create the
User class with the following code:
package net.codejava;

import javax.persistence.Column;
import javax.persistence.Entity;
import javax.persistence.GeneratedValue;
import javax.persistence.GenerationType;
import javax.persistence.Id;
import javax.persistence.Table;

@Entity
@Table(name = "users")
public class User {

	@Id
	@Column(name = "user_id")
	@GeneratedValue(strategy = GenerationType.IDENTITY)
	private Long id;

	private String username;
	private String password;
	private String role;
	private boolean enabled;

	// getters and setters are not shown for brevity

}
You see, this is a pretty simple model class annotated with JPA annotations. Its fields are mapped to columns of the table in database.
5. Code UserRepository class
Next, create the
UserRepository interface with the following code:
package net.codejava;

import org.springframework.data.jpa.repository.Query;
import org.springframework.data.repository.CrudRepository;
import org.springframework.data.repository.query.Param;

public interface UserRepository extends CrudRepository<User, Long> {

	@Query("SELECT u FROM User u WHERE u.username = :username")
	public User getUserByUsername(@Param("username") String username);
}
You see, this interface extends the
CrudRepository interface from Spring Data JPA. At runtime, Spring will generate implementation class that provides all CRUD operations.And we declare the
getUserByUsername() method with an embedded query to select user details by username. Note that this method returns a single
User object if username found, whereas the JPA’s convention method returns a
List collection. So we declare this method for convenience.
6. Implement UserDetails
Next, we need to create a class that implements the
UserDetails interface as required by Spring Security. So create the
MyUserDetails class with the following code:
package net.codejava;

import java.util.Arrays;
import java.util.Collection;

import org.springframework.security.core.GrantedAuthority;
import org.springframework.security.core.authority.SimpleGrantedAuthority;
import org.springframework.security.core.userdetails.UserDetails;

public class MyUserDetails implements UserDetails {

	private User user;

	public MyUserDetails(User user) {
		this.user = user;
	}

	@Override
	public Collection<? extends GrantedAuthority> getAuthorities() {
		SimpleGrantedAuthority authority = new SimpleGrantedAuthority(user.getRole());
		return Arrays.asList(authority);
	}

	@Override
	public String getPassword() {
		return user.getPassword();
	}

	@Override
	public String getUsername() {
		return user.getUsername();
	}

	@Override
	public boolean isAccountNonExpired() {
		return true;
	}

	@Override
	public boolean isAccountNonLocked() {
		return true;
	}

	@Override
	public boolean isCredentialsNonExpired() {
		return true;
	}

	@Override
	public boolean isEnabled() {
		return true;
	}

}
As you can see, this class wraps an instance of
User class, which is injected via constructor. And we override methods defined by the
UserDetails interface, to be used by Spring Security in authentication process.
7. Implement UserDetailsService
For Spring Security authentication using JPA and Hibernate, we need to implement the
UserDetailsService interface by the following class:
package net.codejava;

import org.springframework.beans.factory.annotation.Autowired;
import org.springframework.security.core.userdetails.UserDetails;
import org.springframework.security.core.userdetails.UserDetailsService;
import org.springframework.security.core.userdetails.UsernameNotFoundException;

public class UserDetailsServiceImpl implements UserDetailsService {

	@Autowired
	private UserRepository userRepository;

	@Override
	public UserDetails loadUserByUsername(String username)
			throws UsernameNotFoundException {
		User user = userRepository.getUserByUsername(username);

		if (user == null) {
			throw new UsernameNotFoundException("Could not find user");
		}

		return new MyUserDetails(user);
	}

}
You see, this class makes use of an implementation of
UserRepository, which will be created and injected by Spring Data JPA. And we override the
loadUserByUsername() method to authentication the users.
8. Configure authentication provider and HTTP security
Finally, we connect all the pieces together by coding a Spring Security configuration class
WebSecurityConfig with the following code:
package net.codejava;

import org.springframework.context.annotation.*;
import org.springframework.security.authentication.dao.*;
import org.springframework.security.config.annotation.authentication.builders.*;
import org.springframework.security.config.annotation.web.builders.*;
import org.springframework.security.config.annotation.web.configuration.*;
import org.springframework.security.core.userdetails.*;
import org.springframework.security.crypto.bcrypt.BCryptPasswordEncoder;

@Configuration
@EnableWebSecurity
public class WebSecurityConfig extends WebSecurityConfigurerAdapter {

	@Bean
	public UserDetailsService userDetailsService() {
		return new UserDetailsServiceImpl();
	}

	@Bean
	public BCryptPasswordEncoder passwordEncoder() {
		return new BCryptPasswordEncoder();
	}

	@Bean
	public DaoAuthenticationProvider authenticationProvider() {
		DaoAuthenticationProvider authProvider = new DaoAuthenticationProvider();
		authProvider.setUserDetailsService(userDetailsService());
		authProvider.setPasswordEncoder(passwordEncoder());

		return authProvider;
	}

	@Override
	protected void configure(AuthenticationManagerBuilder auth) throws Exception {
		auth.authenticationProvider(authenticationProvider());
	}

	@Override
	protected void configure(HttpSecurity http) throws Exception {
		http.authorizeRequests()
			.anyRequest().authenticated()
			.and()
			.formLogin().permitAll()
			.and()
			.logout().permitAll();
	}
}
Note that you must use the
@Configuration and
@EnableWebSecurity annotations for this class. To use Spring security with Spring Data JPA and Hibernate, we need to supply a
DaoAuthenticationProvider which requires
UserDetailsService and
PasswordEncoder.And in the
configure(HttpSecurity) method, we specify that all requests must be authenticated (users must login), and use the default login and logout configuration provided by Spring Security. In case you want to use your own login page, refer to
this guide.
NOTES: If you're using Spring Boot 3.x with Spring Security 6.x, update the security configuration class as below:
package net.codejava;

import org.springframework.context.annotation.Bean;
import org.springframework.context.annotation.Configuration;
import org.springframework.security.authentication.dao.DaoAuthenticationProvider;
import org.springframework.security.config.annotation.web.builders.HttpSecurity;
import org.springframework.security.core.userdetails.UserDetailsService;
import org.springframework.security.crypto.bcrypt.BCryptPasswordEncoder;
import org.springframework.security.web.SecurityFilterChain;

@Configuration
public class WebSecurityConfig {

	@Bean
	public UserDetailsService userDetailsService() {
		return new UserDetailsServiceImpl();
	}

	@Bean
	public BCryptPasswordEncoder passwordEncoder() {
		return new BCryptPasswordEncoder();
	}

	@Bean
	public DaoAuthenticationProvider authenticationProvider() {
		DaoAuthenticationProvider authProvider = new DaoAuthenticationProvider();
		authProvider.setUserDetailsService(userDetailsService());
		authProvider.setPasswordEncoder(passwordEncoder());

		return authProvider;
	}

	@Bean
	SecurityFilterChain securityFilterChain(HttpSecurity http) throws Exception {
		http.authorizeHttpRequests(
				auth -> auth.anyRequest().authenticated())
			.formLogin(login -> login.permitAll())
			.logout(logout -> logout.permitAll())
		;

		return http.build();
	}

}
To display username of the logged-in user, insert the following line at the beginning of a Thymeleaf template file:
<h3 th:inline="text">Welcome [[${#httpServletRequest.remoteUser}]]</h3>If Thymeleaf 3.1.2 or newer is used, display username of the authenticated user as below:
<h3 th:inline="text">Welcome <span sec:authentication="principal.username"></span></h3>
And to show the Logout button:
<form th:action="@{/logout}" method="post">
	<input type="submit" value="Logout" />
</form>
That’s the configuration details for user authentication using Spring Security.
9. Test Login & Logout
Now you can test login and logout with two users
namhm (password
codejava) and
admin (password
nimda) – same as described in
this tutorial.To see the coding in action, watch the following video:
Conclusion:So far you have learned how to implement login and logout functions for a Spring application using Spring Security, Spring Data JPA, Hibernate and MySQL. And you’ve seen, Spring Security makes it easy to secure web pages in Java applications based on Spring framework. You can get the
sample code on GitHub, or download the sample project attached below.
Related Spring Security Tutorials:
Other Spring Boot Tutorials:
About the Author:
 Nam Ha Minh
 is certified Java programmer (SCJP and SCWCD). He began programming with Java back in the days of Java 1.4 and has been passionate about it ever since. You can connect with him on
Facebook and watch
his Java videos on YouTube.
Add comment
Comments
for the WebSecurityConfigurerAdapter Deprecated
donot have the access rights to the content 403 forbidden ,how to remove that error
i check everything is sure, but i get error Empty encoded password what can i do to fix this error ?