AI language models in VS Code
Visual Studio Code gives you access to multiple built-in language models, each optimized for different tasks. You can switch models for chat, inline suggestions, and utility tasks, and you can add more models by bringing your own API key.
For background on how language models work, their characteristics, and how to choose the right model, see Language models concepts.
Change the model for chat
Use the language model picker in the chat input field to change the model for chat conversations and code editing.
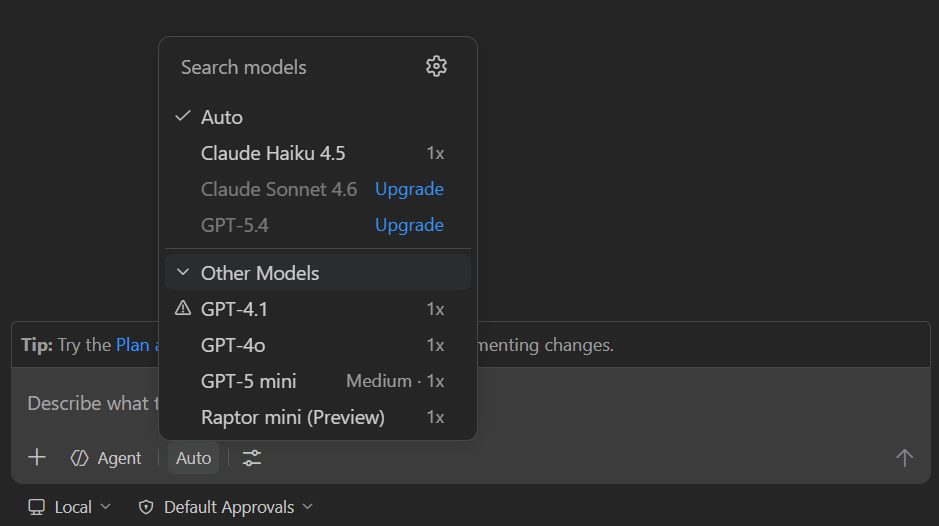
Different models have different strengths. Use a fast model for quick edits and simple questions, and a reasoning model for complex refactoring, architectural decisions, or multi-step tasks. Depending on the type of agent you are using, the list of available models might differ.
You can further extend the list of available models by using your own language model API key.
Install the AI Toolkit extension to add more language models to enhance GitHub Copilot capabilities.
For more information, see Change the chat model.
If you are a Copilot Business or Enterprise user, your administrator needs to enable certain models for your organization by opting in to Editor Preview Features in the Copilot policy settings on GitHub.com.
Configure thinking effort
Some models support configurable thinking effort, which controls how much reasoning the model applies to each request. For background on thinking and reasoning, see Thinking and reasoning.
By default, VS Code sets recommended effort levels and has adaptive reasoning enabled, where the model dynamically determines how much to think based on the complexity of each request. For most use cases, the defaults work well.
To configure the thinking effort:
-
Open the model picker in the chat input field and select a reasoning model.
-
Select the > arrow that appears next to the model name to open the Thinking Effort submenu.
NoteNon-reasoning models, such as GPT-4.1 and GPT-4o, do not show the thinking effort submenu.
-
Select an effort level.
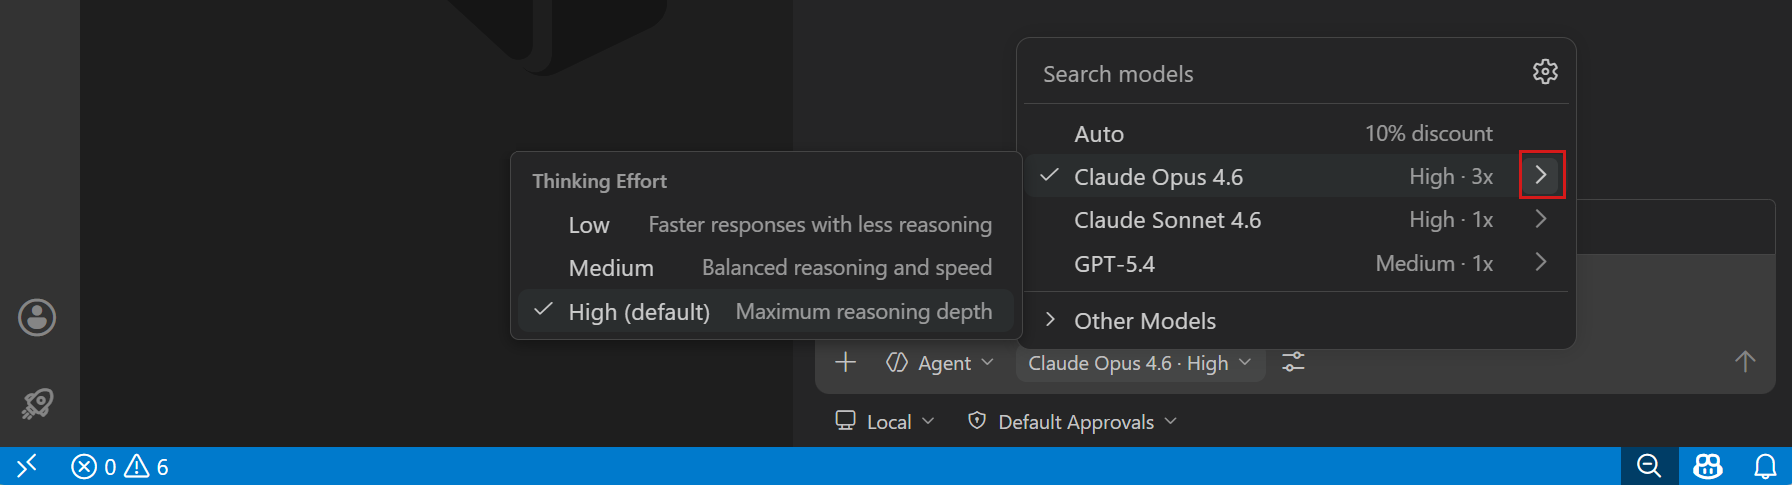
The model picker label updates to show the selected effort level, for example "Claude Sonnet 4.6 · High". The effort level persists across conversations for the same model.
The github.copilot.chat.anthropic.thinking.effort and github.copilot.chat.responsesApiReasoningEffort settings are deprecated. Configure thinking effort directly from the language model picker.
Use auto model selection
With auto model selection, VS Code evaluates task complexity and real-time model availability to route each request to the optimal model. For background on how auto model selection works, see Auto model selection.
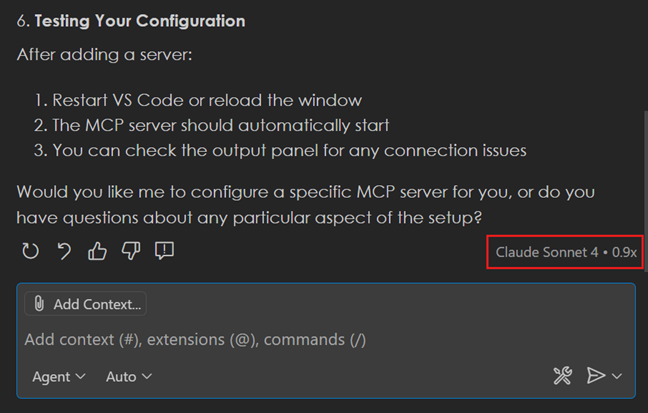
To use auto model selection, select Auto from the model picker in chat. You can see which model is used for generating a response by hovering over the chat response.
Starting April 20, 2026, new sign-ups for Copilot Pro, Copilot Pro+, and student plans are temporarily paused. Additionally, we are tightening weekly usage limits. If you hit a weekly limit and you have premium requests remaining, you can continue using Copilot with auto model selection. See GitHub Copilot usage limits.
Manage language models
You can use the language models editor to view all available models, choose which models are shown in the model picker, and add more models by adding from built-in providers or from extension-provided model providers.
To open the Language Models editor, open the model picker in the Chat view and select Manage Language Models (gear icon) or run the Chat: Manage Language Models command from the Command Palette. The Language Models editor opens by default in a modal overlay on top of the editor area.
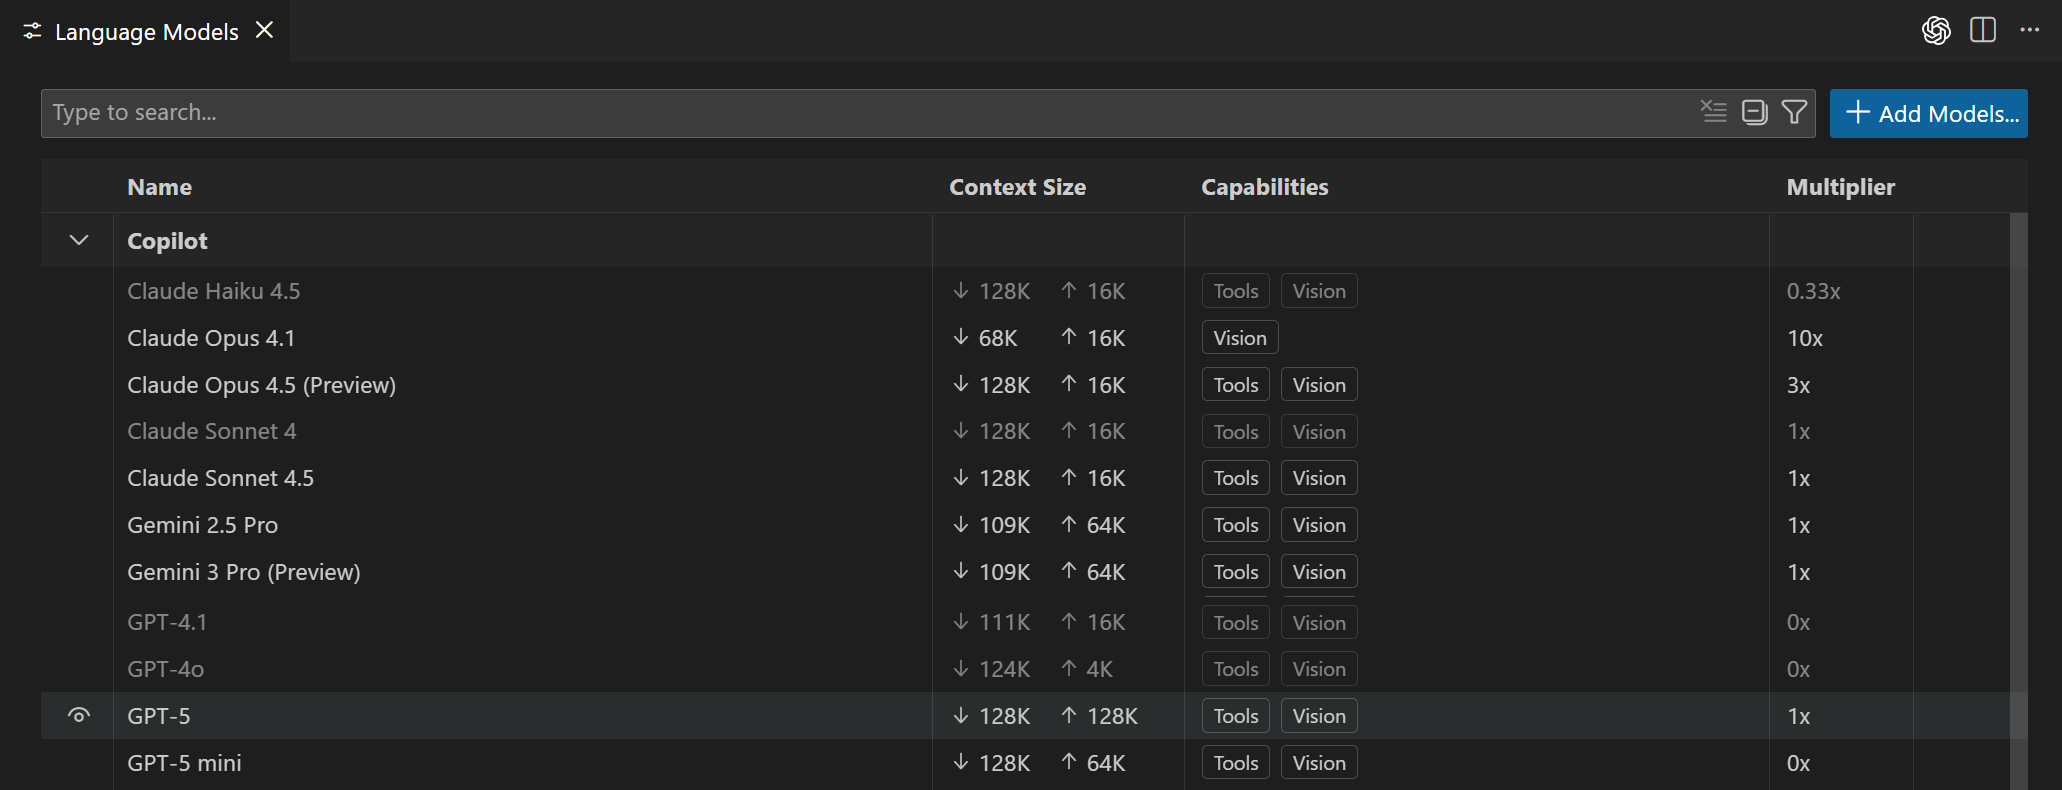
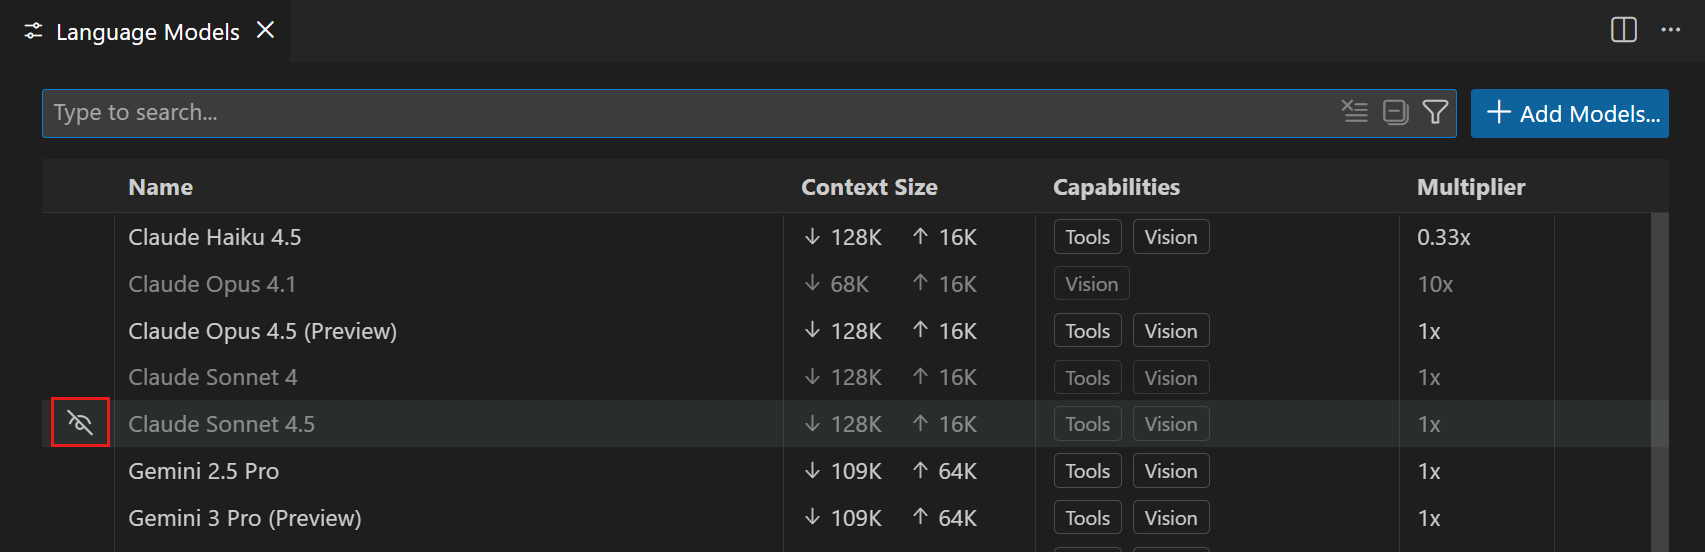
The editor lists all models available to you, showing key information such as the model capabilities, context size, billing details, and visibility status. By default, models are grouped by provider, but you can also group them by visibility.
You can search and filter models by using the following options:
- Text search with the search box
- Provider:
@provider:"OpenAI" - Capability:
@capability:tools,@capability:vision,@capability:agent - Visibility:
@visible:true/false
Customize the model picker
You can customize which models are shown in the model picker by changing the visibility status of models in the Language Models editor. You can show or hide models from any provider.
Hover over a model in the list and select the eye icon to show or hide the model in the model picker.
Pin favorite models
Pin models to keep them in a fixed position at the top of the model picker. Pinned models appear in a dedicated Pinned section and don't shift around as you use other models.
To pin or unpin a model:
-
Open the model picker in the chat input field.
-
Hover over a model and select the pin icon to add it to the Pinned section.
-
To unpin a model, hover over it in the Pinned section and select the unpin icon.
Bring your own language model key
If you want to use a model that is not available as a built-in model or want to control the model hosting, you can bring your own language model API key (BYOK) to use models from other providers or to run models locally. For background on why you might bring your own key and what to consider, see Bring your own language model key.
VS Code provides different options to add more language models:
| Option | When to use | Get started |
|---|---|---|
| Built-in providers | The provider you want is already listed (Azure, Anthropic, Gemini, OpenAI, and others) | Enter your API key for a known provider |
| Custom endpoint (Insiders) | You have a self-hosted, enterprise, or other endpoint that speaks Chat Completions, Responses, or Messages API | Point VS Code at any compatible URL |
| Extensions | A marketplace extension provides the model, for example AI Toolkit for local models | Install the extension and follow its setup |
You can also use these models to override the models used for utility tasks in VS Code (such as title generation and intent detection).
If you are a Copilot Business or Enterprise user, your administrator can disable the Bring Your Own Language Model Key in VS Code policy in the Copilot policy settings on GitHub.com. For more details, see the GitHub Copilot documentation.
Add a model from a built in provider
Pick from a set of common providers that are ready to use in VS Code. Depending on the provider, you need an API key and other configuration details like the endpoint URL.
To configure a language model from a built-in provider:
-
Open the Language Models editor by selecting Manage Language Models (gear icon) from the language model picker or via the Chat: Manage Language Models command from the Command Palette.
-
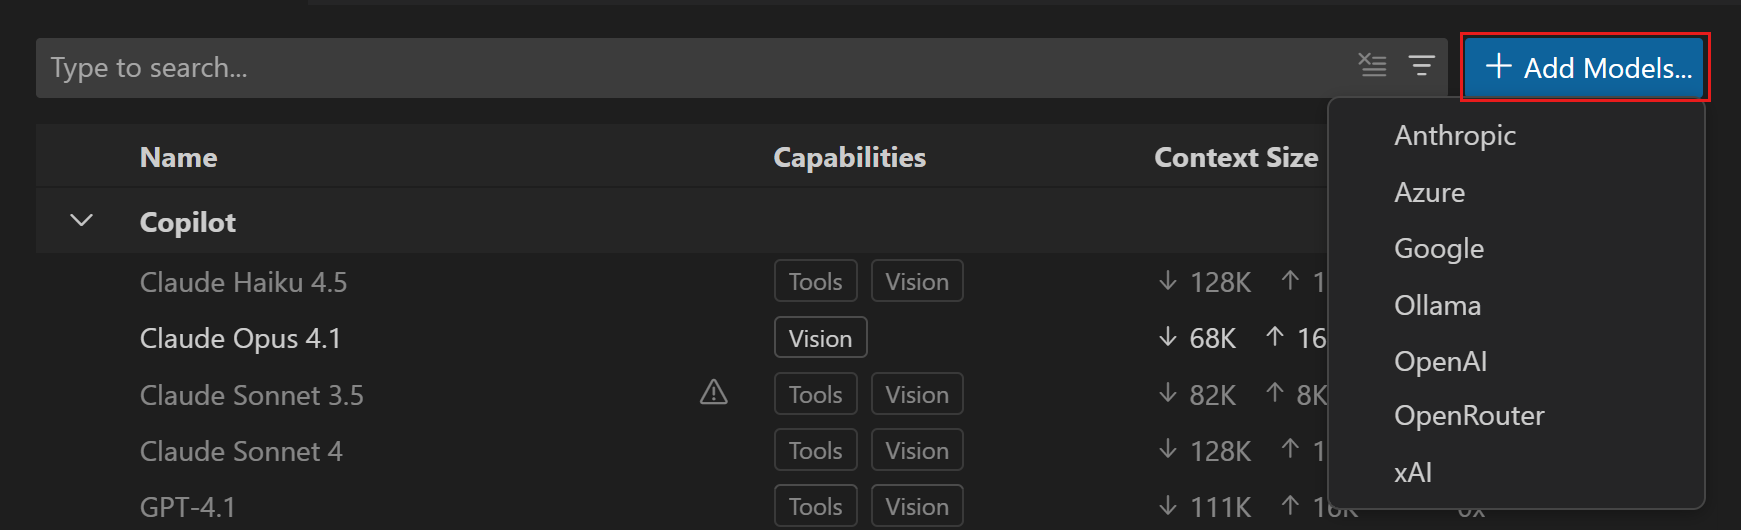
Select Add Models, and then select a model provider from the list.
-
Enter a group name for the models. This is the grouping label shown in the model picker and Language Models editor.
You can change the group name later from the Language Models editor if needed.
-
Enter the provider-specific details, such as the API key or endpoint URL.
-
If the provider requires additional configuration, VS Code opens a
chatLanguageModels.jsonfile where you can configure the provider and model details. See the Model configuration reference for details on the configuration properties.The following example shows an Azure OpenAI configuration that uses Entra ID authentication:
[ { "name": "Azure", "vendor": "azure", "models": [ { "id": "<my-deployment-name>", "name": "GPT-5.5", "url": "https://<my-endpoint>.openai.azure.com", "toolCalling": true, "vision": true, "maxInputTokens": 200000, "maxOutputTokens": 64000 } ] } ] -
After configuring the model, you can now select it from the model picker in chat.
For a model to be available when using agents in chat, it must support tool calling. If the model doesn't support tool calling, it won't be shown in the model picker.
Add a custom endpoint model
The Custom Endpoint provider is currently only available in VS Code Insiders. It replaces the deprecated OpenAI Compatible provider and supports additional API types. The github.copilot.chat.customOAIModels setting is deprecated.
The Custom Endpoint provider lets you connect any compatible API endpoint to chat in VS Code. It supports three API types, which you can select per model: Chat Completions, Responses, and Messages.
To add a model with the Custom Endpoint provider:
-
Open the Language Models editor by selecting Manage Language Models (gear icon) from the language model picker or via the Chat: Manage Language Models command from the Command Palette.
-
Select Add Models, and then select Custom Endpoint from the list.
-
Enter a group name for the models. This is the grouping label shown in the model picker and Language Models editor.
You can change the group name later from the Language Models editor if needed.
-
Enter a display name and API key for the endpoint.
-
Select the API type: Chat Completions, Responses, or Messages. Make sure the model supports this API type.
-
VS Code opens a
chatLanguageModels.jsonfile where you can configure the model details. Update the model properties and save the file. See the Model configuration reference for details on the configuration properties.The following example shows a Messages API configuration for an Anthropic endpoint:
[ { "name": "Anthropic", "vendor": "customendpoint", "apiKey": "YOUR_API_KEY", "apiType": "messages", "models": [ { "id": "claude-sonnet-4-6", "name": "Claude Sonnet 4.6", "url": "https://api.anthropic.com/v1/messages", "toolCalling": true, "vision": true, "maxInputTokens": 200000, "maxOutputTokens": 64000 } ] } ] -
After configuring the model, select it from the model picker in chat.
TipIf the model you added does not immediately appear in the model picker, restart VS Code.
Add a model provider extension
You can install extensions from the Visual Studio Marketplace that add language model providers to VS Code. These extensions can provide access to additional cloud-hosted or locally running models. For example, the Foundry Toolkit for VS Code extension provides access to Foundry's local and cloud-hosted models.
To add a model provider extension:
-
Open the Extensions view and search for
@tag:language-models. -
Select Install to install the extension, for example, Foundry Toolkit for VS Code.
-
Follow the extension's setup instructions to configure model access.
-
The extension's models appear in the model picker in chat and in the Language Model editor. If the models don't appear, reload VS Code.
Update model provider details
To update the details of a model provider you configured previously:
-
Select Manage Language Models (gear icon) from the language model picker in the Chat view or run the Chat: Manage Language Models command from the Command Palette.
-
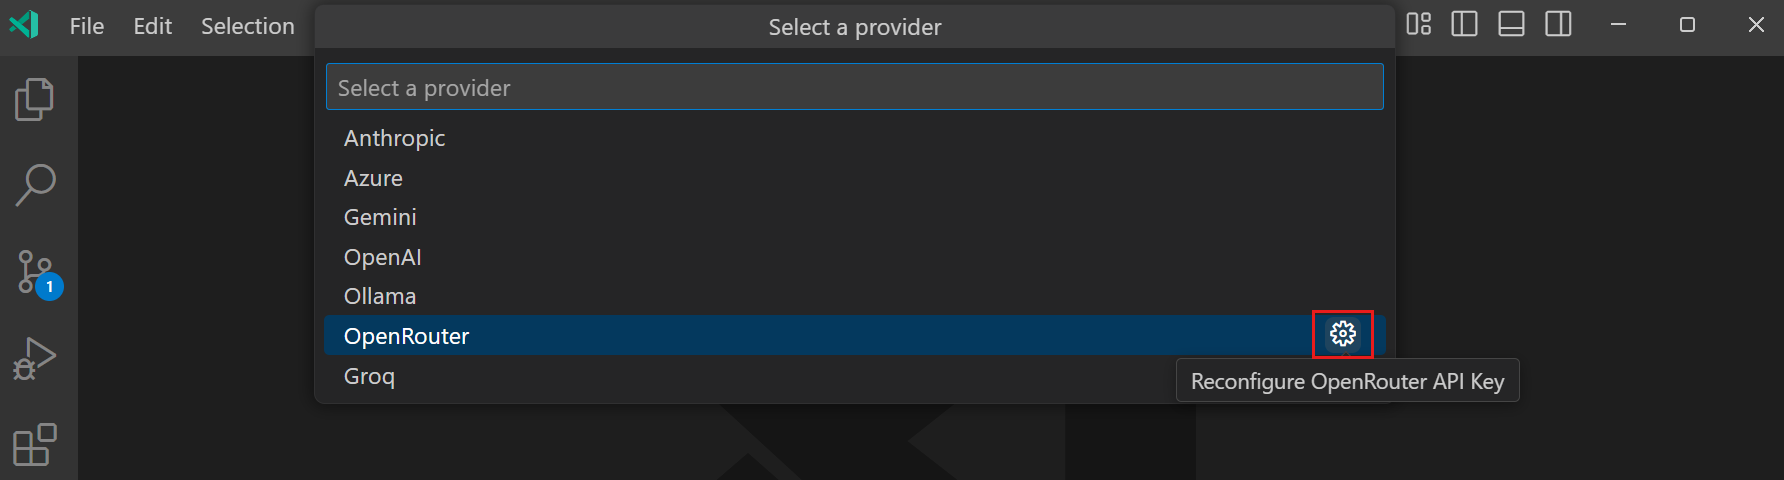
In the Language Models editor, select the gear icon next to the model provider you want to update.
-
Update the provider details, such as the API key or endpoint URL.
Configure models for other features
In addition to the main chat model, you can configure which model is used for inline chat, inline suggestions, and background utility tasks.
Change the model for inline chat
You can configure a default language model for editor inline chat. This enables you to use a different model for inline chat than for chat conversations.
To configure the default model for inline chat, use the inlineChat.defaultModel setting. The setting lists all available models from the model picker.
If you change the model during an inline chat session, the selection persists for the remainder of the session. After you reload VS Code, the model resets to the value specified in the inlineChat.defaultModel setting.
Change the model for inline suggestions
To change the language model that is used for generating inline suggestions in the editor:
-
Select Configure Inline Suggestions... from the Chat menu in the VS Code title bar.
-
Select Change Completions Model..., and then select one of the models from the list.
The models that are available for inline suggestions might evolve over time as we add support for more models.
Change the model for utility tasks
In addition to the main chat model, VS Code uses lightweight models in the background for utility tasks such as generating titles, creating commit messages, and detecting intent. By default, these tasks use built-in utility models provided by GitHub Copilot. You can override which model is used for these tasks with any available model, including BYOK and extension-provided models.
There are two settings for utility models, depending on the type of task:
- chat.utilityModel : Override the model used for general utility flows, such as generating titles and summaries, settings search, and Git review.
- chat.utilitySmallModel : Override the model used for fast, lightweight utility flows, such as commit messages, rename suggestions, branch name generation, prompt categorization, and intent detection. A fast and inexpensive model is recommended for this setting.
Both settings default to Default, which uses the built-in utility model from GitHub Copilot.
Model configuration reference
When you add BYOK model, you can configure the model properties in the chatLanguageModels.json file. The configuration has two levels: provider-level and model-level.
Depending on the provider, some provider and model properties might be required while others are optional. For example, some providers only require an API key and endpoint URL and discover the available models automatically, while others require you to specify the details for each model.
The provider-level properties include:
| Property | Description |
|---|---|
vendor |
The provider of the model, for example azure, openai, customendpoint |
name |
The display name (group name) of the provider shown in the UI. |
models |
(Optional) An array of model configurations provided by this provider. |
Each model in the models array supports the following properties:
| Property | Description |
|---|---|
id |
Model identifier sent to the API. For example, for Foundry this is the deployment name. |
name |
Display name shown in the model picker. |
url |
Full endpoint URL for the model. |
apiType |
(Optional) Override the API type per model (chat-completions, responses, or messages). Defaults to the provider-level apiType. |
toolCalling |
Set to true if the model supports tool calling. |
vision |
Set to true if the model supports image inputs. |
maxInputTokens |
Maximum number of input tokens the model accepts. |
maxOutputTokens |
Maximum number of output tokens the model generates. |
Frequently asked questions
How do I enable bring your own model key for Copilot Business or Copilot Enterprise?
If you are a Copilot Business or Enterprise user, your organization administrator must enable the Bring Your Own Language Model Key in VS Code policy in the Copilot policy settings on GitHub.com. After the policy is enabled, you can use your own API keys to add models, just like individual plan users. For more details, see the GitHub Copilot documentation.
Can I use locally hosted models with Copilot in VS Code?
You can use locally hosted models in chat by using bring your own model key (BYOK) and using a model provider that supports connecting to a local model. You have different options to connect to a local model:
- Use a built-in model provider that supports local models
- Install an extension from the Visual Studio Marketplace, for example, AI Toolkit for VS Code with Foundry Local
Currently, you cannot connect to a local model for inline suggestions. VS Code provides an extension API InlineCompletionItemProvider that enables extensions to contribute a custom completion provider. You can get started with our Inline Completions sample.
Currently, using a locally hosted model still requires the Copilot service for some tasks. Therefore, your GitHub account needs to have access to a Copilot plan (for example, Copilot Free) and you need to be online. This requirement might change in a future release.
Can I use a local model without an internet connection?
Currently, using a local model requires access to the Copilot service and therefore requires you to be online. This requirement might change in a future release.
Can I use a local model without a Copilot plan?
No, currently you need to have access to a Copilot plan (for example, Copilot Free) to use a local model. This requirement might change in a future release.