|
|
Introduction
This is the 5th part of this series, where I am going to explain to display database data in webgrid in asp.net MVCYou know, Dotnet awesome is a platform to learn, read and explore contents related to web development. Here in this series "Implement basic functionality in asp.net MVC application", I have explained how to create some very basic functionality like create a registration page, login page, file upload page etc., especially for beginners.
I have explained following articles in the series "Implement basic functionality in asp.net MVC application"
- How to create a User Registration page using asp.net mvc
- How to create a login page using asp.net mvc
- How to create career page with Upload file (CV) in MVC
- How to create Feedback page with cascade dropdownlist in MVC.
- How to display database data in webgrid in mvc
Steps :
Step - 1: Create New Project.
Go to File > New > Project > Select asp.net MVC4 web application > Entry Application Name > Click OK > Select Internet Application > Select view engine Razor > OKStep-2: Add a Database.
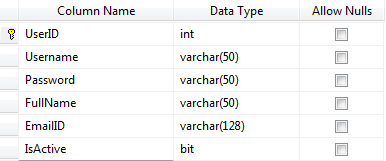
Go to Solution Explorer > Right Click on App_Data folder > Add > New item > Select SQL Server Database Under Data > Enter Database name > Add.Step-3: Create table for Get data.
Open Database > Right Click on Table > Add New Table > Add Columns > Save > Enter table name > Ok.
In this example, I have used one tables as below

Step-4: Add Entity Data Model.
Go to Solution Explorer > Right Click on Project name form Solution Explorer > Add > New item > Select ADO.net Entity Data Model under data > Enter model name > Add.A popup window will come (Entity Data Model Wizard) > Select Generate from database > Next >
Chose your data connection > select your database > next > Select tables > enter Model Namespace > Finish.
Step-5: Create a Controller.
Go to Solution Explorer > Right Click on Controllers folder form Solution Explorer > Add > Controller > Enter Controller name > Select Templete "empty MVC Controller"> Add.Here I have created a controller "UserController"
Step-6: Add new action into your controller for Get Method, which will get data from database
            namespace MVCSimpleWebgrid.Controllers
            {
                public class UserController : Controller
                {
                    //
                    // GET: /User/
                    public ActionResult List()
                    {
                        var users = new List<UserMaster>();
                        //here  MyDatabaseEntities is the dbcontext
                        using (MyDatabaseEntities dc = new MyDatabaseEntities())
                        {
                            users = dc.UserMasters.ToList();
                        }
                        return View(users);
                    }

                }
            }
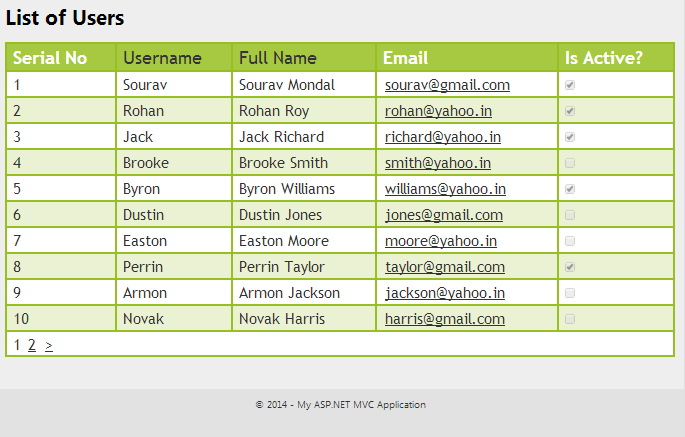
Step-7: Add view for your Action & design for show data in webgrid.
[N.B.: Before going to add view for your action, Please rebuild your application]Right Click on Action Method (here right click on List action) > Add View... > Enter View Name > Select View Engine (Razor) > Check "Create a strong-typed view" > Select your model class > Add.
HTML Code
            @model List<MVCSimpleWebgrid.UserMaster>
            @{
                ViewBag.Title = "List of users";
                var grid = new WebGrid(source:Model,canPage:true, rowsPerPage:10);
                grid.Pager(WebGridPagerModes.All);
            }

            <h2>List of Users</h2>

            <style type="text/css">
            /*Here we will add css for style webgrid*/
                .webgrid-table
                {
                    font-family: "Trebuchet MS" , Arial, Helvetica, sans-serif;
                    font-size: 1.2em;
                    width: 100%;
                    display: table;
                    border-collapse: separate;
                    border: solid 1px #98BF21;
                    background-color: white;
                }
                .webgrid-table td, th
                {
                    border: 1px solid #98BF21;
                    padding: 3px 7px 2px;
                }
                .webgrid-header
                {
                    background-color: #A7C942;
                    color: #FFFFFF;
                    padding-bottom: 4px;
                    padding-top: 5px;
                    text-align: left;
                }
                .webgrid-footer
                {
                }
                .webgrid-row-style
                {
                    padding: 3px 7px 2px;
                }
                .webgrid-alternating-row
                {
                    background-color: #EAF2D3;
                    padding: 3px 7px 2px;
                }
            </style>

            <div id="content">
                @grid.GetHtml(
                tableStyle:"webgrid-table",
                headerStyle:"webgrid-header",
                footerStyle:"webgrid-footer",
                alternatingRowStyle:"webgrid-alternating-row",
                rowStyle:"webgrid-row-style",
                columns:grid.Columns(
                    //here i will add column for serial no
                    grid.Column(header:"Serial No", format:@<text><div>@(item.WebGrid.Rows.IndexOf(item)+1)</div></text>),
                    grid.Column(columnName:"Username",header:"Username"),
                    grid.Column(columnName:"FullName", header:"Full Name"),
                    grid.Column(header:"Email", format:@<text><a href="mailto:@item.EmailID">@item.EmailID</a></text>),
                    grid.Column(header:"Is Active?", format:@<text><input type="checkbox" checked="@item.isActive" disabled="disabled" /></text>)
                    ))
            </div>
Step-8: Run Application.
Download Application Live Demo

