In React, events are actions that occur within an application, such as clicking a button, typing in a text field, or moving the mouse. React provides an efficient way to handle these actions using its event system. Event handlers like onClick, onChange, and onSubmit are used to capture and respond to these events.
Syntax
<element onEvent={handlerFunction} />- element: The JSX element where the event is triggered (e.g., <button>, <input>, etc.).
- onEvent: The event name in camelCase (e.g., onClick, onChange).
- handlerFunction: The function that handles the event when it occurs.
Now let's understand this with the help of an example
CSS
/*App.css*/

.App {
    text-align: center;
    margin-top: 50px;
    font-family: Arial, sans-serif;
}

h1 {
    color: #4CAF50;
    font-size: 2.5rem;
    margin-bottom: 20px;
}

h2 {
    font-size: 1.5rem;
    color: #333;
}

.input-field {
    padding: 10px;
    font-size: 16px;
    width: 250px;
    margin: 20px 0;
    border: 2px solid #ddd;
    border-radius: 5px;
    outline: none;
    transition: border 0.3s ease;
}

.input-field:focus {
    border-color: #4CAF50;
}

.save-button {
    padding: 10px 20px;
    font-size: 16px;
    background-color: #4CAF50;
    color: white;
    border: none;
    border-radius: 5px;
    cursor: pointer;
    transition: background-color 0.3s ease;
}

.save-button:hover {
    background-color: #45a049;
}

.save-button:active {
    background-color: #388e3c;
}
//App.js

import "./App.css";
import { useState } from "react";

function App() {
    const [inp, setINP] = useState("");
    const [name, setName] = useState("");

    const clk = () => {
        setName(inp);
        setINP("");
    };

    return (
        <div className="App">
            <h1>GeeksforGeeks</h1>
            {name ? <h2>Your Name: {name}</h2> : null}
            <input
                type="text"
                placeholder="Enter your name..."
                onChange={(e) => setINP(e.target.value)}
                value={inp}
            />
            <button onClick={clk}>Save</button>
        </div>
    );
}

export default App;
Output
 React Events
In this example
- The component uses useState to manage two states: inp for the input field’s value and name to store the user’s name once it’s submitted.
- The input field’s value is controlled by inp. When the user types, onChange updates inp with the current input.
- Clicking the “Save” button sets the name to the current input value and clears inp.
- If the name is set, it displays a message with the user’s name; otherwise, it shows only the input field and the button.
Commonly Used React Event Handlers
React provides a variety of built-in event handlers that we can use to handle different user interactions:
React Event | Description |
|---|
onClick | This event is used to detect mouse clicks in the user interface. |
|---|
onChange | This event is used to detect a change in the input field in the user interface. |
|---|
onSubmit | This event fires on the submission of a form in the user interface and is also used to prevent the default behavior of the form. |
|---|
onKeyDown | This event occurs when the user press any key from the keyboard. |
|---|
onKeyUp | This event occurs when the user releases any key from the keyboard. |
|---|
onMouseEnter | This event occurs when the ouse enters the boundary of the element |
|---|
Handling Events in React
1. Adding Event Handlers
In React, event handlers are added directly to elements via JSX attributes. React uses the camelCase convention for event names, which differs from the standard HTML event names (e.g., onClick instead of onclick).
JavaScript
import React, { Component } from 'react';

class App extends Component {
    constructor(props) {
        super(props);
        this.state = {
            message: 'Hello, welcome to React!',
        };

        this.handleClick = this.handleClick.bind(this);
    }


    handleClick() {

        this.setState({
            message: 'You clicked the button!',
        });
    }

    render() {
        return (
            <div>
                <h1>{this.state.message}</h1>
                {/* Add event handler to the button */}
                <button onClick={this.handleClick}>Click Me</button>
            </div>
        );
    }
}

export default App;
Output
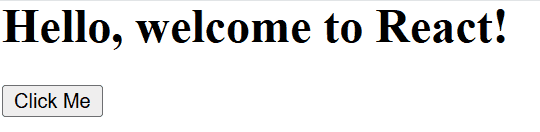 Adding Event Handlers
 2. Reading Props in Event Handlers
In React, event handlers often need access to the props passed from parent components. This is useful when the event handler needs to perform actions based on the data provided via props.
App.css
body {
    margin: 0;
    padding: 0;
    display: flex;
    align-items: flex-start;
    height: 100vh;
    background-color: #f0f0f0;
}

.parent-container {
    text-align: center;
}

.child-container {
    display: inline-block;
    margin-top: 20px;
    padding: 20px;
    background-color: #fff;
    border: 1px solid #ddd;
    box-shadow: 0 4px 8px rgba(0, 0, 0, 0.1);
}

button {
    padding: 10px 20px;
    background-color: #007BFF;
    color: white;
    border: none;
    cursor: pointer;
    font-size: 16px;
}

button:hover {
    background-color: #0056b3;
}
import React, { Component } from 'react';
import Child from './Child';
import './App.css';

class Parent extends Component {
    render() {
        return (
            <div className="parent-container">
                <h1>Parent Component</h1>
                <Child greeting="Hello from Parent!" />
            </div>
        );
    }
}

export default Parent;
import React, { Component } from 'react';

class Child extends Component {
    handleClick = () => {
        alert(this.props.greeting);
    };

    render() {
        return (
            <div className="child-container">
                <h2>Child Component</h2>
                <button onClick={this.handleClick}>Click to See Greeting</button>
            </div>
        );
    }
}

export default Child;
Output
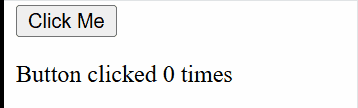
3. Passing Event Handlers as Props
Event handlers can be passed down to child components as props. This allows child components to communicate back to the parent and trigger actions in the parent when events occur.
App.js
import React, { Component } from 'react';
import Child from './Child';

class Parent extends Component {

    handleClick = () => {
        alert("Button clicked in Child component!");
    };

    render() {
        const containerStyle = {
            display: "flex",
            justifyContent: "center",
            alignItems: "flex-start",
            height: "100vh",
            margin: "0",
        };

        return (
            <div style={containerStyle}>
                <div>
                    <h1>Parent Component</h1>
                    {/* Passing the event handler as a prop to the Child component */}
                    <Child onClickHandler={this.handleClick} />
                </div>
            </div>
        );
    }
}

export default Parent;
import React from 'react';

function Child({ onClickHandler }) {
    const buttonStyle = {
        padding: "12px 24px",
        fontSize: "16px",
        color: "white",
        backgroundColor: "#007bff",
        border: "none",
        borderRadius: "4px",
        cursor: "pointer",
        transition: "background-color 0.3s",
    };

    const buttonHoverStyle = {
        backgroundColor: "#0056b3",
    };

    return (
        <div>
            <h2>Child Component</h2>
            {/* Button to call the event handler */}
            <button
                onClick={onClickHandler}
                style={buttonStyle}
                onMouseOver={(e) => (e.target.style.backgroundColor = buttonHoverStyle.backgroundColor)}
                onMouseOut={(e) => (e.target.style.backgroundColor = "#007bff")}
            >
                Click Me!
            </button>
        </div>
    );
}

export default Child;
Output
4. Naming Event Handler Props
In React, it’s common to name event handler props according to the event being handled. This helps in maintaining clarity and consistency in your codebase.
JavaScript
import React from "react";

function Button({ onClickHandler }) {
    return <button onClick={onClickHandler}>Click Me</button>;
}

function Parent() {
    const handleClick = () => {
        alert("Button clicked!");
    };

    return <Button onClickHandler={handleClick} />;
}

export default Parent;
Output
 Naming Event Handler Props
Event Propagation in React
In React, event propagation refers to the process where events are passed from the target element (the element where the event occurred) to its ancestors in the DOM. By default, React uses the bubbling phase of event propagation, meaning events propagate from the target element upwards through its ancestors (parent, grandparent, etc.) unless explicitly stopped.
JavaScript
import React from "react";

function Child() {
    const handleClick = (event) => {
        event.stopPropagation();
        alert("Child button clicked");
    };

    return <button onClick={handleClick}>Child Button</button>;
}

function Parent() {
    const handleClick = () => {
        alert("Parent div clicked");
    };

    return (
        <div
            onClick={handleClick}
            style={{ padding: "50px", backgroundColor: "lightgray" }}
        >
            <Child />
        </div>
    );
}

export default Parent;
Output
For more details follow this article => What is Event propagation, capturing, bubbling ?
Preventing Default Behavior in React Events
In React, event.preventDefault() is used to prevent the default behavior of events. This is useful when you want to handle an event in a custom way instead of relying on the browser's default behavior.
JavaScript
import React, { useState } from "react";

function SimpleForm() {
    const [name, setName] = useState("");

    const handleSubmit = (event) => {
        event.preventDefault();
        alert(`Form submitted with name: ${name}`);
    };

    return (
        <div style={styles.container}>
            <form onSubmit={handleSubmit} style={styles.form}>
                <input
                    type="text"
                    value={name}
                    onChange={(e) => setName(e.target.value)}
                    placeholder="Enter your name"
                    style={styles.input}
                />
                <button type="submit" style={styles.button}>
                    Submit
                </button>
            </form>
        </div>
    );
}

const styles = {
    container: {
        display: "flex",
        justifyContent: "center",
        alignItems: "flex-start", // Align items at the top
        height: "100vh", // Full viewport height
        backgroundColor: "#f0f0f0",
        paddingTop: "50px", // Added padding to center it towards top
    },
    form: {
        textAlign: "center",
        padding: "20px",
        backgroundColor: "white",
        borderRadius: "5px",
        boxShadow: "0 4px 8px rgba(0, 0, 0, 0.1)",
    },
    input: {
        padding: "10px",
        fontSize: "16px",
        marginBottom: "10px",
        borderRadius: "4px",
        border: "1px solid #ccc",
        width: "200px",
    },
    button: {
        padding: "10px 20px",
        fontSize: "16px",
        borderRadius: "4px",
        border: "1px solid #ccc",
        backgroundColor: "#4CAF50",
        color: "white",
        cursor: "pointer",
        marginTop: "20px",
    },
};

export default SimpleForm;
Output
Difference Between HTML DOM and React DOM
Feature | HTML DOM | React DOM |
|---|
Nature | Represents the structure of the HTML document. | Represents the virtual representation of the UI. |
Updates | Updates the actual DOM directly after every change. | Updates the virtual DOM first, then selectively updates the real DOM. |
Performance | Can lead to performance issues with frequent direct updates | Optimized performance using a virtual DOM and efficient reconciliation. |
Event Handling | Requires a full re-render of the page or element. | Events are attached to the virtual DOM and handled by React’s synthetic event system. |
Data Binding | Events are directly attached to DOM elements. | React uses state and props to manage and bind data between components. |
DOM Representation | The DOM is a tree structure where each element is a node. | React DOM uses a virtual DOM, a lightweight copy of the real DOM for efficient updates. |
Similar Reads
React Components In React, React components are independent, reusable building blocks in a React application that define what gets displayed on the UI. They accept inputs called props and return React elements describing the UI.In this article, we will explore the basics of React components, props, state, and render
4 min read
React Events Reference In React, events handle user actions like clicks, typing, and form submissions. React uses a synthetic event system that makes it easy to manage these events consistently across browsers. This guide will help you understand how React events work and how to use them in your applications.What are Reac
4 min read
ReactJS Examples This article contains a wide collection of React JS examples. These examples are categorized based on the topics, including components, props, hooks, and advanced topics in React. Many of these program examples contain multiple approaches to solve the respective problems.These React JS examples prov
5 min read
React Environment Setup To run any React application, we need to first setup a ReactJS Development Environment. In this article, we will show you a step-by-step guide to installing and configuring a working React development environment.We will discuss the following approaches to setup environment in React.Table of Content
3 min read
ReactJS Reactstrap Reactstrap is a React component library for Bootstrap. Reactstrap is a bootstrap-based React UI library that is used to make good-looking webpages with its seamless and easy-to-use component. Reactstrap does not embed its style, but it depends upon the Bootstrap CSS framework for its styles and them
2 min read