

Tutorial 8 - Tenth Yaay!
So I'm making  from
from  .
.
1. Prep your base (sharpen, crop etc etc).
2. As you can see, this picture is very blue, and the icon is very normal browny colour, so we need to change the Color Balance. I generally make this as a New Adjustment Layer (that way I can see my settings). (On PSP this option is located here.)
My settings as follows:
Midtones: 20 0 -20 (Unclick Preserve luminosity)
Highlights: 18 4 -11
Shadows: 26 0 -12
Click ok, and your base should now look like this --> (If it isn't blue you can miss this step.)
3. Ok, so that's kinda boring so make a copy of the base, paste on top of the adjustment layer then Desaturate it. Set that black and white layer to Screen. Now you look like this -->
4. Hide the new layer (the Screen layer) then Merge Visible. Copy that new layer (as in proper copy, not duplicate layer) then undo the Merge (so then you can see the color balance stuff). Make the Screen layer visible then paste the copied layer (above the now visible Screen layer), and set to Overlay. -->
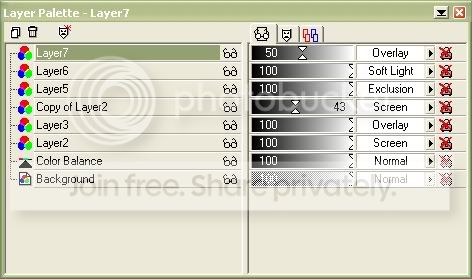
5. It's dark, but no worries. :D Duplicate the black and white layer and bring it to the top. It's already set to Screen but you need to change the Opacity to 43%. It washes the colour out a tad (and makes things easy on the eyes). -->
6. Now, make a new layer, and flood fill with #101256. Set to Exclusion (yes, that old trick), and watch the Tennant come through. -->
7. Copy the Overlay layer, bring to the top and set to Soft Light. It makes it look prettiful! :D -->
8. Now, you could leave it here, or you could add text. I added 'YAAY' in Arial Black in size 10 in the colour white. I put it where I wanted it, set to Overlay at 50% then Convert to Raster Layer. Add a Drop Shadow and you're done. -->
A screenshot of the layer palette:
Now, if you have any questions, comment or IM me or email me or something. Don't copy this tutorial step for step then pass on the icon as your own, otherwise Tenth will come at you with his screwdriver and make your head explode.
Rach xxx
from .1. Prep your base (sharpen, crop etc etc).
2. As you can see, this picture is very blue, and the icon is very normal browny colour, so we need to change the Color Balance. I generally make this as a New Adjustment Layer (that way I can see my settings). (On PSP this option is located here.)

My settings as follows:
Midtones: 20 0 -20 (Unclick Preserve luminosity)
Highlights: 18 4 -11
Shadows: 26 0 -12
Click ok, and your base should now look like this -->
(If it isn't blue you can miss this step.)3. Ok, so that's kinda boring so make a copy of the base, paste on top of the adjustment layer then Desaturate it. Set that black and white layer to Screen. Now you look like this -->
4. Hide the new layer (the Screen layer) then Merge Visible. Copy that new layer (as in proper copy, not duplicate layer) then undo the Merge (so then you can see the color balance stuff). Make the Screen layer visible then paste the copied layer (above the now visible Screen layer), and set to Overlay. -->
5. It's dark, but no worries. :D Duplicate the black and white layer and bring it to the top. It's already set to Screen but you need to change the Opacity to 43%. It washes the colour out a tad (and makes things easy on the eyes). -->
6. Now, make a new layer, and flood fill with #101256. Set to Exclusion (yes, that old trick), and watch the Tennant come through. -->
7. Copy the Overlay layer, bring to the top and set to Soft Light. It makes it look prettiful! :D -->
8. Now, you could leave it here, or you could add text. I added 'YAAY' in Arial Black in size 10 in the colour white. I put it where I wanted it, set to Overlay at 50% then Convert to Raster Layer. Add a Drop Shadow and you're done. -->
A screenshot of the layer palette:
Now, if you have any questions, comment or IM me or email me or something. Don't copy this tutorial step for step then pass on the icon as your own, otherwise Tenth will come at you with his screwdriver and make your head explode.
Rach xxx