


Tutorial: Animated Gif
Step by step, ooh, baby. I'm going to walk you through making a full-size of this giiiiiiif.

There are a lot of images after each cut. Fair warning.
So. There's a youtube clip that you want to make animations from. This is how I would do it. Step one (one, one)!
1. Download the clip. I used to use keepvid.com, but it's pretty much a giant hooker of late. That's where DH for Firefox saves me. It will save flv files from a website (doesn't work on Hulu, unless you want the advertisements).
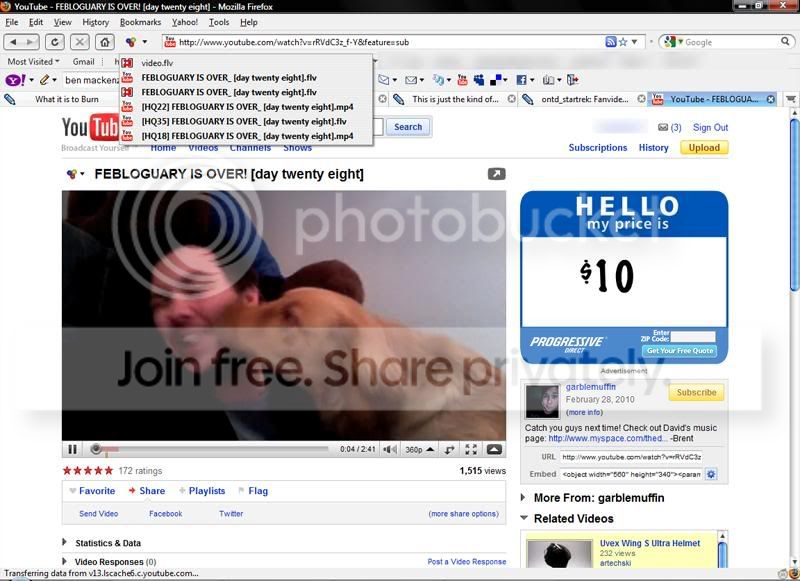
One click and you can see all the available files. I usually grab whatever flv looks the best, but you can hover over each and see what it is.
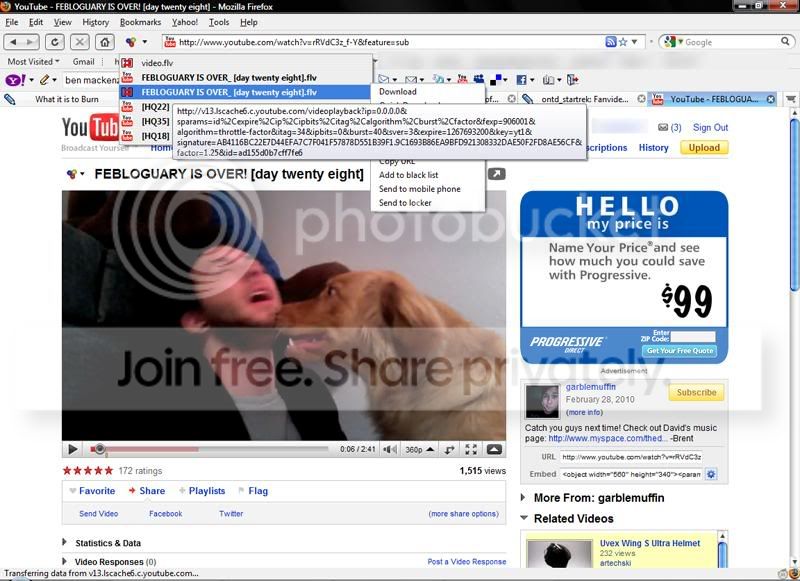
This link will download the ad. BOO.
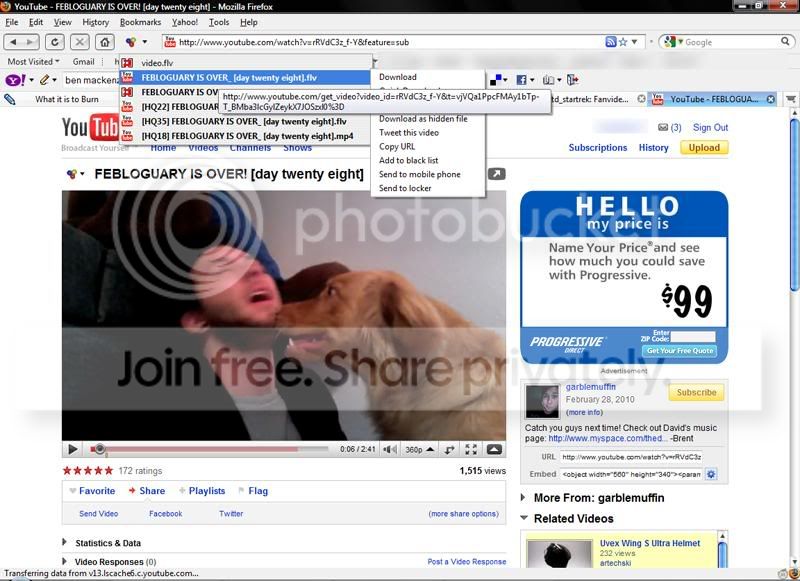
Oh, Internet magic. What won't you do?
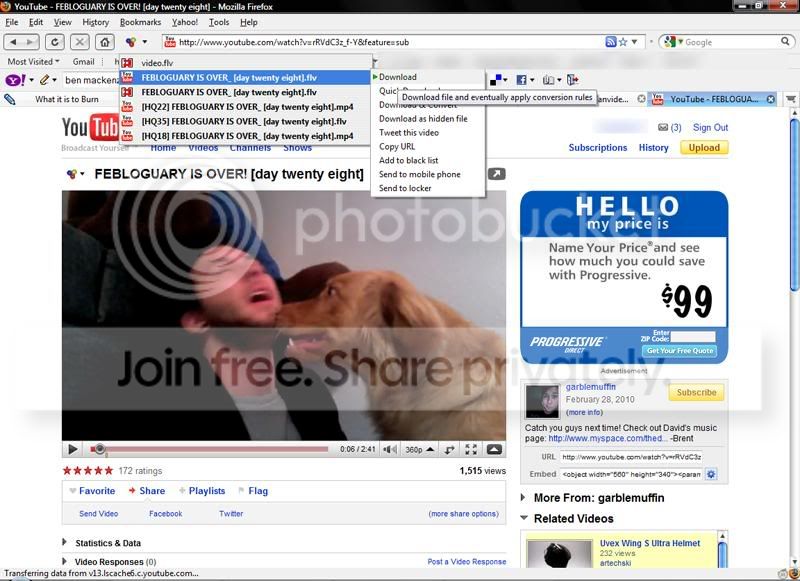
Click the download option for whatever file you want to save.
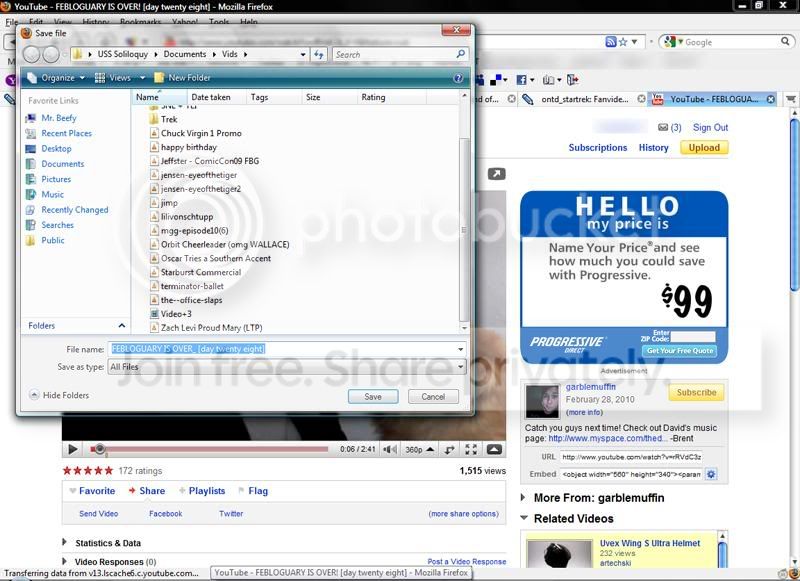
You should be able to just save it and then play it in VLC, but. You may want to add the .flv extension with All Files selected for the save-as type.
2. Screencap. If you've never used VLC before, it might be a good idea to enable hotkeys, or change the screencap hotkey. Shift ctrl eleven tab q is annoying. I literally just press "c". You can set them up to save as png files, and in specific folders if you want. All mine go into a general VLC caps folder.
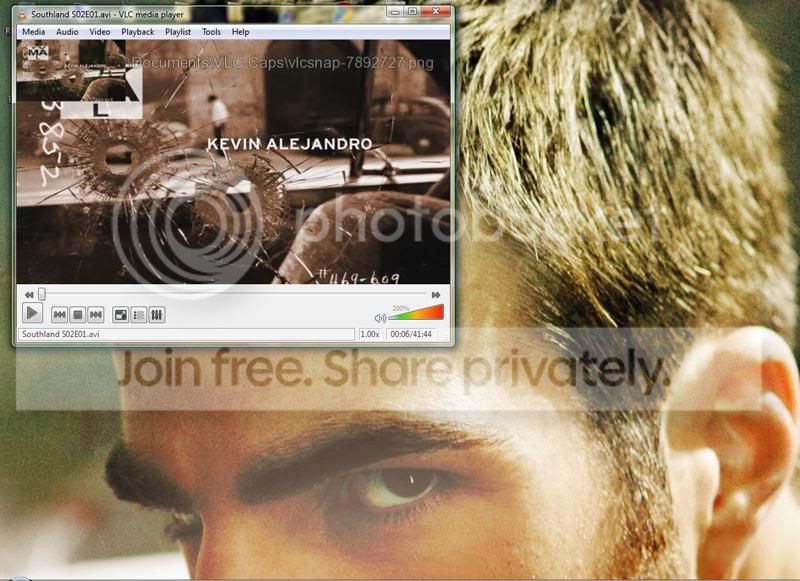
Sylar says hey.
If the scene is short and you're not getting all the caps you want, try slowing down the video.
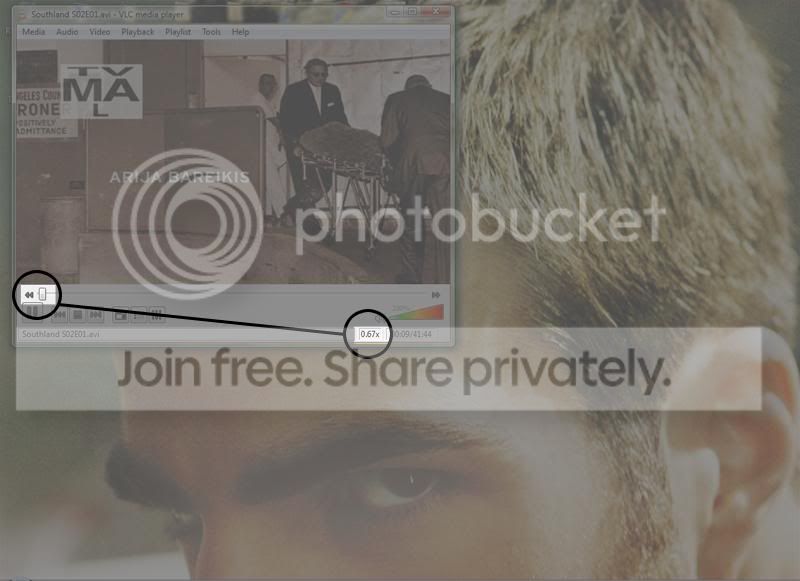
Once you have the seen capped and you're satisfied, it's time to animate. But first. But first. But first. But first. Chopping block. But first. If you had an episode and were just capping as you went along, you'll want to move the files into a separate folder. It's so much easier, believe me.
Go through and select what you want to animate, copy (or cut), paste to a specific, EMPTY, folder.
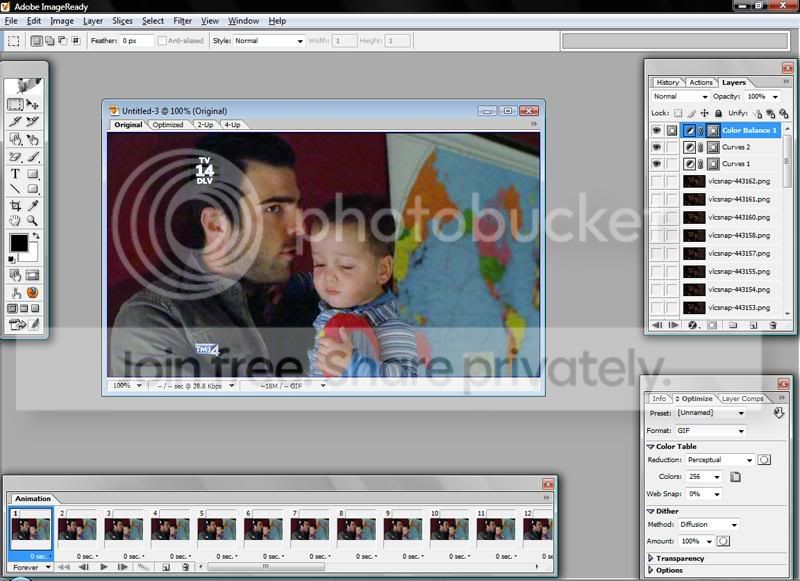
3. Animate. Open ImageReady. Go to File --> Import --> Folder as Frames.
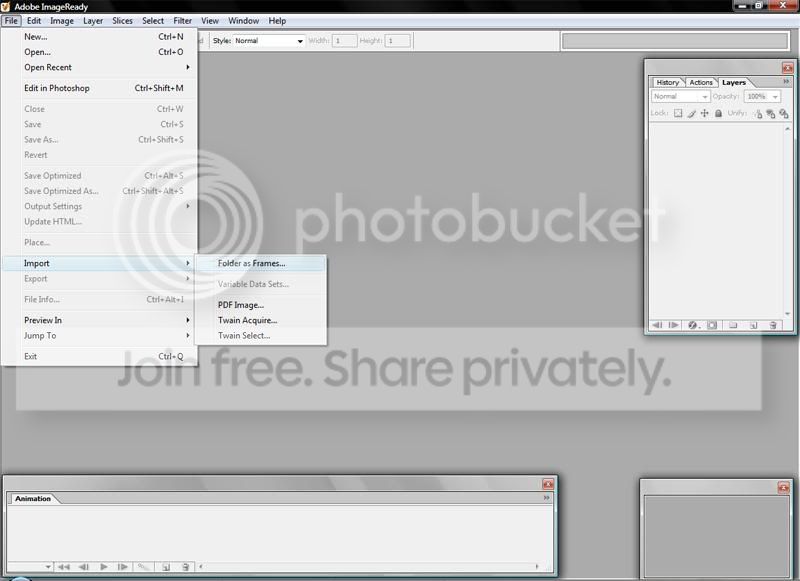
ImageReady may take some time to gather what it needs. It's probably just my computer being evil, though. Once the Browse for Folder window appears, go to wherever you pasted those screencaps.
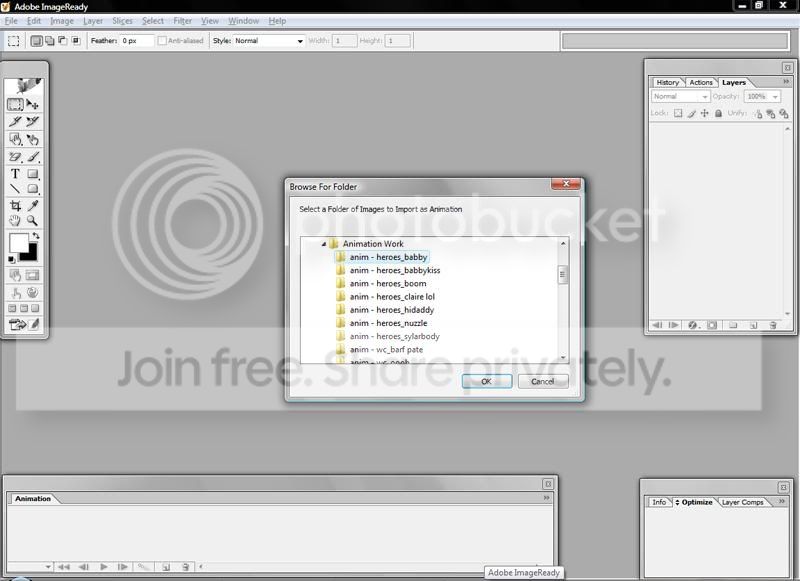
Click OK, and bam. I mean, bam! Folder imported as frames.
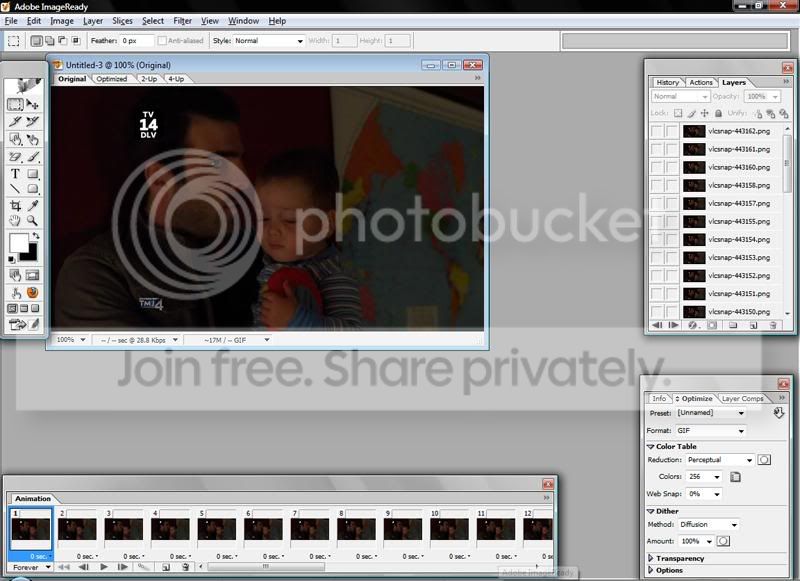
You could just save it and go as it is (for reference, it would look like this), or you could enhance the frames in some way. That's what I plan on doing. You can either go directly to Photoshop, or hide the frames.
3.a Hiding Frames:
Select the second frame through the last frame (shift clicks, shift clicks!)
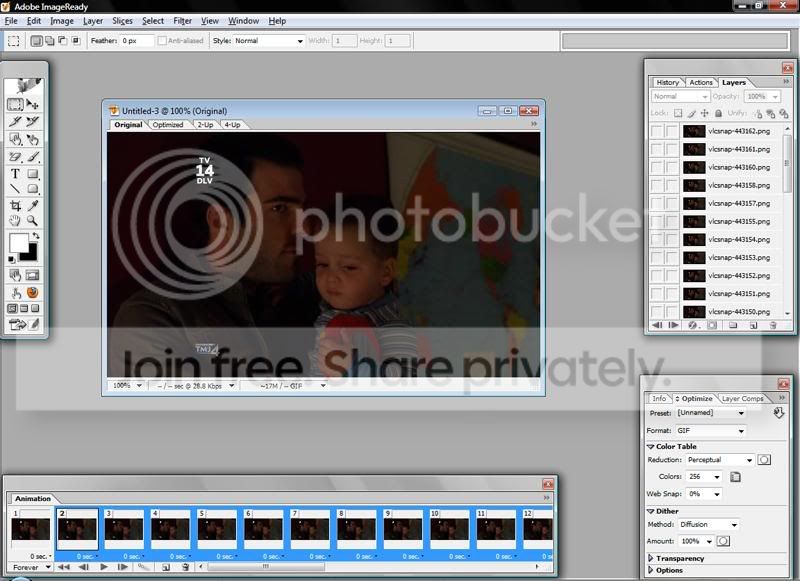
With those selected, click (don't let go!) and drag to the tiny trashcan icon.
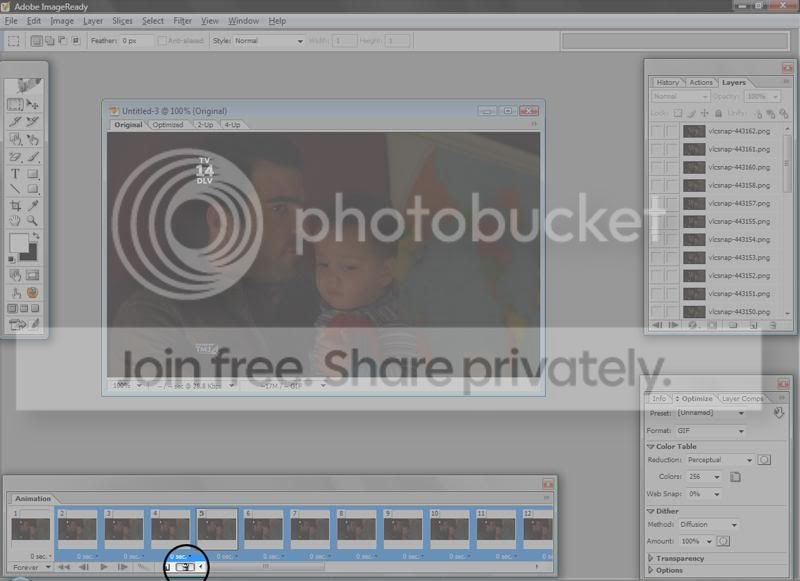
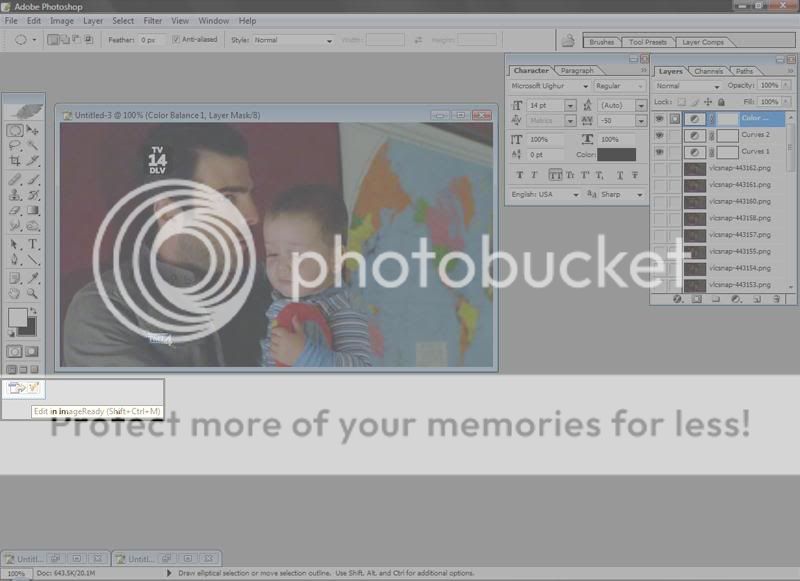
Now you have a one-frame animation area and it'll be easier to adjust layers in PS. Let's go there. You can press shift+ctrl+m or click the button.
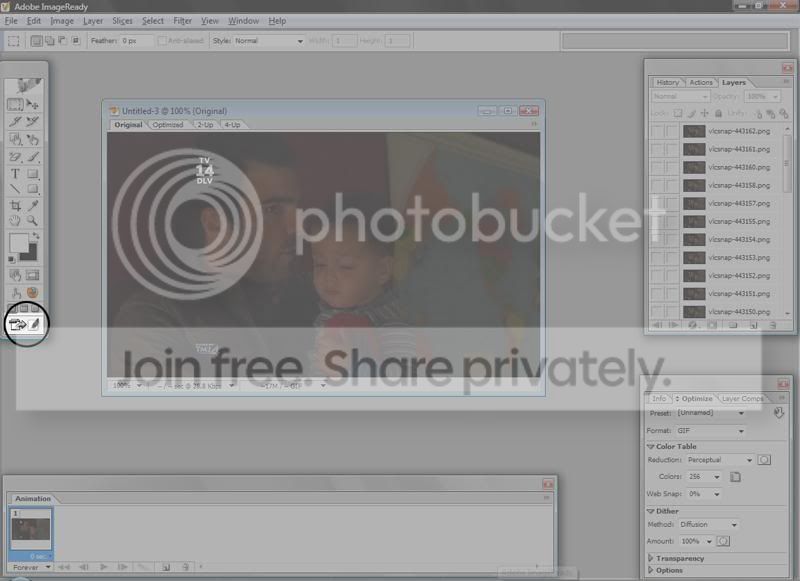
Either way, we're going to move the file.
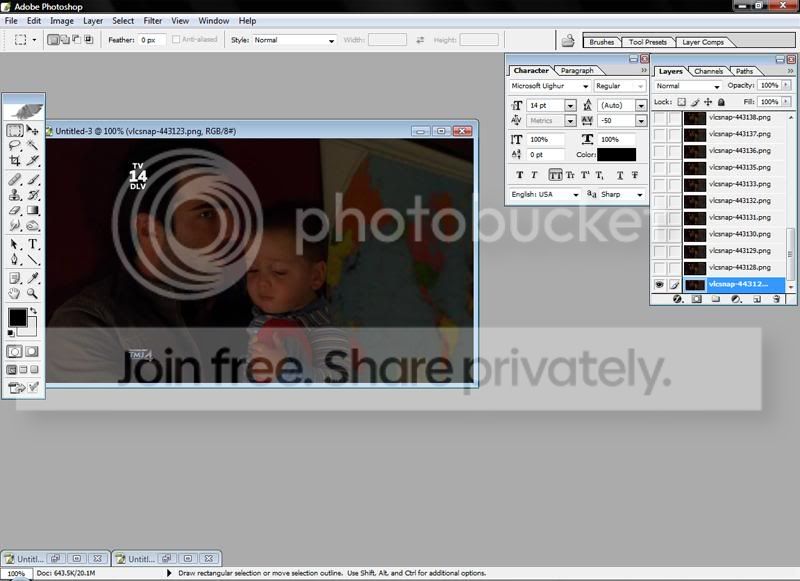
The file opens and you can see the layers like you normally would. What you want is to keep any image enhancements at the top. Scroll up and click the top-most layer, unselect the visiblity option.
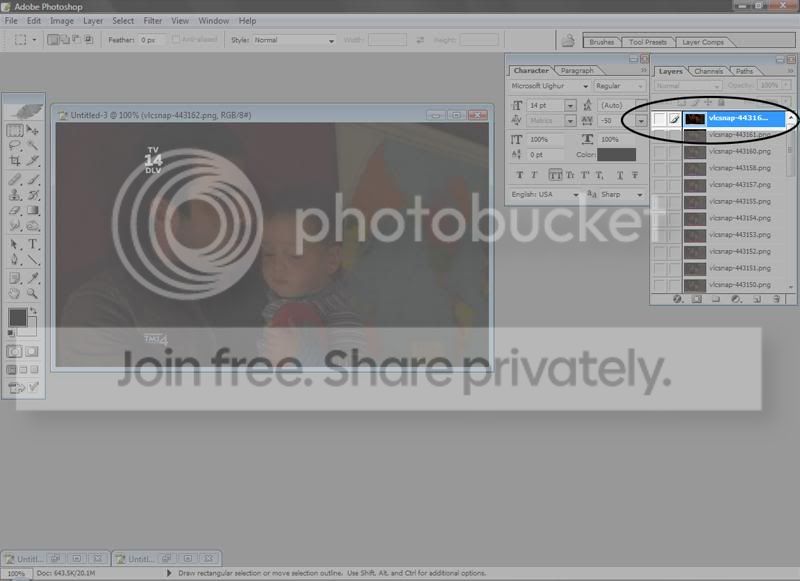
Do whatever you want to adjust brightness, colour, etc. Everything looks better smaller... digitally. I'm not going to worry about making this too terribly pretty. Logos and such get a pass. This time.
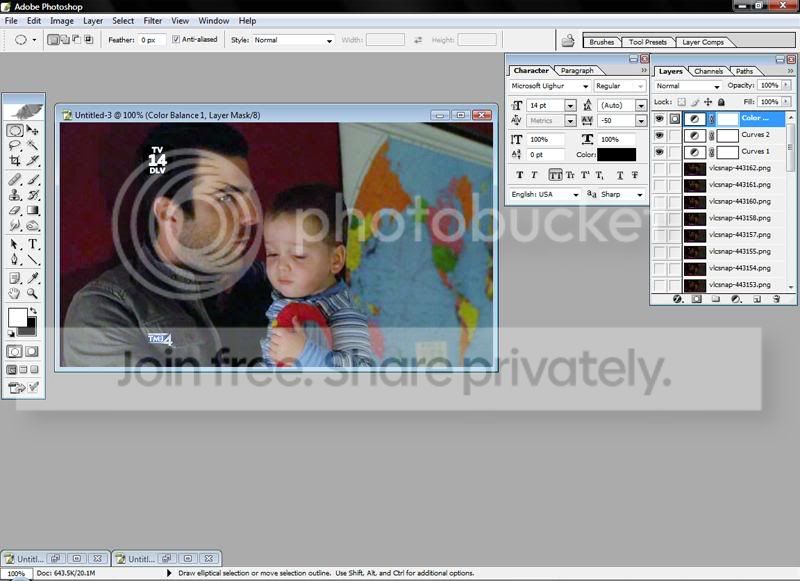
Once you're done, go back to ImageReady.
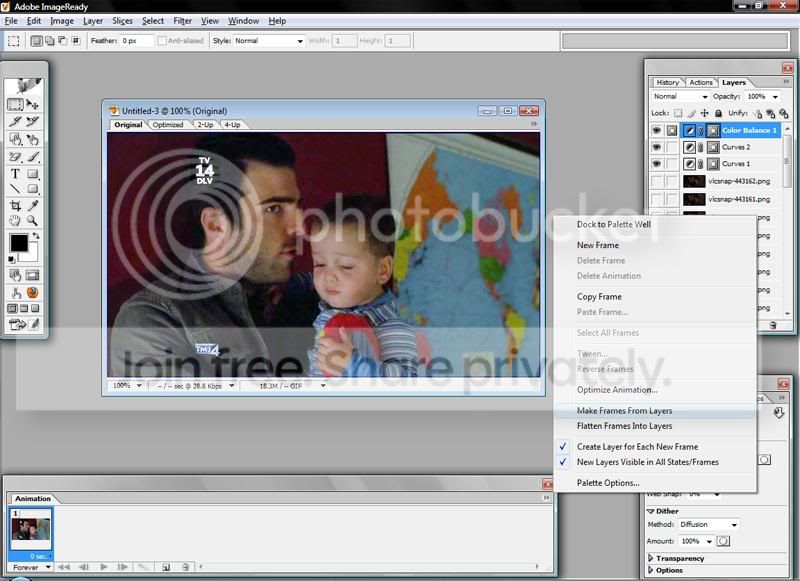
In the animation window, look for the double arrows. Click Make Frames From Layers
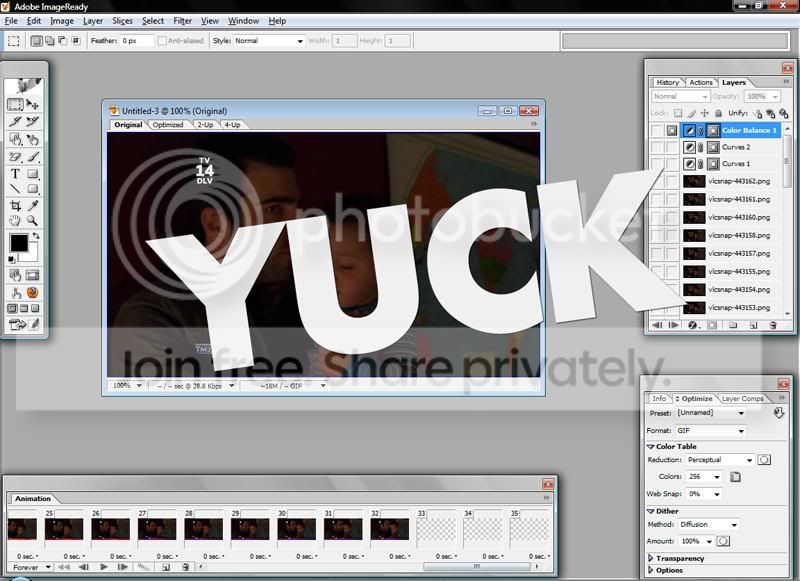
Delete any frames at the end -- Image Ready will literally make a frame from whatever layer there is. I had three enhancements, three frames.
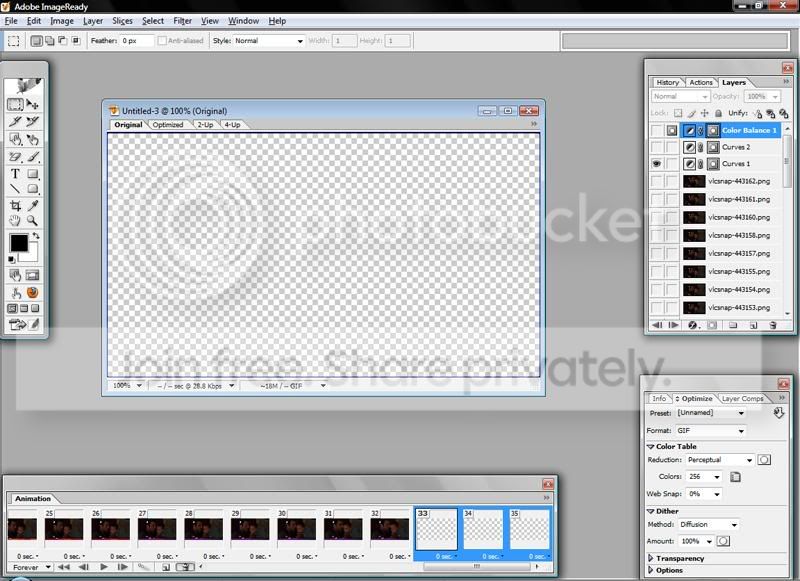
Go back to that first frame. Make your enhancement layers visible.
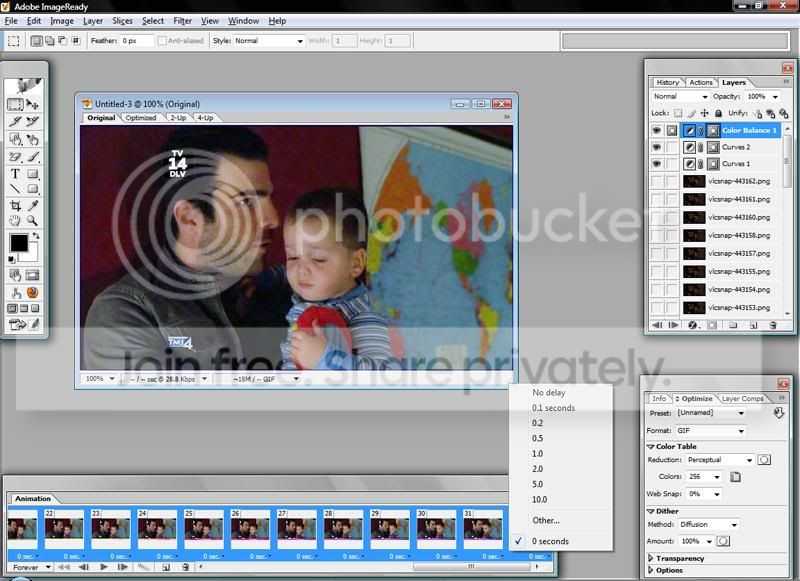
04. Speed. Shoot the hostage. Select all layers (shift click) and right click on any layer you want. The delay options will appear. I'm going to select 0.1 and be on my way.
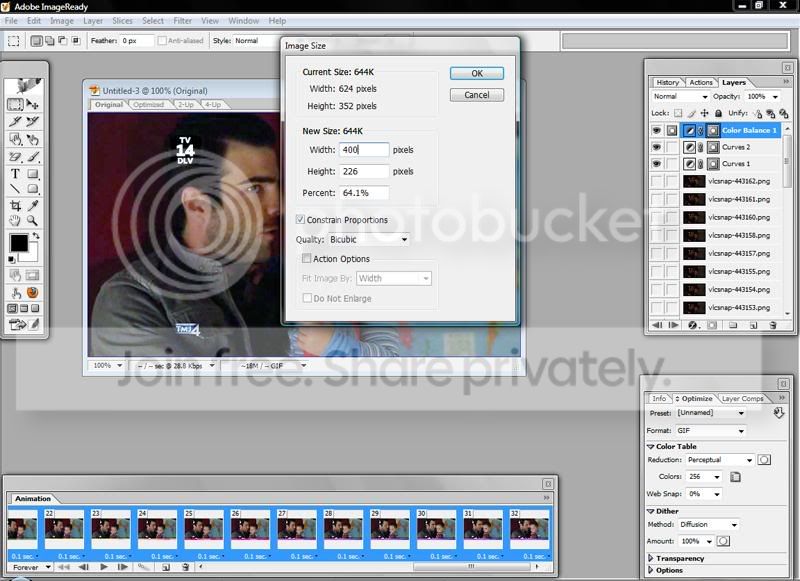
05. Resize. Image --> Image Size. I usually keep it around 400px wide.
Border-free.
06. Optional: Border. Make a new layer, set one of your colours to #000000, fill (alt/ctrl backspace).
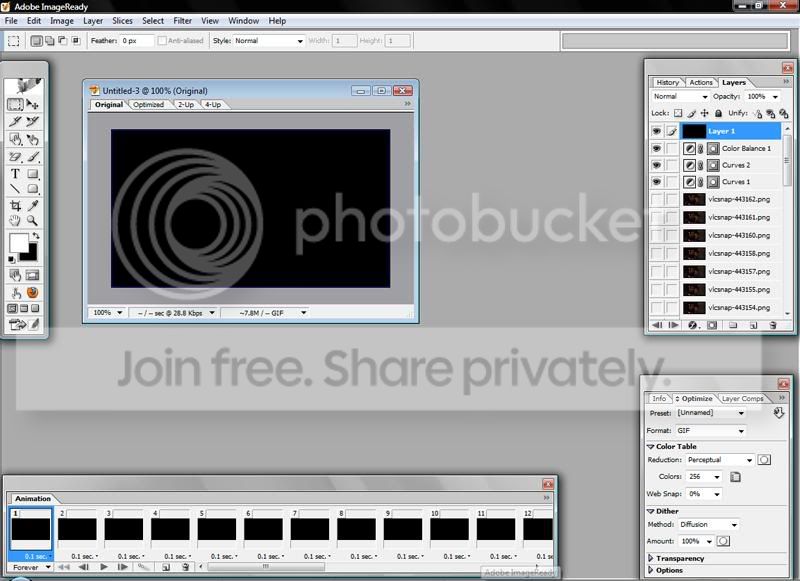
Zoom in once. Ctrl click from a corner You'll want to bring it in and over two px and then move your selection over and up/down one
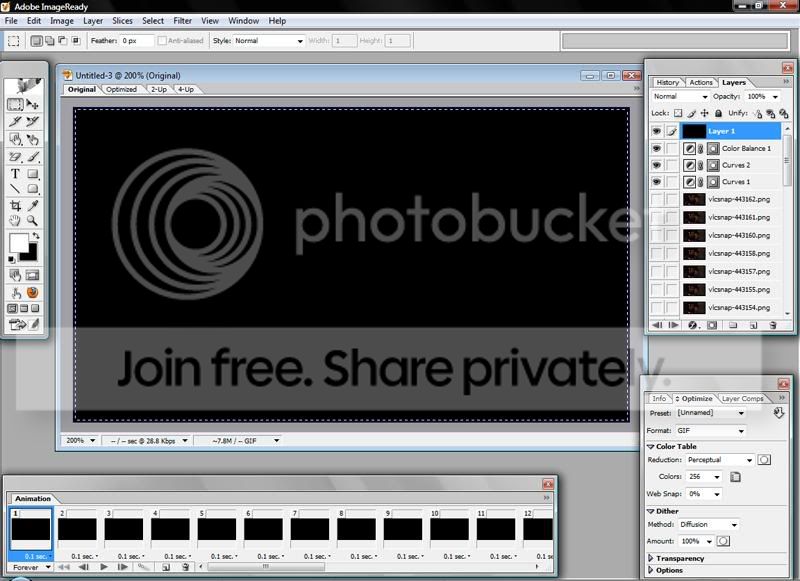
Delete. Have a border.
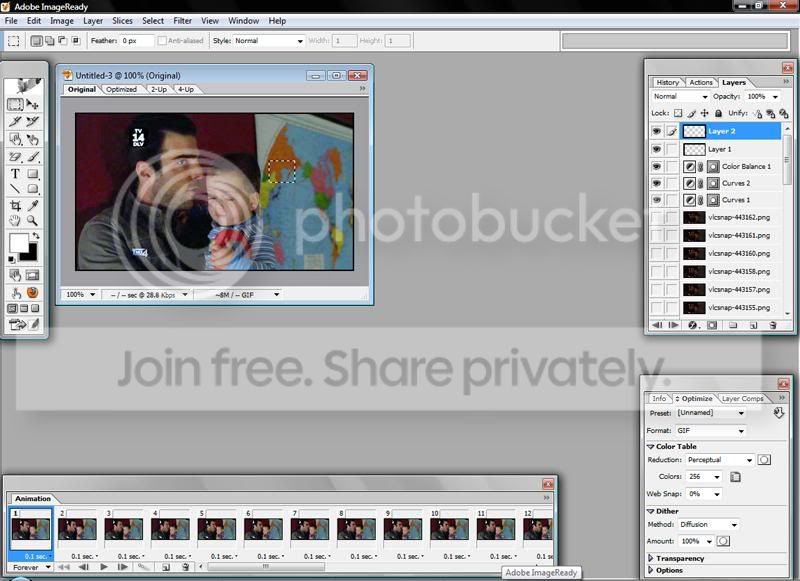
07. Optional: Fade to black. Duplicate the last frame three times. Your layer palate will increase with three frames.
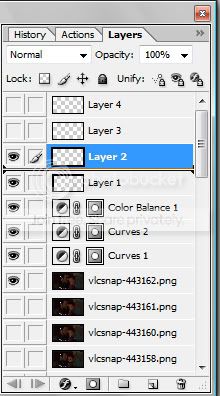
Delete two of them. Pull the one you didn't delete below the last layer in the animation, fill it with black. There is a possibility all your frames will be filled with black. If that is the case, go to the first frame in the animation and unselect the visiblity for the black layer.
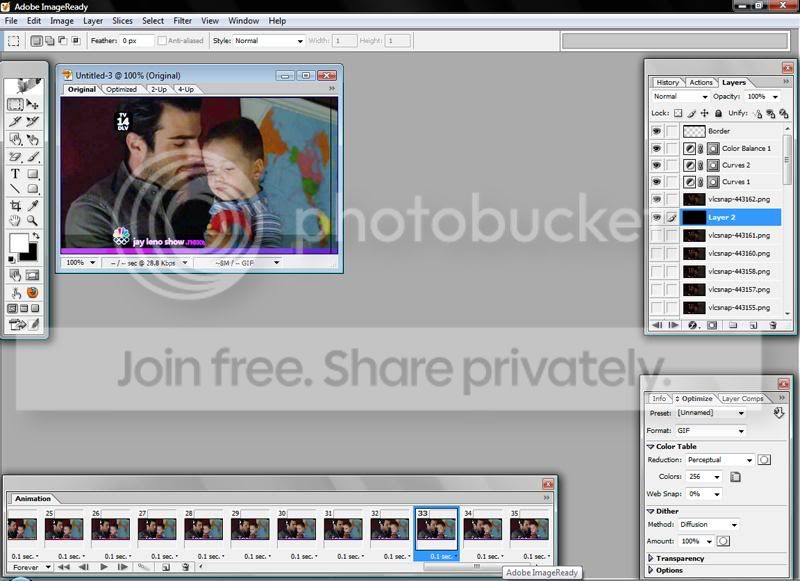
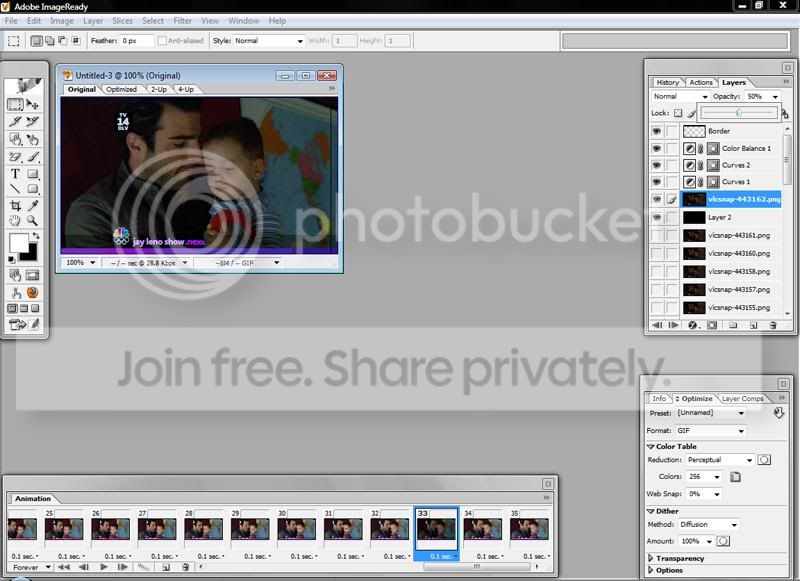
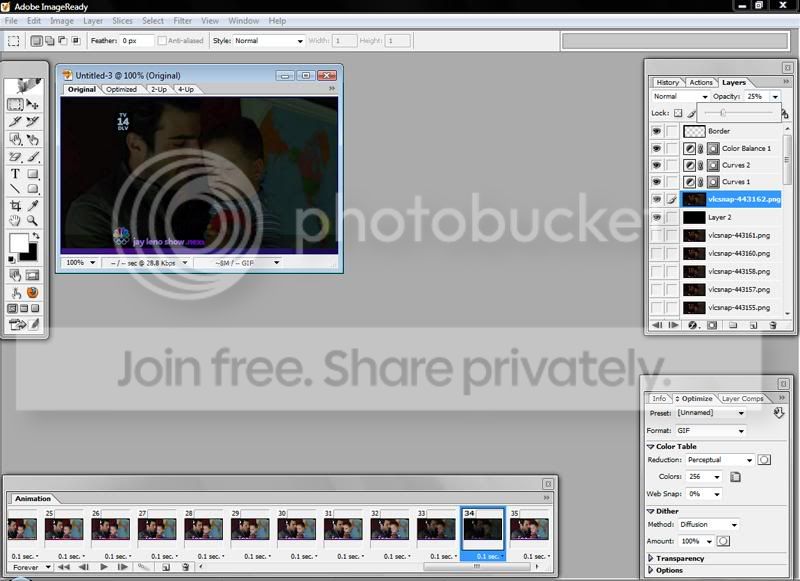
In this case, 33, 34, and 35 are the only ones that will have black visible.
On layer 33 bring the opacity of the screencap down to about 50
On 34 bring the opacity of the screencap down to about 25
On 35, do not have the screencap visible. Also, change the time delay. I selected 0.5 seconds.
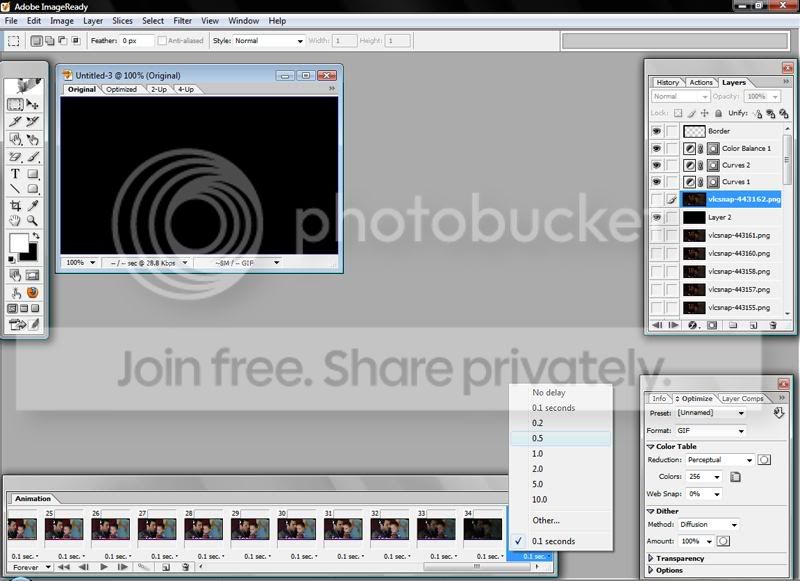
No fade-out.
08. Saving as a gif. File --> Save Optimized As
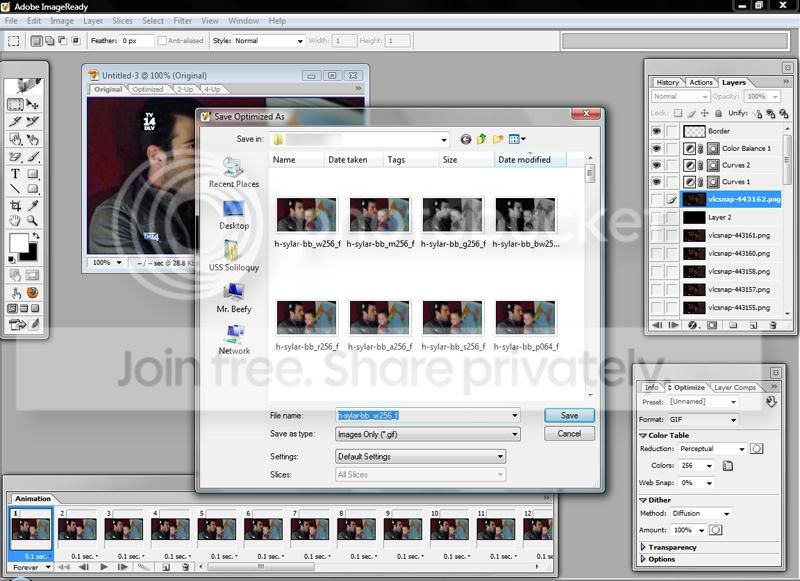
Unfortunately, just saving it doesn't mean it's animated. Image Ready will let you optimize something to reduce/increase file size.
You've been able to see my optimize palate this whole time. How indecent.
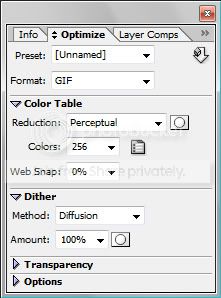
I saved this specific gif as Perceptual with 256 colors.
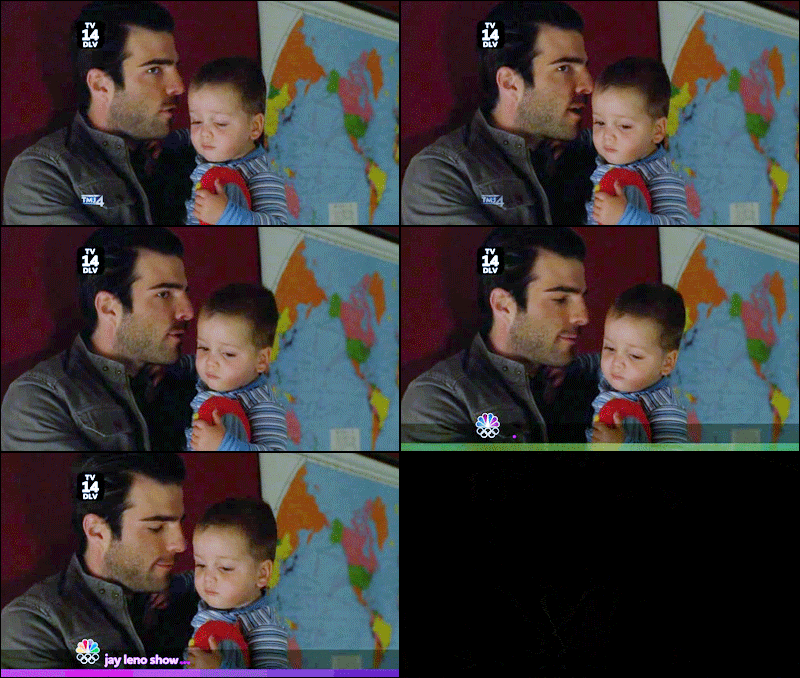
See it as something else!
Perceptual, 128 colors
Perceptual, 64 colors
Selective, 256 colors
Adaptive, 256 colors
Restrictive, 256 colors
Black & White, 256 colors (lol, acid trip)
Grayscale, 256 colors
Mac OS, 256 colors
Windows, 256 colors
Programs:
Download Helper for Mozilla Firefox
VLC Media Player / PowerDVD
Adobe ImageReady CS
Adobe Photoshop CS
Thank you for your time.
There are a lot of images after each cut. Fair warning.
So. There's a youtube clip that you want to make animations from. This is how I would do it. Step one (one, one)!
1. Download the clip. I used to use keepvid.com, but it's pretty much a giant hooker of late. That's where DH for Firefox saves me. It will save flv files from a website (doesn't work on Hulu, unless you want the advertisements).
One click and you can see all the available files. I usually grab whatever flv looks the best, but you can hover over each and see what it is.
This link will download the ad. BOO.
Oh, Internet magic. What won't you do?
Click the download option for whatever file you want to save.
You should be able to just save it and then play it in VLC, but. You may want to add the .flv extension with All Files selected for the save-as type.
2. Screencap. If you've never used VLC before, it might be a good idea to enable hotkeys, or change the screencap hotkey. Shift ctrl eleven tab q is annoying. I literally just press "c". You can set them up to save as png files, and in specific folders if you want. All mine go into a general VLC caps folder.
Sylar says hey.
If the scene is short and you're not getting all the caps you want, try slowing down the video.
Once you have the seen capped and you're satisfied, it's time to animate. But first. But first. But first. But first. Chopping block. But first. If you had an episode and were just capping as you went along, you'll want to move the files into a separate folder. It's so much easier, believe me.
Go through and select what you want to animate, copy (or cut), paste to a specific, EMPTY, folder.
3. Animate. Open ImageReady. Go to File --> Import --> Folder as Frames.
ImageReady may take some time to gather what it needs. It's probably just my computer being evil, though. Once the Browse for Folder window appears, go to wherever you pasted those screencaps.
Click OK, and bam. I mean, bam! Folder imported as frames.
You could just save it and go as it is (for reference, it would look like this), or you could enhance the frames in some way. That's what I plan on doing. You can either go directly to Photoshop, or hide the frames.

3.a Hiding Frames:
Select the second frame through the last frame (shift clicks, shift clicks!)
With those selected, click (don't let go!) and drag to the tiny trashcan icon.
Now you have a one-frame animation area and it'll be easier to adjust layers in PS. Let's go there. You can press shift+ctrl+m or click the button.
Either way, we're going to move the file.
The file opens and you can see the layers like you normally would. What you want is to keep any image enhancements at the top. Scroll up and click the top-most layer, unselect the visiblity option.
Do whatever you want to adjust brightness, colour, etc. Everything looks better smaller... digitally. I'm not going to worry about making this too terribly pretty. Logos and such get a pass. This time.
Once you're done, go back to ImageReady.
In the animation window, look for the double arrows. Click Make Frames From Layers
Delete any frames at the end -- Image Ready will literally make a frame from whatever layer there is. I had three enhancements, three frames.
Go back to that first frame. Make your enhancement layers visible.
04. Speed. Shoot the hostage. Select all layers (shift click) and right click on any layer you want. The delay options will appear. I'm going to select 0.1 and be on my way.
05. Resize. Image --> Image Size. I usually keep it around 400px wide.
Border-free.

06. Optional: Border. Make a new layer, set one of your colours to #000000, fill (alt/ctrl backspace).
Zoom in once. Ctrl click from a corner You'll want to bring it in and over two px and then move your selection over and up/down one
Delete. Have a border.
07. Optional: Fade to black. Duplicate the last frame three times. Your layer palate will increase with three frames.
Delete two of them. Pull the one you didn't delete below the last layer in the animation, fill it with black. There is a possibility all your frames will be filled with black. If that is the case, go to the first frame in the animation and unselect the visiblity for the black layer.
In this case, 33, 34, and 35 are the only ones that will have black visible.
On layer 33 bring the opacity of the screencap down to about 50
On 34 bring the opacity of the screencap down to about 25
On 35, do not have the screencap visible. Also, change the time delay. I selected 0.5 seconds.
No fade-out.

08. Saving as a gif. File --> Save Optimized As
Unfortunately, just saving it doesn't mean it's animated. Image Ready will let you optimize something to reduce/increase file size.
You've been able to see my optimize palate this whole time. How indecent.
I saved this specific gif as Perceptual with 256 colors.
See it as something else!
Perceptual, 128 colors

Perceptual, 64 colors

Selective, 256 colors

Adaptive, 256 colors

Restrictive, 256 colors

Black & White, 256 colors (lol, acid trip)

Grayscale, 256 colors

Mac OS, 256 colors

Windows, 256 colors

Programs:
Download Helper for Mozilla Firefox
VLC Media Player / PowerDVD
Adobe ImageReady CS
Adobe Photoshop CS
Thank you for your time.