
If you want to extend your ABP.IO application with a custom module, like Vineforce.Test—this guide is for you. Whether you’re building a new feature or organizing your code into reusable parts, creating a custom module helps keep your application clean, scalable, and maintainable.
In this guide, we’ll walk through the full integration process step by step, covering both the backend and the Angular frontend. You’ll learn how to properly register the module, configure dependencies, and connect the UI layer to your logic. By the end, you’ll have a working module that’s fully integrated into your ABP.IO solution, following best practices.
No guesswork, no skipping steps—just a clear path to getting your custom module up and running.
Prerequisites
1. Install ABP CLI
If not already installed, run the following command:
dotnet tool install -g Volo.Abp.Cli
2. Create the main Apb.io application with the name “Vineforce.Admin”
abp new Vineforce.Admin -t app -u angular -m none --separate-auth-server --database-provider ef -csf

It creates the structure of backend of main abp application as follows:

3. Configure appsettings.json of the main ABP.IO
Edit the appsettings.json files in the two projects below to include the correct connection strings:
Projects:
- Vineforce.Admin.HttpApi.Host
- Vineforce.Admin.DbMigrator
4. Create the Module folder in main application as Follow the official guide to create your module:

If you choose Angular as the UI framework (by using the -u angular option), the generated solution will include a folder named angular. This folder contains all the client-side code for the application.
Example: A module named Vineforce.Test was created using the Angular UI option.
1. When you open the angular folder in an IDE, the folder structure will appear as follows:

2. And backend structure as follows:

3. Configure appsettings.json
Edit the appsettings.json file in the Host projects to include correct connection strings:
Projects:
- Vineforce.Test.AuthServer
- Vineforce.Test.HttpApi.Host
- Vineforce.Test.Web.Unified
"ConnectionStrings": { "Default": "Server=servername;Database=Test_Main;Trusted_Connection=True;TrustServerCertificate=True", "Test": "Server=VINEFORCE-SHIVA;Database=Test_Module;Trusted_Connection=True;TrustServerCertificate=True" }
Make sure the server names and database details match your development environment.

4. Apply Database Update
In the Package Manager Console (under the EntityFrameworkCore project), run:
Update-Database

5. Run the Application
Set Vineforce.Test.Web.Unified as the startup project and launch the application using the default credentials:
- Username: admin
- Password: 1q2w3E*
6. Ensure Redis Is Running
Redis is used for distributed caching. Make sure Redis is installed and running before starting the application.
7. Application Startup Order
Run the following projects in order:
*.AuthServer or *.IdentityServer
*.HttpApi.Host
*.Web.Unified
1. Adding a Module to the Backend of the Main Application
cd C:\Users\Vineforce\source\repos\AbpAdmin
2. Add All Required Projects of the module to the Main ABP.IO Solution

To include various parts of your module (such as Domain, Application, EntityFrameworkCore, and HttpApi) in the main ABP solution, run the following commands:
dotnet sln add modules\vineforce.test\src\Vineforce.Test.Domain\Vineforce.Test.Domain.csproj
dotnet sln add modules\vineforce.test\src\Vineforce.Test.Application\Vineforce.Test.Application.csproj
dotnet sln add modules\vineforce.test\src\Vineforce.Test.EntityFrameworkCore\Vineforce.Test.EntityFrameworkCore.csproj
dotnet sln add modules\vineforce.test\src\Vineforce.Test.HttpApi\Vineforce.Test.HttpApi.csproj
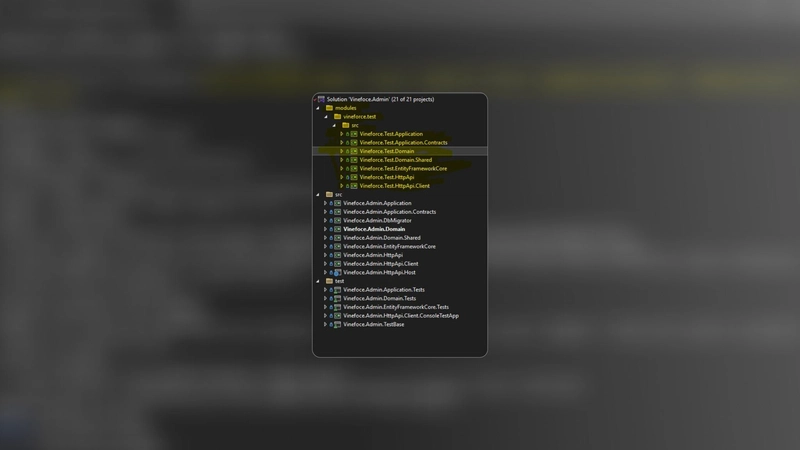
Projects are added as below:
Add Project References Using Visual Studio
In the Vineforce.Admin.HttpApi.Host project: Right-click the project and select “Add” → “Project Reference”.
1. In the dialog that appears, check the following projects:
- Vineforce.Test.Application
- Vineforce.Test.EntityFrameworkCore
- Vineforce.Test.HttpApi
2. Click OK to confirm and add the references.

3. After adding the project > reference, here you can add all module references you want.


Register Module Dependencies in AdminHttpApiHostModule.cs
In AdminHttpApiHostModule.cs, update the [DependsOn(...)] attribute:.

typeof(TestHttpApiModule),
typeof(TestApplicationModule),
typeof(TestEntityFrameworkCoreModule),
typeof(TestDomainSharedModule)
Also, add the necessary using statements:
using Vineforce.Test;
using Vineforce.Test.EntityFrameworkCore;

Configure the Module in the EntityFrameworkCore Project
To ensure that schema, table mappings, and other Entity Framework configurations from the module are applied in the main ABP.IO application, follow these steps:
Add a Project Reference:
Right-click on the Vineforce.Admin.EntityFrameworkCore project.
Select Add → Project Reference.
Check and add: Vineforce.Test.EntityFrameworkCore


Update the DbContext Configuration
- Open AdminDbContext.cs.
- Inside the OnModelCreating method, add the following line to apply the module’s configuration:
builder.ConfigureTest();


You can verify this by navigating to the Vineforce.Test.EntityFrameworkCore module and opening the TestDbContext class.


Apply Migrations to Update the Database Schema
After completing the integration steps, you need to apply Entity Framework migrations to reflect the module’s schema changes in the database.
Option 1: Using PowerShell or Terminal
- Open a PowerShell or terminal window.
- Navigate to the EntityFrameworkCore project directory of your main application, for example:cd src/Vineforce.Admin.EntityFrameworkCore
- Run the following command to create a new migration:
dotnet ef migrations add Add_Test_Module
Option 2: Using the Package Manager Console in Visual Studio
- Open the Package Manager Console (Tools → NuGet Package Manager → Package Manager Console).
- Set the Default Project to src\Vineforce.Admin.EntityFrameworkCore.
- Run the following command:
PM> Add-Migration Add_Test_Module
This will generate a new migration that includes all Entity Framework changes from the integrated module.

Then run the following command to apply the migration and update the database:
Update-Database
Steps to add the module application to the main ABP.IO application
Step 1: Build the Angular Module
Navigate to the module’s frontend directory and build the module using the Angular CLI:
ng build test --configuration production
This command compiles the test Angular module in production mode and outputs the build artifacts to the dist folder.

Output folder:
C:\Users\Vineforce\source\repos\AbpAdmin\modules\Vineforce.Test\angular\dist

Step 2: Copy Module Output to Main App
- Go to your main app’s angular folder: C:\Users\Vineforce\source\repos\AbpAdmin\angular
- Create a projects folder inside it.
- Copy the test folder from the dist directory into projects.
- Final pathC:\Users\Vineforce\source\repos\AbpAdmin\angular\projects\test


Step 3: Update App Routing
Open app-routing.module.ts in the main app:
C:\Users\Vineforce\source\repos\AbpAdmin\angular\src\app\app-routing.module.ts
In app-routing.module.ts, import the module’s routing configuration and add it to the main route definitions:
{
  path: 'test',
  loadChildren: () =>
    import('test').then(m => m.TestModule.forLazy())
}
Step 4: Link the Module in package.json
Open the package.json file having path C:\Users\Vineforce\source\repos\AbpAdmin\angular add the following line under the “dependencies” section to link your local module:
"test": "file:projects/test"

Then install dependencies:
npm install
You can now see the Test Module API controller in the Swagger UI of the main application.

You can now log in to the main application

The Test module now appears in the main application. You can add, edit, or delete items according to the assigned permissions.

Country ‘Russia’ has been added. You can view, edit, or delete it on the page

You can grant or revoke permission by this following page


Now Edit permission has been disabled for the current user/page.

Currently, the delete option is visible, but the edit option is not showing on the pagepermission has been disabled for the current user/page.

By following this step-by-step guide, you’ve learned how to successfully integrate a custom module—like Vineforce.Test—into your ABP.IO application. From backend setup to Angular frontend integration, you now have a solid foundation for building scalable, maintainable, and modular applications. With best practices in place, your ABP.IO projects are ready to grow more efficiently.
If you're looking for expert help with ABP.IO SaaS development, feel free to reach out to Vineforce. For more tutorials and insights like this, be sure to explore the Vineforce Blog.

Top comments (0)