
I created a working 3D first-person shooter game inside the browser — using only prompts with Amazon Q, JavaScript, and Three.js.
🚀 Overview
As part of the Build Games with Amazon Q CLI challenge, I set out to build a 3D browser FPS game inspired by Counter-Strike, entirely on Windows 11, using Amazon Q in VS Code as my development assistant.
I didn’t manually write most of the code. Instead, I relied on conversational prompts to Amazon Q, and it handled the logic, visuals, and structure — powered by Three.js, Vite, and Vanilla JavaScript.
🧰 Tech Stack
- 💻 Windows 11
- 🧠 Amazon Q (VS Code Extension)
- ⚙️ Node.js + Vite
- 🧱 HTML, CSS, and JavaScript
- 🌐 Three.js for 3D graphics
- 🎮 No game engine — just the browser and AI
💬 Amazon Q Prompts I Used (For the 3D Game)
These are the exact prompts I gave to Amazon Q to generate the entire game step-by-step:
1️⃣ Project Setup with Vite
I want to build a 3D browser FPS game like Counter-Strike using JavaScript and Three.js in a Vite project. Give me index.html, main.js, and style.css to start.
✅ Q provided the entire starter setup. I scaffolded the Vite project and installed Three.js using:
npm install three
2️⃣ Set Up the Scene, Camera & Lighting
Create a 3D scene using Three.js with a PerspectiveCamera, ambient light, and directional light. Add a floor using PlaneGeometry and basic background color.
✅ Result:
- Scene created
- Lighting added
- Camera positioned
- Floor placed
- Render loop running
3️⃣ Add Player Controls (WASD + Mouse Look)
Add FPS-style controls using PointerLockControls from Three.js. Enable WASD movement and mouse-based look direction.
✅ I could now move and look around just like in a typical FPS.
4️⃣ Add a Gun in Front of the Camera
Add a simple gun model (like a BoxGeometry) attached to the camera so it stays in view as the player moves.
✅ Now it looked like I was holding a weapon — even though it was basic, it was effective.
5️⃣ Enable Shooting Bullets
Create bullets when the mouse is clicked. Use raycasting to shoot in the direction the player is looking. Destroy bullet after hitting an enemy or after a few seconds.
✅ Q added a bullets array, movement logic, and raycasting hit detection.
6️⃣ Add Enemies That Move Toward the Player
Add enemy boxes that spawn at random X/Z positions and move toward the player. If they reach the player, reduce health.
✅ Enemy movement worked using vector math, and enemies were deleted when they reached the player or got shot.
7️⃣ Handle Bullet-Enemy Collision
When a bullet hits an enemy, remove the enemy and increase the player’s score.
✅ Collision detection was refined using bounding boxes + raycasting.
8️⃣ Add Health and Score UI
Display the player's current health and score on the screen using DOM overlays.
✅ I added a fixed-position div on top of the canvas showing:
❤️ Health: 100
🎯 Score: 0
9️⃣ Add Game Over State and Restart Option
When health reaches 0, stop the game loop, show “Game Over” text and a restart button.
✅ Q froze the animation loop and displayed a styled overlay. I added a restart option on keypress (R).
🧪 Debugging & Tweaking with Q
Whenever something didn’t feel right, I just asked Q:
❌ Enemies too fast?
“Reduce enemy speed by half.”
❌ Camera clipping through objects?
“Fix camera so it doesn’t clip through objects.”
❌ Bullets not visible?
“Make bullets visible with yellow color and Trail effect.”
❌ Game lagging?
“Optimize game loop for fewer object updates per frame.”
This was hands-down the smoothest development workflow I’ve ever experienced.
📸 Screenshots
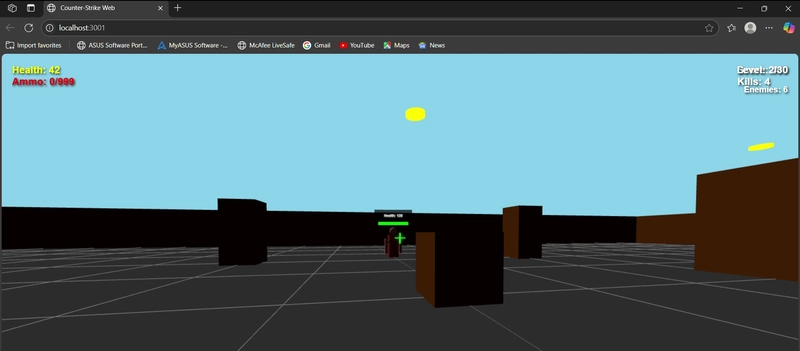
Glimpse of the game
https://youtu.be/EsIlsrxNA-8
🚀 What's Next?
- I’m planning to extend the game by asking Q to:
- Add background sound and gunfire effects
- Spawn multiple enemy types
- Use textures for realism
- Add a level system with increasing difficulty
🗣️ Final Thoughts
“I didn’t write this game alone — I built it side-by-side with an AI. Amazon Q didn’t just give me code. It taught me how to build.”
This challenge was proof that you don’t need years of game dev experience.
You just need a clear idea and the right prompts.

Top comments (0)