
Introduction
Host TypingMind with ease using this ultimate guide on deploying the TypingMind open-source application through ServerAvatar! If you’ve been exploring self-hosted AI assistants and want to run a ChatGPT-like interface securely on your own server, TypingMind is an amazing option. It’s sleek, flexible, and best of all, open-source.
But getting it up and running smoothly can be a bit of a maze, especially if you’re not super experienced with DevOps or server administration. That’s where ServerAvatar comes in. It simplifies server management to the point where even non-techies can deploy and manage applications like TypingMind without breaking a sweat.
So in this guide, we’re going step-by-step to take you from zero to a fully functioning, self-hosted TypingMind setup using ServerAvatar. Whether you’re looking to keep your data private, customize your assistant, or just learn something new, you’ve come to the right place. Ready to dive in?
What is TypingMind?
TypingMind is a lightweight, open-source front-end interface built for interacting with large language models like ChatGPT, Claude, and others. Unlike traditional browser-based tools or chatbots, TypingMind gives you full control of your experience. It’s fast, intuitive, and incredibly customizable.
Key Features of TypingMind
- Self-Hosted: Say goodbye to sending your data to third-party servers. TypingMind can be completely self-hosted.
- Multi-Model Support: Works seamlessly with OpenAI APIs, Local LLMs, Claude, Gemini, and more.
- Chat Memory Management: Save and manage your conversation history.
- UI Customisation: Tweak the interface the way you like dark mode, compact view, and more.
- Prompt Library: Create, save, and reuse prompts for maximum productivity.
- Multiple Chat Threads: Handle multiple conversations with ease.
- API Key Management: Switch between API keys or models without hassle.
Use Cases for TypingMind
Whether you’re a developer, content creator, researcher, or just an AI enthusiast, TypingMind has something for everyone:
- Developers: Use TypingMind as a debugging assistant or co-coding partner.
- Writers & Bloggers: Get content ideas, drafts, and even SEO outlines with ease.
- Students & Researchers: Break down complex topics, summarize readings, and generate citations.
- Entrepreneurs: Handle customer support, automate tasks, or generate business plans.
Its open-source nature makes it even more powerful because you’re not locked into anyone’s rules or pricing model.
Understanding ServerAvatar
You might be wondering: Why use ServerAvatar when you can just deploy everything manually on a VPS? The ServerAvatar turns a nerve-wracking command-line experience into a clean, click-based interface that’s built for ease and efficiency.
What is ServerAvatar?
ServerAvatar is like having a sysadmin in your pocket.
It streamlines the process of managing VPS servers from complex command line tools to a simple and clean looking dashboard. If you’re a developer, a business owner, or a marketer, ServerAvatar makes it a breeze to deploy, manage, and scale apps such as N8N.
Rather than spend hours configuring Nginx, SSL, firewall rules, monitoring and so on manually, ServerAvatar takes care of the process for you. With a click, you get app management, server metrics, backups, SSL certificates and even cron jobs.
With ServerAvatar, you’re not wasting hours on server setup or troubleshooting. Instead, you’re focused on building and improving your app.
Pre-Requisites to Host TypingMind
- A VPS or cloud server from providers like DigitalOcean, AWS, Linode, Vultr, etc.
- At least 1 GB of RAM on the server.
- Minimum 20 GB of storage space available.
- A fresh server setup (recommended to avoid software conflicts).
- Ubuntu version 20.04, 22.04, or 24.04 installed on the server.
- Port 43210 must be open for ServerAvatar to connect properly.
- A domain or subdomain for TypingMind app (optional. you can also use the test domain provided by ServerAvatar if you don’t have your own domain).
- An active ServerAvatar account (free or paid).
Getting Started With ServerAvatar
Signing Up and Logging In
Start by heading over to ServerAvatar.com and creating an account. It takes just a few minutes, and you’ll land on a clean dashboard after verification. If you’re new, you might get a free trial, which is perfect for testing out the hosting process.
Connect Your Fresh Server with ServerAvatar
After signing in to your ServerAvatar dashboard, the next step is to connect your server. This is where ServerAvatar really shines and simplifies the entire setup process for you.
Instead of requiring you to manually install web server packages, configure firewalls, or set up users and permissions, ServerAvatar automates all of it. You just need to provide your server’s IP address and root login credentials (or SSH key).
Upon submission, ServerAvatar securely establishes a connection to your server and automatically installs all required software such as NGINX or Apache or Openlitespeed, PHP, MySQL or MariaDB, and others.
This is a huge time saver for those who aren’t very familiar with command-line tasks or server configuration. In a matter of minutes, your server is configured to be the optimal place to host applications, websites or services, this makes ServerAvatar a developer-friendly tool due to it’s simplicity and ease of use for both developers and business owners
News: You can now purchase servers directly from the ServerAvatar panel. Check out how to purchase and connect our Manage Server in one step via ServerAvatar.
Follow this documentation for connecting your server with ServerAvatar panel with custom method. You can also follow the respective docs for connecting your servers from Amazon Lightsail, Vultr, DigitalOcean, Hetzner, and Linode. ServerAvatar provides easy integration with all of them.
Note: While selecting the tech stack, make sure to choose the tech stack as the Node stack(MERN stack), as TypingMind supports only this stack.
Step-by-Step Deployment Process for TypingMind in Ser
Step 1: Navigate to Applications Section
Once you connected your server with Serveravtar then you will directed to the server pannel, locate the Applications section in the main navigation menu. This is where you’ll manage all your deployed applications.
Click on the “Create Application” button to begin the setup process. This will open the application creation wizard that will guide you through the configuration.

Step 2: Configure Application Name and Domain
Enter a name for your application. You can use any name that helps you identify this deployment. For this tutorial, we’ll use “TypingMindApp” as the application name.
ServerAvatar provides two domain options to configure Domain:
- Primary Domain: This is the main domain where your application will be hosted. Users will access your TypingMind instance through this URL. Make sure you own this domain and have configured its DNS settings to point to ServerAvatar.
- Test Domain: ServerAvatar provides a test domain for staging and development purposes. This is particularly useful for testing your application before making it live on your primary domain. The test domain eliminates manual configuration and reduces technical barriers.
For this tutorial, we’ll use the test domain to demonstrate the process, but you can choose either option based on your needs.

Step 3: Select Deployment Method
Since TypingMind is an open-source project available on GitHub, we’ll deploy it directly from its repository.
Method Type: Select “Git” as the method type. This tells ServerAvatar that we’ll be deploying from a Git repository.
Service Provider: Choose “GitHub” as the service provider since TypingMind’s source code is hosted on GitHub

Step 4: Repository Configuration
When setting up the TypingMind repository, you should select the repository types as “Public Repository” since TypingMind is an open-source project where the code is freely available for everyone to access. For the clone URL, use https://github.com/TypingMind/typingmind.git, which you can find directly on the TypingMind GitHub repository page. Make sure to choose “main” as a branch since this is the standard stable branch that contains the most recent production-ready code. The main branch is your best option because it represents the latest working version of the project that’s been tested and is ready for use.

Step 5: Configure Render Type
Render Type: Select “Client Side Rendering” for TypingMind.
Why Client Side Rendering?
Client Side Rendering (CSR) is the appropriate choice for TypingMind because:
The application runs primarily in the user’s browser, with JavaScript handling the user interface and interactions. This approach provides a more responsive user experience as the browser can update parts of the page without requiring full page reloads. TypingMind’s chat interface benefits from this approach as it allows for real-time updates and smooth user interactions.
CSR also reduces server load since most of the processing happens on the client side, making it more scalable for applications like TypingMind that handle dynamic content and user interactions.
Step 5: Configure Render Type
Render Type: Select “Client Side Rendering” for TypingMind.
Why Client Side Rendering? Client Side Rendering (CSR) is the appropriate choice for TypingMind because:
The application runs primarily in the user’s browser, with JavaScript handling the user interface and interactions. This approach provides a more responsive user experience as the browser can update parts of the page without requiring full page reloads. TypingMind’s chat interface benefits from this approach as it allows for real-time updates and smooth user interactions.
CSR also reduces server load since most of the processing happens on the client side, making it more scalable for applications like TypingMind that handle dynamic content and user interactions.
Step 6: Port and Package Manager Configuration
Port Number: Enter “3000” as the port number. This is the standard port that TypingMind uses for its development server.
Package Manager: You can choose between npm or yarn. Both are supported by ServerAvatar:
- npm: The default Node.js package manager
- yarn: An alternative package manager known for faster installations
For this tutorial, we’ll use npm as the package manager
Process Manager: Keep the process manager setting as “fork”. This is the default setting that works well for most Node.js applications.

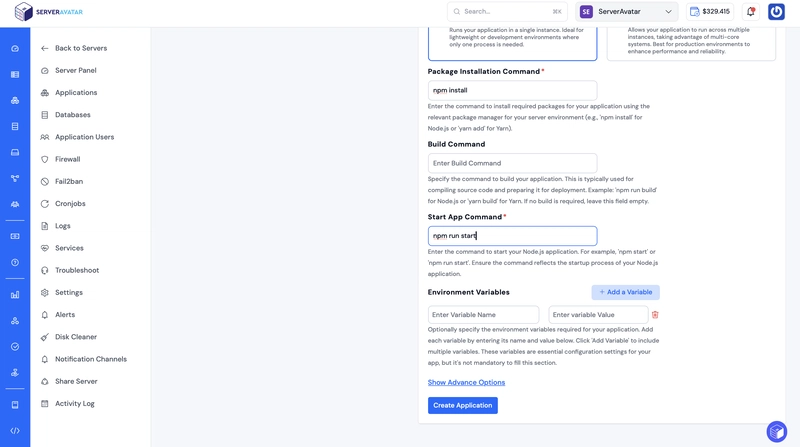
Step 7: Installation and Start Commands
Enter the appropriate commands based on the selected package manager to install the dependencies and run the application
For npm:
- Package Installation Command: npm install
- Start App Command: npm run start
For yarn:
- Package Installation Command: yarn install
- Start App Command: yarn start
These commands tell ServerAvatar how to install dependencies and start an application.
Step 8: Create the Application
Click on “Create Application” to begin the deployment process. ServerAvatar will now:
- Clone the TypingMind repository from GitHub
- Install all required dependencies
- Configure the application settings
- Start the application on the specified port
This process may take a few minutes, depending on the size of the application and the number of dependencies.
The application is successfully created, you might encounter an error as you can see in the below image when visiting your primary domain. This is completely normal and expected.

The error occurs because TypingMind requires HTTPS connections, but our newly deployed application doesn’t have an SSL certificate yet. The application tries to use HTTPS but falls back to HTTP, causing the connection error.
The Solution is to Install an SSL certificate for TypingMind application.
ServerAvatar provides a seamless, one-click solution to install SSL on your TypingMind instance and no server login or technical configuration required. You can choose to use the Auto Installer, which sets up a free Let’s Encrypt SSL certificate and automatically handles renewals, or go the manual route by uploading your own certificate and private key. Everything is managed through the ServerAvatar dashboard.
Once the SSL certificate is installed, the TypingMind application is secured and now accessible over an HTTPS connection. You can also configure a redirect to automatically send users from HTTP to HTTPS.
Read our complete step-by-step docs for:
- Installing SSL using the Auto Installer
- Attaching a Manual SSL Certificate from your dashboard
Tip:
If you’re managing your domain through Cloudflare and you’ve enabled the proxy (orange cloud) for your domain, make sure to follow the special Cloudflare SSL installation guide included in the docs to avoid conflicts or certificate errors.

Now, Visit the primary domain as tyou can see in your dashboard. You have suuccefully deployed the typingmind application without touching the commanline
Now that the deployment is complete, you can visit your primary domain — the one you assigned during setup — which is visible in your ServerAvatar dashboard.
Congratulations! You have successfully deployed the TypingMind application without using the command line at all. Everything was handled seamlessly through the ServerAvatar dashboard.

ServerAvatar Log Monitoring Suite for N8N
ServerAvatar provides a powerful Log Monitoring Suite that helps you monitor everything happening on your server and applications — from basic request logs to traffic stats, performance, and error tracking — all in one place, and without writing a single command.
Whether you’re debugging an app, tracking traffic spikes, or watching for unexpected behavior, ServerAvatar gives you the tools to monitor and act quickly.

Key Security Features ServerAvatar Provides:
- One-Click SSL Installation
- Easily secure your TypingMind instance with HTTPS using the Auto SSL Installer. It sets up Let’s Encrypt certificates and handles renewals automatically without any terminal commands. NGINX configurations.
- Manual SSL Certificate Support
- Prefer using your own SSL certificate? Upload and install custom SSL by the ServerAvatar SSL installation feature for your site.
- Secure Firewall & IP Blocking ServerAvatar includes integrated firewall controls that let you block unwanted IPs and manage access rules for ports and services, helping reduce attack vectors.
- SSH Key Management Improve server login security by managing SSH keys right from the dashboard. Disable password login and allow access only via secure keys.
- Fail2Ban Integration Automatically bans suspicious IPs that attempt brute-force logins or access restricted areas. This helps prevent unauthorized access and bots.
- Malware Scanning & Security Updates ServerAvatar regularly checks for potential threats and ensures your server software is up-to-date with the latest security patches.
- SFTP User Management Create secure SFTP-only users for limited access to specific application files or folders, great for teams and clients.
- Automatic Backups Even if something goes wrong, you’re covered. ServerAvatar supports daily automatic backups to secure locations (local or remote).
Conclusion
Deploying TypingMind using ServerAvatar transforms what could be a complex technical process into a straightforward, manageable task. The platform’s automated SSL certificate management, intuitive dashboard, and comprehensive documentation make it accessible to users of all technical levels.
Whether you’re a developer looking to quickly deploy a TypingMind instance for your team or a business owner wanting to provide AI chat capabilities to your users, ServerAvatar provides the tools and automation needed to get your application online quickly and securely.
The combination of TypingMind’s powerful AI chat interface and ServerAvatar’s deployment automation creates a robust solution that can scale with your needs while maintaining security and performance standards.
By following this guide, you now have a fully functional, SSL-secured TypingMind deployment that’s ready to serve your users with enhanced AI chat capabilities.

Top comments (0)