In this blog, we'll walk through the process of setting up a scalable and secure AWS infrastructure. The setup includes:
- A Virtual Private Cloud (VPC)
- Public and private subnets
- An Internet Gateway
- A NAT Gateway
- An Application Load Balancer (ALB)
- EC2 instances in private subnets
- Apache HTTP server installed on EC2
- CloudWatch Agent to send Apache logs to CloudWatch
This guide is ideal for beginners and intermediate users aiming to understand foundational AWS networking and logging.
Step 1: VPC and Subnet Design
- Create a VPC using the "VPC and more" option for visual configuration.
- Select two Availability Zones (e.g., ap-south-1a and ap-south-1b).
- Create four subnets:
- Two public subnets (one per AZ)
- Two private subnets (one per AZ)
- Use a CIDR block like 11.0.0.0/16 for your VPC.
Step 2: Configure Routing and Internet Access
- Create Route Tables:
- One for public subnets (routes to Internet Gateway)
- One or two for private subnets (routes to NAT Gateway)
- Create an Internet Gateway and attach it to the VPC.
- Create a NAT Gateway in one of the public subnets.
- Update routing tables:
- Public subnet: 0.0.0.0/0 to Internet Gateway
- Private subnet: 0.0.0.0/0 to NAT Gateway
Step 3: Launch EC2 Instances
- Launch two Ubuntu Linux EC2 instances in private subnets.
- Choose instance type t2.micro.
- Disable public IP assignment.
- In user data, provide a script to install Apache and a simple HTML response with the hostname:
- Script is is in below Screen shot

Step 4: Configure the Application Load Balancer (ALB)
- Create an Application Load Balancer:
- Internet-facing
- IPv4
- Attach to the public subnets
- Create a Security Group for ALB:
- Allow inbound HTTP traffic from the internet
- we select previously created VPC and 2 AZ inside 2 AZ select previously created 2 public subnets
- Then we need to create a target group
- Target type will be instance , port 80 , same vpc like before , other settings are unchanged
- Select both the instances for target group and click include as pending below , When you add EC2 instances to an Application Load Balancer (ALB) target group, they are listed as “Registered targets – pending below” or “pending” until the health check passes.
- This is the summery you can check before the create ALB
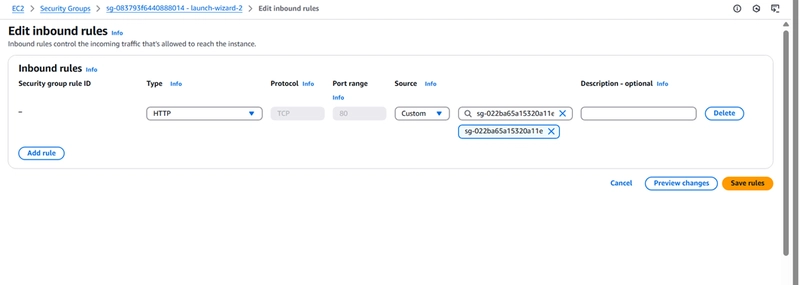
- Modify the EC2 Security Group:
In above picture we can see in the common SG of 2 private instance we delete the previous inbound rule and add SG of ALB and add here

Above diagram is explaining user when access the private ec2 instance the request only go through ALB
Step 5: Install and Configure CloudWatch Agent
So far, after completing my tasks, the ALB isn't working. To fix this, I need to debug the issue, which requires sending Apache logs from the Ubuntu EC2 (in the private subnet) to CloudWatch.
- For that 1st we create a jump server or Bastian host
- this is public instance in same vpc with a public subnet , in SG we created SG which will accept traffic from anywhere on port 22 SSH port
- now this private instance again create inbound rule which will take inbound traffic from the SG which created for public subnet
In above picture we can see its taking ssh inbound traffic from SG created for jump server
- Now we will install the CloudWatch Agent on Ubuntu ) private instances ) `# Go to a temporary directory cd /tmp
Download the CloudWatch agent .deb package from AWS
wget https://s3.amazonaws.com/amazoncloudwatch-agent/ubuntu/amd64/latest/amazon-cloudwatch-agent.deb
Install the downloaded .deb package
sudo dpkg -i -E ./amazon-cloudwatch-agent.deb
**Verify Installation **
- Create CloudWatch Agent Configuration File
- Create the file at sudo vi /opt/aws/amazon-cloudwatch-agent/bin/config.json
{

  "logs": {

    "logs_collected": {

      "files": {

        "collect_list": [

          {

            "file_path": "/var/log/apache2/access.log",

            "log_group_name": "ApacheAccessLogs",

            "log_stream_name": "{instance_id}/access_log",

            "timestamp_format": "%d/%b/%Y:%H:%M:%S"

          },

          {

            "file_path": "/var/log/apache2/error.log",

            "log_group_name": "ApacheErrorLogs",

            "log_stream_name": "{instance_id}/error_log",

            "timestamp_format": "%d/%b/%Y:%H:%M:%S"

          }

        ]

      }

    }

  }

}
Start CloudWatch Agent
sudo /opt/aws/amazon-cloudwatch-agent/bin/amazon-cloudwatch-agent-ctl \

  -a fetch-config \

  -m ec2 \

  -c file:/opt/aws/amazon-cloudwatch-agent/bin/config.json \

  -s
How to Verify It’s Now Running
sudo systemctl status amazon-cloudwatch-agent
below is the expected output
Now head to the AWS Console:
- Go to CloudWatch → Log Groups
- Look for:
- ApacheAccessLogs
- ApacheErrorLogs Repeat for both private instances after some checks and balance Now we can see the ssh msg from both the instance
this is the message return from both the instances with there private IP address , every time I refresh IP is changing it shows that ALB is working
and finally in CloudWatch access_log we can see this msg
11.0.17.14 - - [17/May/2025:17:11:12 +0000] "GET / HTTP/1.1" 200 289 "-" "ELB-HealthChecker/2.0" it means load balancer working
it means it can access the logs


Top comments (0)