(This is a submission for the Postmark Challenge: Inbox Innovators).
What I Built
Mail to Blog is a streamlined workflow that allows users to publish blog posts directly via email. There's no need to log into a CMS dashboard or use any third-party application. Simply send an email where the subject becomes the post title and the body becomes the content. The post is published within seconds.
Links
- 'Mail to Blog' GitHub Repo: https://github.com/gigaArpit/mail-to-blog
- A demo blog built on this workflow: https://quotes.microgeek.dev/
- GitHub repo of the demo blog: https://github.com/gigaArpit/quotes
Tech Stack
- Postmark: Inbound email parsing
- Hugo + GitHub: Static site generator and hosting
- Cloudflare Workers: Receives parsed email data, converts to Markdown, commits to GitHub
One-Time Setup
Hugo Site
- Create a new GitHub repository.
- Clone it locally.
- Initialize a Hugo site, configure a theme, and set up GitHub Actions for automatic deployment.
- Using Hugo is totally optional. You can use any static site generator like Jekyll etc.
For convenience, a sample Hugo setup with pre-configured theme and GitHub Actions is available here.
Generate GitHub Token
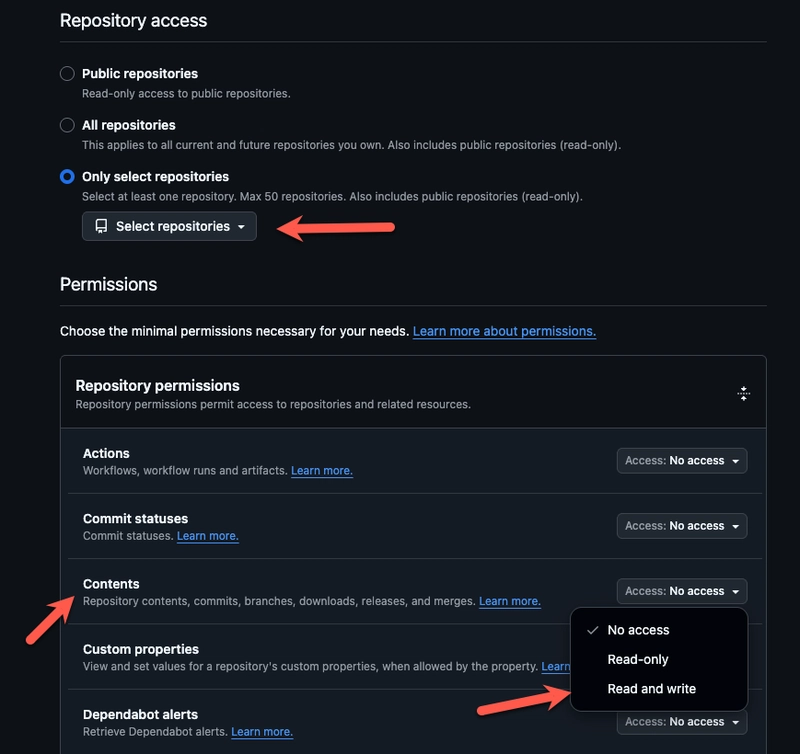
Visit this link to create a personal access token with the following configuration:
- Repository Access: Restrict to the above repository
- Permissions: Contents → Read and Write
Cloudflare Worker
Sign-up for Cloudflare Workers, and create a new worker from the web interface. Use this sample script, which does the following things:
- Accepts
POSTrequests from Postmark's inbound webhook - Converts the parsed email content to Markdown
- Commits a new post to GitHub using your personal access token
Don't forget to modify the above sample script by entering correct GitHub username and repo name etc. (see instructions at the script end).
Once deployed the Worker script, record its URL for later use. Try opening this URL in browser, and you should get Method Not Allowed error, as it receives only POST requests.
Go to its Settings, and under the "Variables and Secrets", save a new environment variable with name GITHUB_TOKEN, and value as your GitHub access token created in previous step.
Postmark
Postmark handles inbound email parsing:
- It assigns you an address like
[email protected](customizable with your custom domain). - It parses incoming emails into structured JSON.
- It sends this JSON to your configured webhook (the above Cloudflare Worker).
Steps to configure:
- Sign up for Postmark, Create a server
- In the Inbound settings, set the webhook URL to your Worker
- Note your unique inbound email address
The free tier includes 100 inbound emails/month, which should be enough for most individuals. You can upgrade for paid plans if planning to extend this idea.
Publishing
After completing above one-time setup:
- Send an email to your Postmark inbound address
- Postmark parses and forwards the content to Cloudflare Worker
- The Worker pushes a Markdown file to your GitHub repo, with email subject as the post title; and email body as the post content
- GitHub Actions rebuild the Hugo site, and deploys to Cloudflare Pages platform
Your new post will appear on the live site within minutes.
You can share your Postmark inbound address with your friends and family, and easily start a group blog too.
Postmark Experience
Integrating Postmark’s inbound email parsing into my pipeline was frictionless. The webhook configuration was immediate, and the inbound stream began delivering structured JSON without requiring custom MIME parsing or manual sanitation. The payload included all critical fields—subject, sender, body, attachments with consistent formatting that held up across test cases.


Top comments (0)