
Getting Started with Your Azure Playground
So, you're taking your first steps in the world of Microsoft Azure? Awesome! One of the very first things you'll encounter is the idea of a Virtual Network, or VNet.
Think of a VNet as your very own secure and isolated network right there in the cloud. It's the dedicated space where all your Azure goodies – things like virtual machines, databases, and web applications – can chat and work together safely. In this friendly guide, I'll show you how to build and set up your own VNet using the Azure Portal. No need to be a command-line whiz here – we'll do it all with clicks!
Ready to jump in?
💡 Why Bother with Virtual Networks?
When you start launching resources in Azure, you don't want them just hanging out in the open, do you? A VNet acts like a secure boundary, giving you:
Your own private corner: It keeps your different services separate and organized.
Control over your digital address book: You get to decide the ranges of IP addresses, divide your network into smaller sections (subnets), and manage how traffic flows.
A bridge to your existing setup: You can even connect your on-premises network to your Azure VNet.
Your own cloud security guards: You can set up firewall rules (using Network Security Groups) to control who can access what.
Basically, if you're building anything beyond a simple test, a VNet is going to be your new best friend.
🛠 What You'll Need in Your Toolkit
Before we get started, make sure you have these two things handy:
A Microsoft Azure account.
Access to the Azure Portal (your web-based control center for Azure)
🚧 Step 1: create a Virtual Network
We will start by creating a VNet first.
Login your Azure Portal on the web: https://potal.azure.com and sign in.

Search for "Virtual Network" by using the search bar at the top of the portal, type Virtual Network and select the service from the listed ones.

Click "+ create" to Start a New VNet

i. Fill in the information
ii. Choose a the correct and active Subscription
iii. Create a new Resource Group (you can give it a name "VNet-Demo-RG") and press OK or you can use the existing resource group.

INSTANCE DETAILS
Name: Give your Virtual Network a name(VNet1)
Region: Choose the region closest to you

IP Address Space settings:
Click on IP Addresses

The default IP Address should be something like 10.0.0.0/16, which we can work with for now

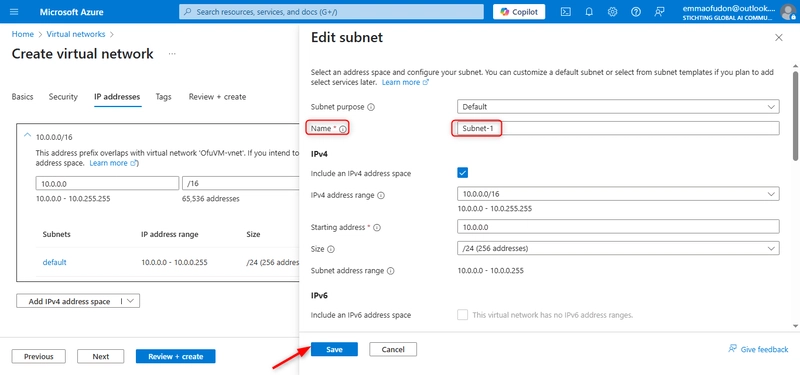
Add your first subnet, you can call it Subnet-1 with the IP address range 10.0.0.0/16
Click on the pencil sign on default

Change the name to Subnet-1. Explore the other default settings including the starting address, size and subnet IP address range and then click on save.
Add your second subnet, you call it "Subnet-2" with IP address range 10.0.0.0/24
Click on the +Add a Subnet

Change the name to Subnet-2. Explore the default settings and click on Add

The Subnet have been added:

Continue exploring the remaining tabs.
You can skip the Security and DNS tabs for now unless you're already comfortable with those advanced settings. Once you've looked through the other tabs click "Review + Create" and then "Create" to finish.

Click n the tab "Create"

Deployment is complete

🛠 Step 2: Configure the VNet to use firewall
Now that your network exists, let's perform some customization to enhance its security. We'll start by configuring the Virtual Network (VNet) to use a firewall.
+Add More Subnets
Before we configure the firewall, let's add more subnets to our Virtual Network. To do this:
- Create a new Virtual Network: Navigate to the search box located at the top of the Azure portal. Type "virtual network" into the search bar.
- Select Virtual Network: From the dropdown menu that appears, click on "Virtual network."

Click on +Create

To get started Use your active subscription, select a Resource Group. Next choose a name for the Resource Group or you can use an existing Resource Group, and then select a Region, preferably the same as the previous region used for consistency.

Click on IP Addresses

Click on default

On the Subnet Purpose, click on the dropdown and click on Azure Firewall. Then click save

Click on Reviwe + Create

Click on Create tab

Set Up VNet Peering
To establish a secure connection between your Virtual Network, especially when operating across multiple VNets for purposes like isolation or reginal segregation, you'll utilize peering.
To get started with Peering you will go back to your Resource Group that was created earlier(VNet-Demo-RG) Click on it.

Click on VNet1 to navigate to Peerings

Go the left side search bar and search Peerings

Click on the +Add tab

On the remote Virtual Network, peering link name should be 'VNet1-to-VNet-2'
On the Virtual Network choose VNet-2
Check the resource manager and also check the Allow VNet-2 to access VNet1

On the local Virtual Network, Peering link name should be 'VNet-2-to-VNet1'
Check the Resource Manager and also check the Allow 'VNet1 to AccESS VNet-2'

To be sure that the Peering of the Remote VNet and Local VNet was successful, the Peering state of the two VNet will shown Connected

Next Steps with your VNet
Now that your virtual network is all set up, Here are a few things on the radar:
- Spin up a Virtual Machine within one of the subnets.
- Play around with NSG rules to fine-tune the network traffic flow.
- Give connecting two VNets a shot using peering.
- Look into setting up a VPN Gateway to bridge the VNet with the local network.
🔄 A Little More on VNet Peering
During the setup, I touched on something called Virtual Network Peering, and I wanted to clarify what that really entails.
Imagine each of my Virtual Networks (VNets) in Azure as its own secure area. By default, these areas can't communicate with each other, even if they all belong to me. VNet Peering is like creating a private, secure pathway between two of your own areas. This allows resources, like the virtual machines or applications I deploy, in one VNet to easily and privately communicate with those in another.
This is incredibly useful when:
If you want to organize your resources into distinct VNets, perhaps for better security or to scale different parts of your infrastructure independently.
You have VNets in different geographical locations but need them to function as a cohesive system.
Your setting up a centralized hub network with other VNets connecting to it.
And the great thing is, the communication between these peered VNets stays within the Azure network; it doesn't traverse the public internet.
So, when you add a peering connection in Azure, I'm essentially telling two of your networks, "You're now connected, communicate securely with each other."
💬 Wrapping Up
Getting practical with Azure networking doesn't have to feel overwhelming. The Azure Portal provides a pretty intuitive way to configure and customize a Virtual Network.
If this has been helpful, or if you'd be interested in a follow-up guide on deploying VMs or setting up hybrid networks, let me know! Happy building!
📌 Stay tuned for more beginner-friendly Azure and cloud development insights!

Top comments (0)