While it’s common to hear that C++ gives you “more control” than Blueprints, the main advantage of using C++ in Unreal Engine is full access to the Unreal API. Many engine features, advanced systems, and low-level optimizations are only available or fully customizable in C++. Blueprints are powerful for rapid prototyping and visual scripting, but they intentionally expose only a subset of the engine’s capabilities to keep things simple and safe for designers (for more info about this look: Using cpp versus blueprint scripting ).
Key Points:
Full API Access:
C++ lets you use every class, function, and subsystem in Unreal Engine. Some advanced features (like custom rendering, networking, or memory management) are only accessible in C++.Custom Engine Features:
If you need to extend the engine, create custom components, or deeply modify gameplay systems, C++ is required.Performance:
While C++ can be faster in some edge cases (especially for tight loops or heavy math), Unreal’s Blueprint system is highly optimized. For most gameplay logic, the performance difference is negligible. Only in performance-critical code paths does C++ offer a clear advantage.Hybrid Approach:
Many teams use C++ for core systems and expose variables/functions to Blueprints for designers to tweak and extend. This combines the strengths of both systems.
Summary:
- The biggest reason to use C++ is not raw speed, but access to the full power and flexibility of Unreal Engine.
- Blueprints are ideal for most gameplay scripting, but C++ is essential for advanced or custom engine work.
This distinction helps teams choose the right tool for the job: Blueprints for speed and accessibility, C++ for depth and extensibility.
Now the topic of this article is on how to convert a blueprint into a cpp class file, meaning converting visual script logic into text logic.
This is the blueprint to convert. The bot player.

This is the Blueprint for the Bot Player in Unreal Engine 5. Here’s a breakdown of its structure and components:
Components
- SphereCollision: The root component, likely used for collision detection.
- BotMesh: The visual mesh representing the bot.
- SpringArm: Used to position and smooth the camera relative to the bot.
- ThirdPersonCamera: A camera attached to the spring arm for a third-person view.
- FirstPersonCamera: An additional camera, possibly for switching to a first-person view.
- FloatingPawnMovement: Handles movement logic for the pawn, allowing it to move smoothly in the world.
Functions
- Several custom functions are defined, such as:
Fire/SpawnBlasterFireLaserGetEndTraceGetTargetPointShowLevelClearedMessageIsCurrentColorNotDefault- And more...
These functions likely handle the bot’s gameplay logic, including firing weapons, targeting, and displaying messages.
Variables
- Variables like
bHasRifle(Boolean),RightRifleSocketName(Name), and various transforms and names for weapon sockets. - These variables are used to manage the bot’s state, equipment, and interactions.
Interfaces and Macros
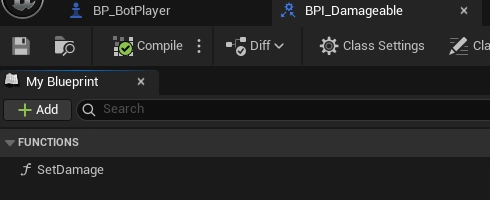
- The Blueprint may implement interfaces and macros for reusable logic and communication with other Blueprints or systems. This blueprint does use the BPI_Damageable interface.
And also the BPI_TaggedActor
These interfaces are used in a combat or interaction system, where:
SetDamage is used when something is hit or attacked.
GetTag/SetTag are used to classify identity of this actor as Player (e.g., tagging this BP_BotPlayer as having the “PlayerTag” or “EnemyTag” in case of BP_Enemy).
Summary:
This Blueprint defines a player-controlled bot pawn with cameras for both first- and third-person views, movement logic, weapon handling, and various gameplay functions and variables. It serves as the main class for the bot player in your game.
- Create the C++ Class In Unreal Editor, go to File > New C++ Class. Choose the appropriate parent class (e.g., APawn or ACharacter for a player, APawn or AActor for an enemy bot). Name your class (e.g., PlayerPawn, EnemyBot).
- Move Variables and Components In your new C++ header file, declare variables and components you used in Blueprint (e.g., health, movement speed, mesh, camera). Use UPROPERTY macros to expose them to the editor if needed.
2.1. Declaring and creating components (sphere collision, botmesh[staticMesh], cameras, FloatingPawnMovement)
- SphereCollision: A sphere collision component, likely used for collision detection and as the root.
- BotMesh: A static mesh representing the bot’s visual appearance.
- SpringArm: A spring arm to position and smooth the camera.
- ThirdPersonCamera: A camera attached to the spring arm for a third-person view.
- FirstPersonCamera: An additional camera, possibly for first-person view.
- FloatingPawnMovement: Handles movement logic for the pawn.
C++ Header File (BotPlayer.h)
#pragma once

#include "CoreMinimal.h"
#include "GameFramework/Pawn.h"
#include "GameFramework/FloatingPawnMovement.h"
#include "Components/SphereComponent.h"
#include "Components/StaticMeshComponent.h"
#include "Camera/CameraComponent.h"
#include "GameFramework/SpringArmComponent.h"
#include "BotPlayer.generated.h"

UCLASS()
class YOURGAME_API ABotPlayer : public APawn
{
    GENERATED_BODY()

public:
    ABotPlayer();

protected:
    virtual void BeginPlay() override;

public:
    // Components
    UPROPERTY(VisibleAnywhere, BlueprintReadOnly, Category="Components")
    USphereComponent* SphereCollision;

    UPROPERTY(VisibleAnywhere, BlueprintReadOnly, Category="Components")
    UStaticMeshComponent* BotMesh;

    UPROPERTY(VisibleAnywhere, BlueprintReadOnly, Category="Components")
    USpringArmComponent* SpringArm;

    UPROPERTY(VisibleAnywhere, BlueprintReadOnly, Category="Components")
    UCameraComponent* ThirdPersonCamera;

    UPROPERTY(VisibleAnywhere, BlueprintReadOnly, Category="Components")
    UCameraComponent* FirstPersonCamera;

    UPROPERTY(VisibleAnywhere, BlueprintReadOnly, Category="Components")
    UFloatingPawnMovement* FloatingPawnMovement;
};
C++ Source File (BotPlayer.cpp)
#include "BotPlayer.h"

ABotPlayer::ABotPlayer()
{
    // Set this pawn to call Tick() every frame if needed
    PrimaryActorTick.bCanEverTick = true;

    // Create components
    SphereCollision = CreateDefaultSubobject<USphereComponent>(TEXT("SphereCollision"));
    RootComponent = SphereCollision;

    BotMesh = CreateDefaultSubobject<UStaticMeshComponent>(TEXT("BotMesh"));
    BotMesh->SetupAttachment(RootComponent);

    SpringArm = CreateDefaultSubobject<USpringArmComponent>(TEXT("SpringArm"));
    SpringArm->SetupAttachment(RootComponent);

    ThirdPersonCamera = CreateDefaultSubobject<UCameraComponent>(TEXT("ThirdPersonCamera"));
    ThirdPersonCamera->SetupAttachment(SpringArm);

    FirstPersonCamera = CreateDefaultSubobject<UCameraComponent>(TEXT("FirstPersonCamera"));
    FirstPersonCamera->SetupAttachment(RootComponent);

    FloatingPawnMovement = CreateDefaultSubobject<UFloatingPawnMovement>(TEXT("FloatingPawnMovement"));
}

void ABotPlayer::BeginPlay()
{
    Super::BeginPlay();

    // Initialization logic here (if needed)
    // Example: Log that BeginPlay was called
    UE_LOG(LogTemp, Log, TEXT("BotPlayer BeginPlay!"));
}
Summary of Steps:
All components are declared as pointers in the header file.
All necessary Unreal Engine includes are provided.
Components are created and attached in the constructor.
SphereCollision is set as the root component.
And here there is a call for closure to keep this not too long.
Next chapter will bring examples of converting the BeginPlay from blueprint to a C++ script.


Top comments (0)