You’re downloading an image from the internet, and instead of your standard JPG or PNG format, you get a WEBP file. This particular image format helps sites load faster, but it can be frustrating if you want a file that opens easily in almost any app.
Let’s look at how to convert a WEBP file to JPG or PNG on your Mac.
Why are WEBP files so difficult to use and so disliked? This raster image format was developed by Google and introduced back in 2010 as a way to load images faster on sites, replacing the slower JPG and PNG formats.
While this is a perfectly serviceable format, as indicated by its widespread use, it’s not a popular format once taken offline.
Why?
While WEBP is widely used online, offline support is limited despite key image editing software like Photoshop and Clip Studio Paint natively supporting it. This file type can’t be uploaded to social media sites, either, which makes WEBP files impractical and irritating to many users, regardless of the ecosystem.
How to Convert a WEBP File to JPG or PNG
The solution to the problem of a downloaded WEBP file is to simply convert it into a different format. Let’s take a look at a few ways to do that.
Converting Individual Files on Mac OS
This is the simplest way to convert a WEBP file to JPG or PNG on Mac. Here’s what to do:
Step 1. Locate your WEBP file in Finder.
Step 2. Press the space bar to open it in Preview. Alternatively, right-click the file and select “Open With” and then “Preview.”
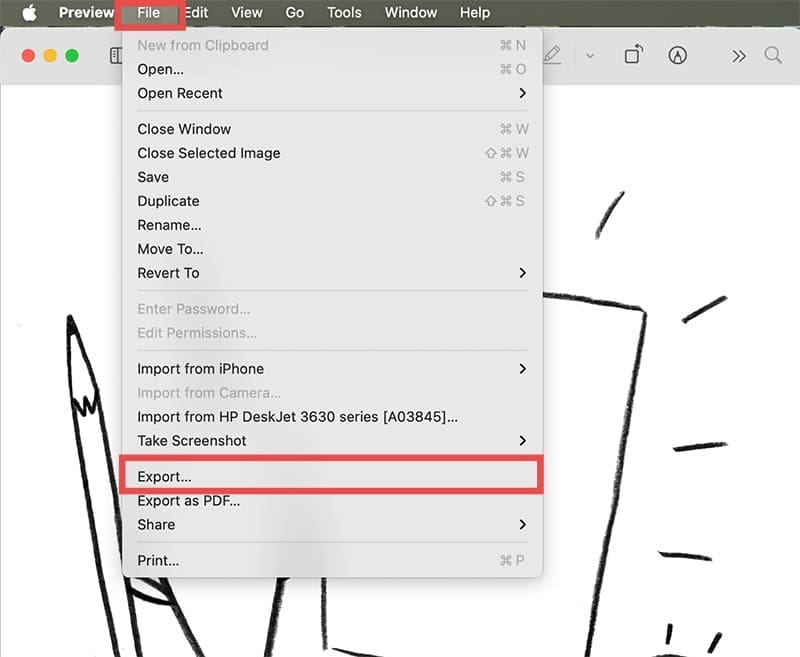
Step 3. Once in the Preview window, click “File” in the Menu Bar and select “Export.”
Step 4. Rename the image if needed, choose the save location, and (most importantly) choose your preferred image type from the dropdown menu.
Step 5. Click the “Save” button to complete the process.
Using Quick Actions
Another quick conversion method is to use Quick Actions. Here’s how:
Step 1. Right-click on the image file you want to convert. You can also select more than one.
Step 2. In the context menu that pops up, hover over “Quick Actions,” then click “Convert Image.”
Step 3. Choose the file format you want to convert to in the first dropdown, and the image size of your file from the second. Hit the blue “Convert to [file format]” button to finalize.
Automate the Task
What if you have a batch of WEBP files that need conversion? What if you want a permanent way to automate things? Here’s where you can take advantage of Automator to convert WEBP files automatically. This is what to do:
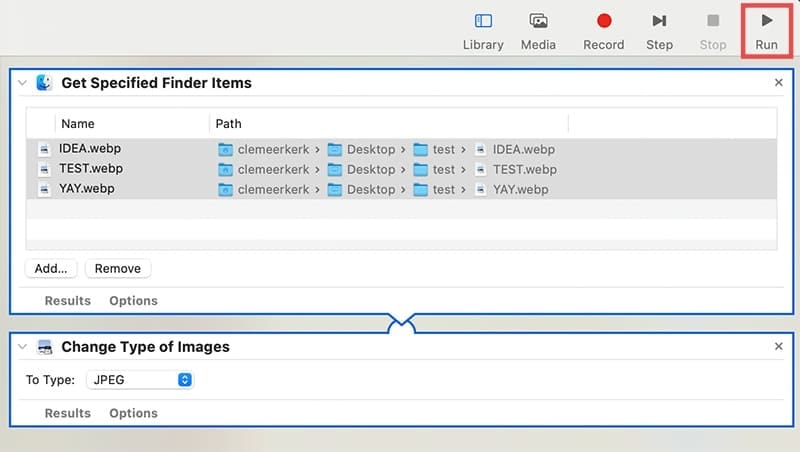
Step 1. Open the Automator app by typing it into the search bar.
Step 2. Click on “File,” then “New” and select “Workflow” from the options.
Step 3. In the left sidebar, choose “Get Specified Finder Items.” Drag it into the main window.
Step 4. Click “Add” and select the WEBP files you want to batch convert.
Step 5. Add “Change Type of Images” and add it below “Get Specified Finder Items.”
Step 6. Click “Change Type of Images” and choose “JPEG” or “PNG” from the dropdown list.
Step 7. Finally, click the “Run” button to automate the process.
Third Party Tools
If you want even more control over the editing process, you can download a third-party conversion app to fix WEBP files on Mac. Tools like GraphicConverter, GIMP, and Retrobatch are popular options that can help you get the job done efficiently.
As an avid gamer, I’ve run into my fair share of error codes and weird faults that have forced me to find fixes to problems I never anticipated. That gave me a passion for sharing those fixes with others so we can all game without feeling like our hardware is rebelling against us.


Write a Comment